1 General Information
1.1 Purposes
This User Manual covers the DEEPSITE Document Insighter system, detailing its interface, management functions, and offering solutions to common problems. It aims to help users quickly log in, browse, and utilize the system while accessing available resources and support.
1.2 System Overview
Document Insighter is an AI-powered digitizing solution that quickly provides services like reading documents, digitizing images and tables, extracting relevant data, and processing content. It also offers automatic validation against databases like enterprise SAP using extracted data. Furthermore, Document Insighter supports user feedback and continuous learning for improved accuracy through a cloud-based portal.
2 Getting Started
2.1 Logging on
Open the browser and visit DEEPSITE Document Insighter to access the login page:

Log in to the DEEPSITE Insighter portal by clicking button ① “OKTA”, selecting ② “IFF”, and entering your IFF ID and password.
2.2 Role Types
Users of various roles will have different permissions:
| Role Type | Access | User Profile | Permission Level |
|---|---|---|---|
| Viewer | view/access portal only | users/technicians | default |
| Contributor | revise the extracted results | users/technicians | default |
2.3 Homepage
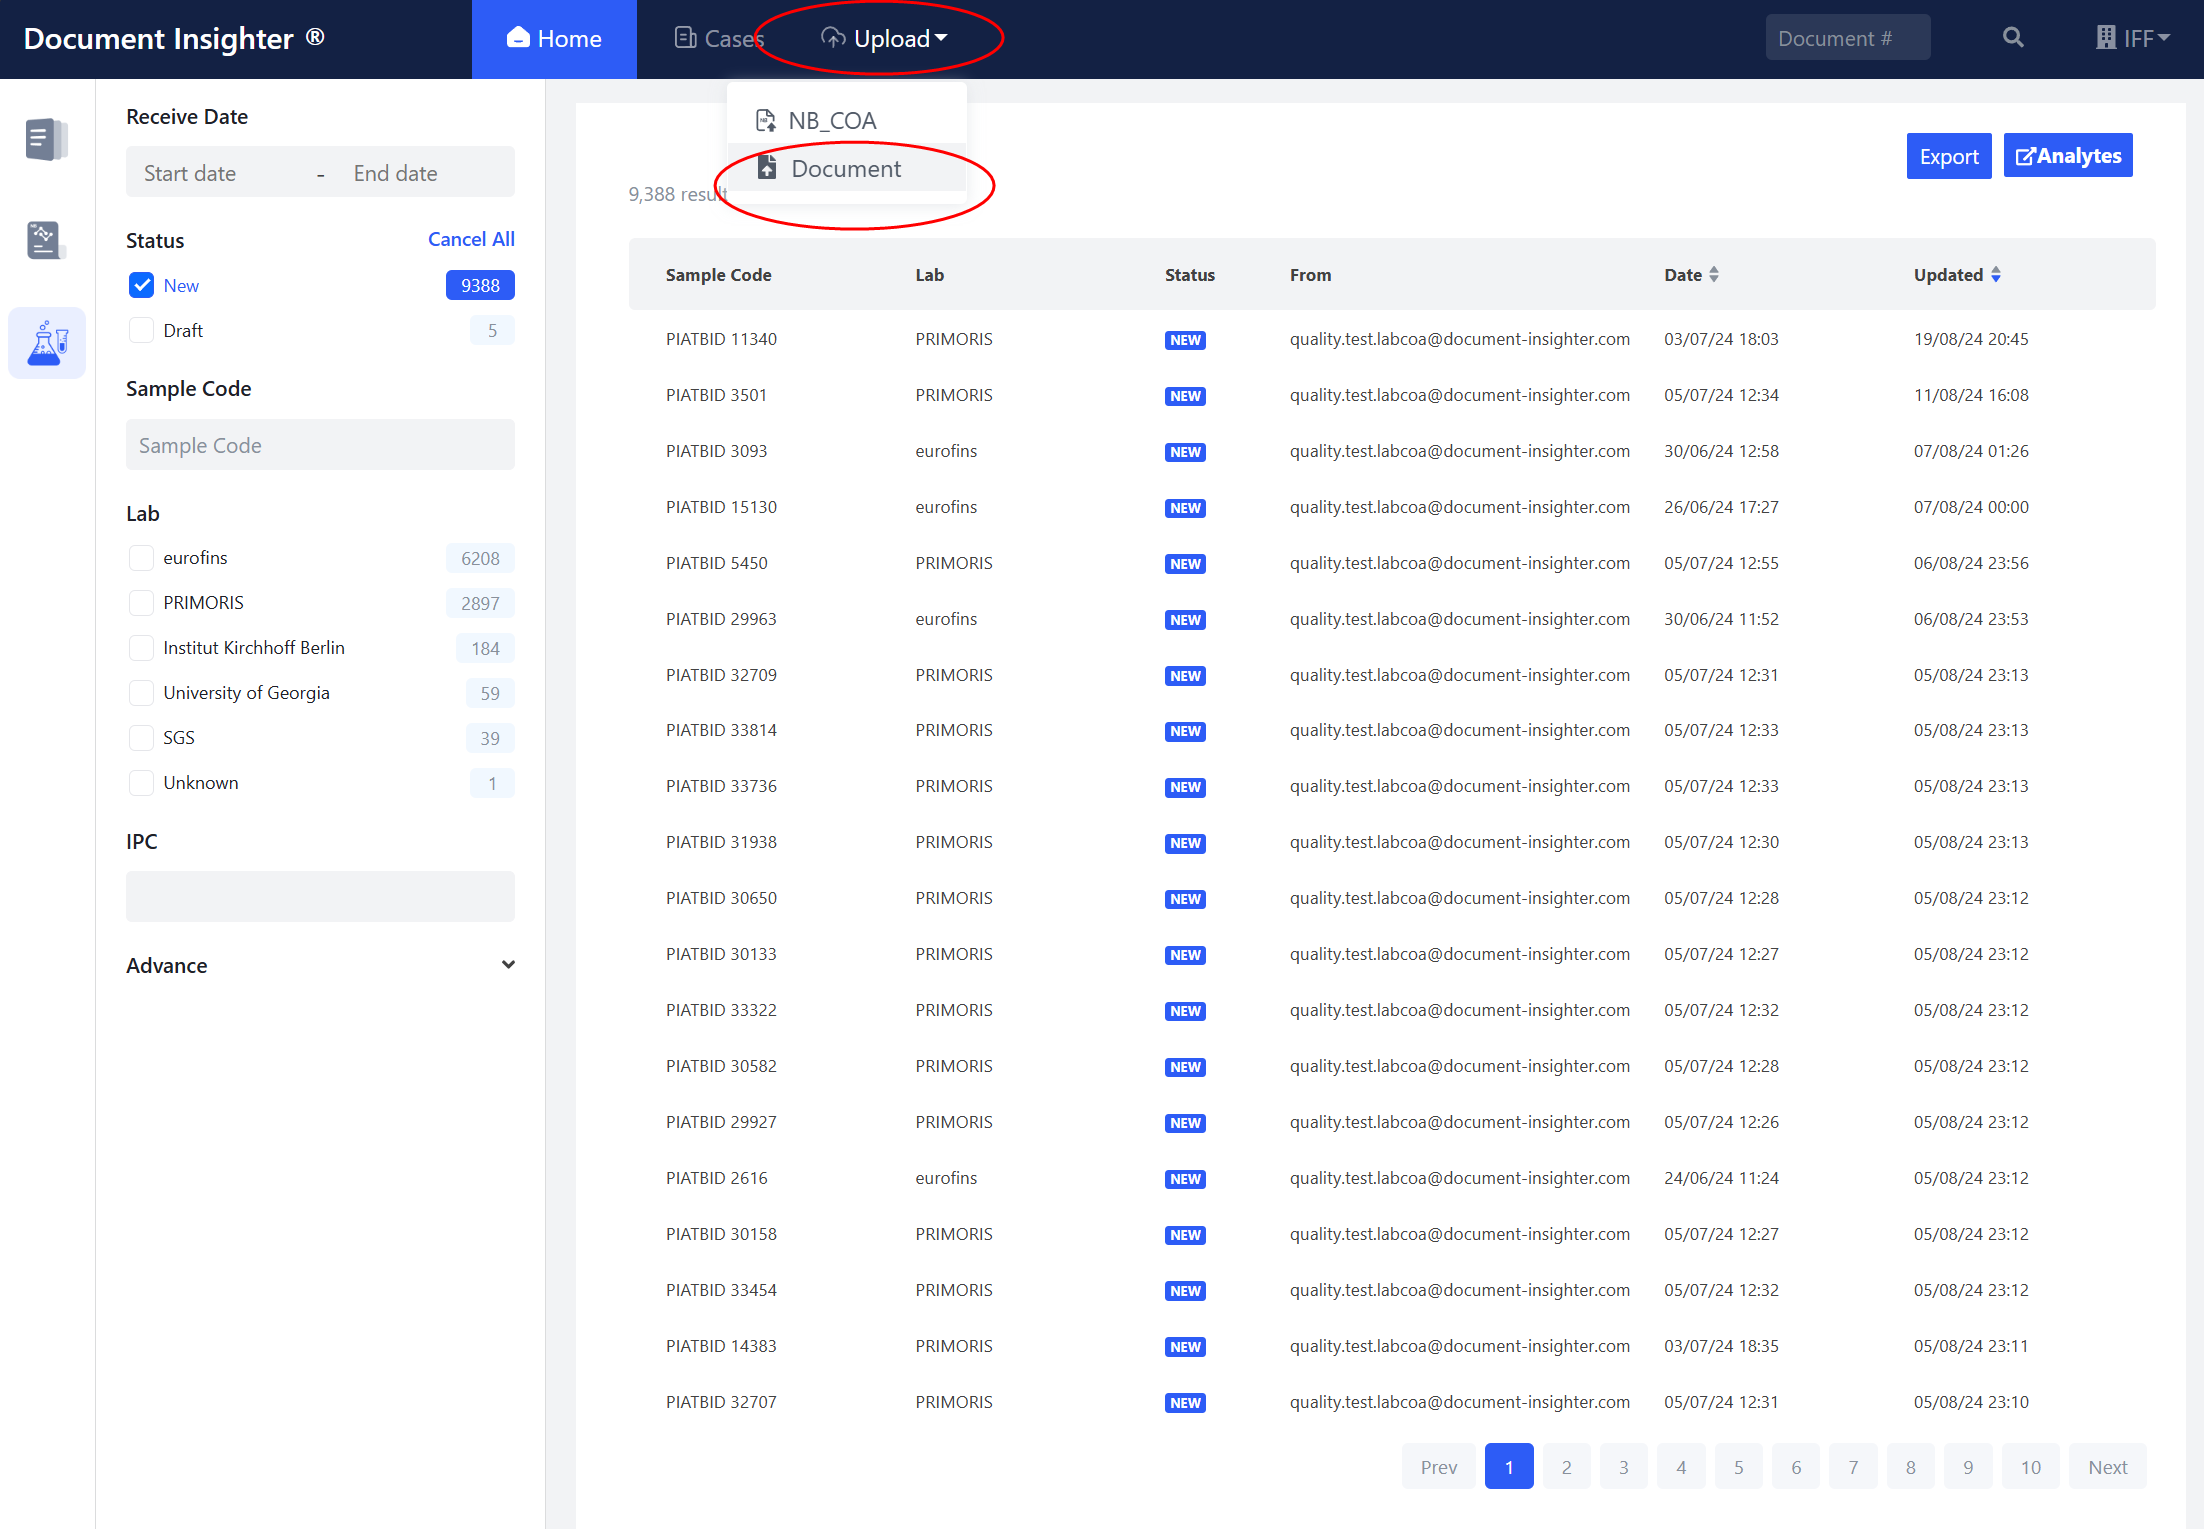
The system automatically archives documents and data, offering convenient and rich search capabilities. Access the home page by logging in or clicking the “Home” button in the top ribbon.
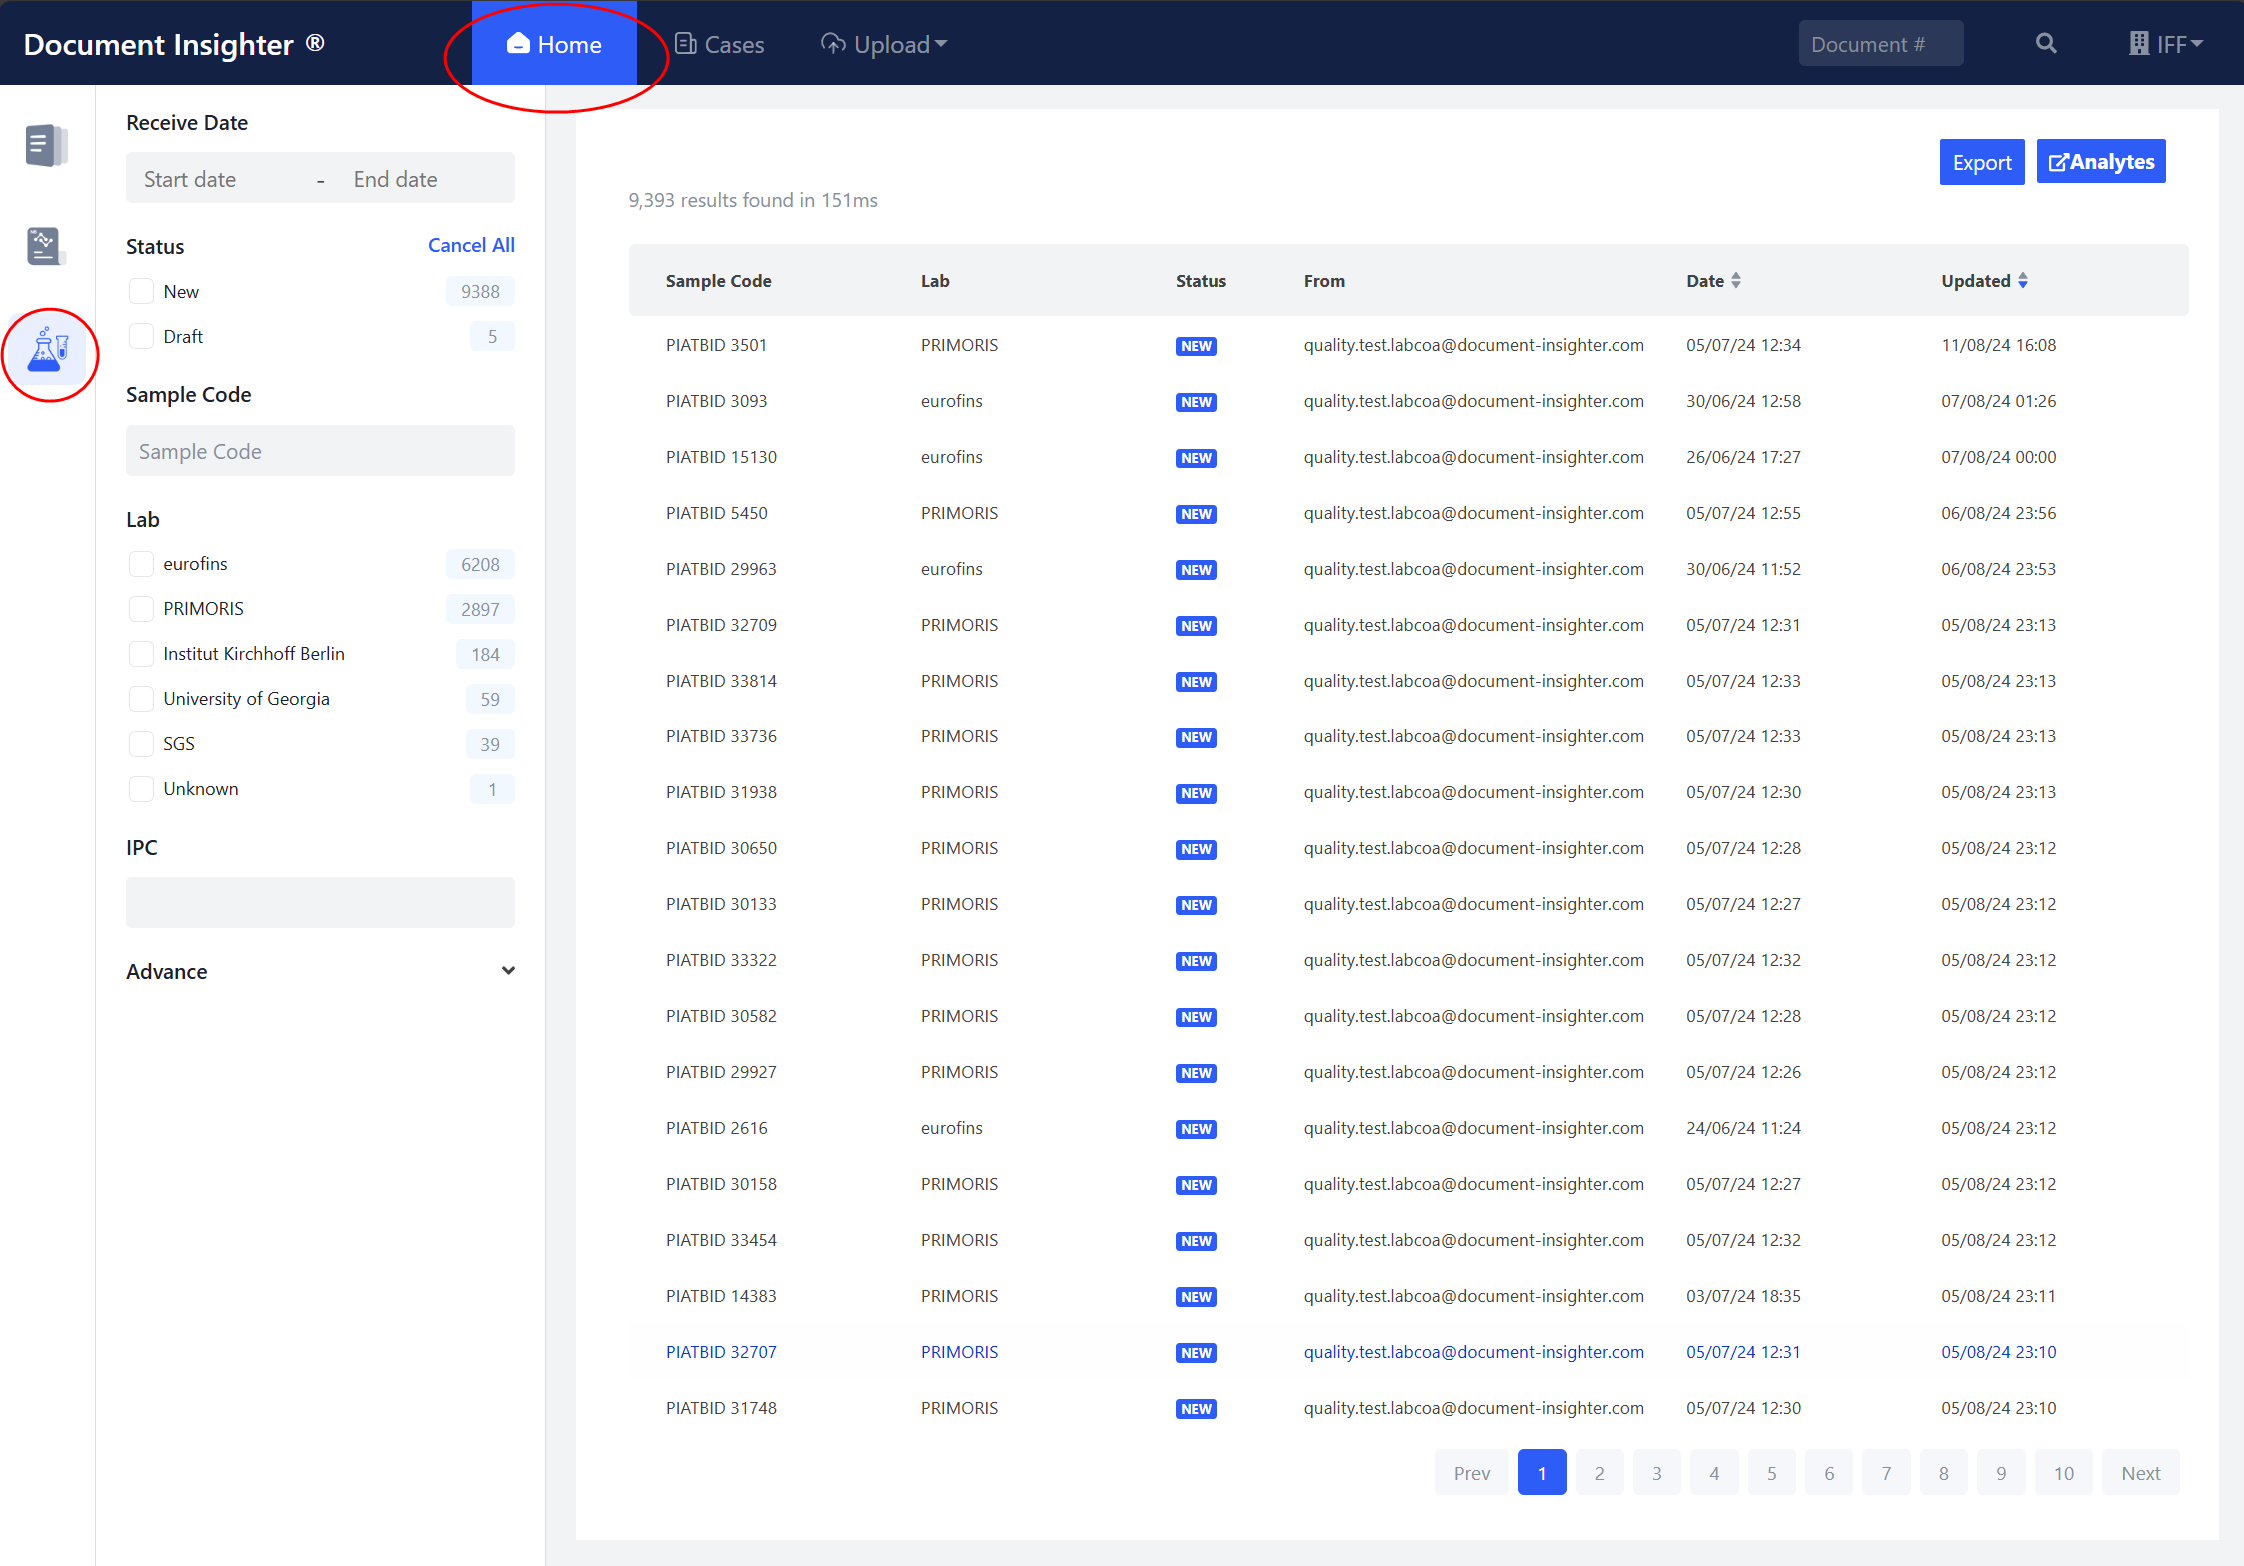
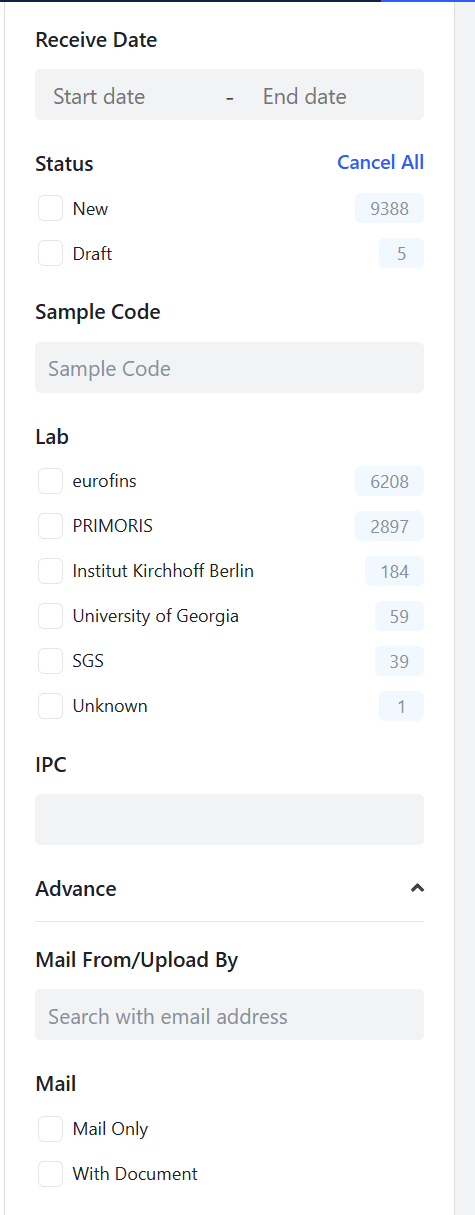
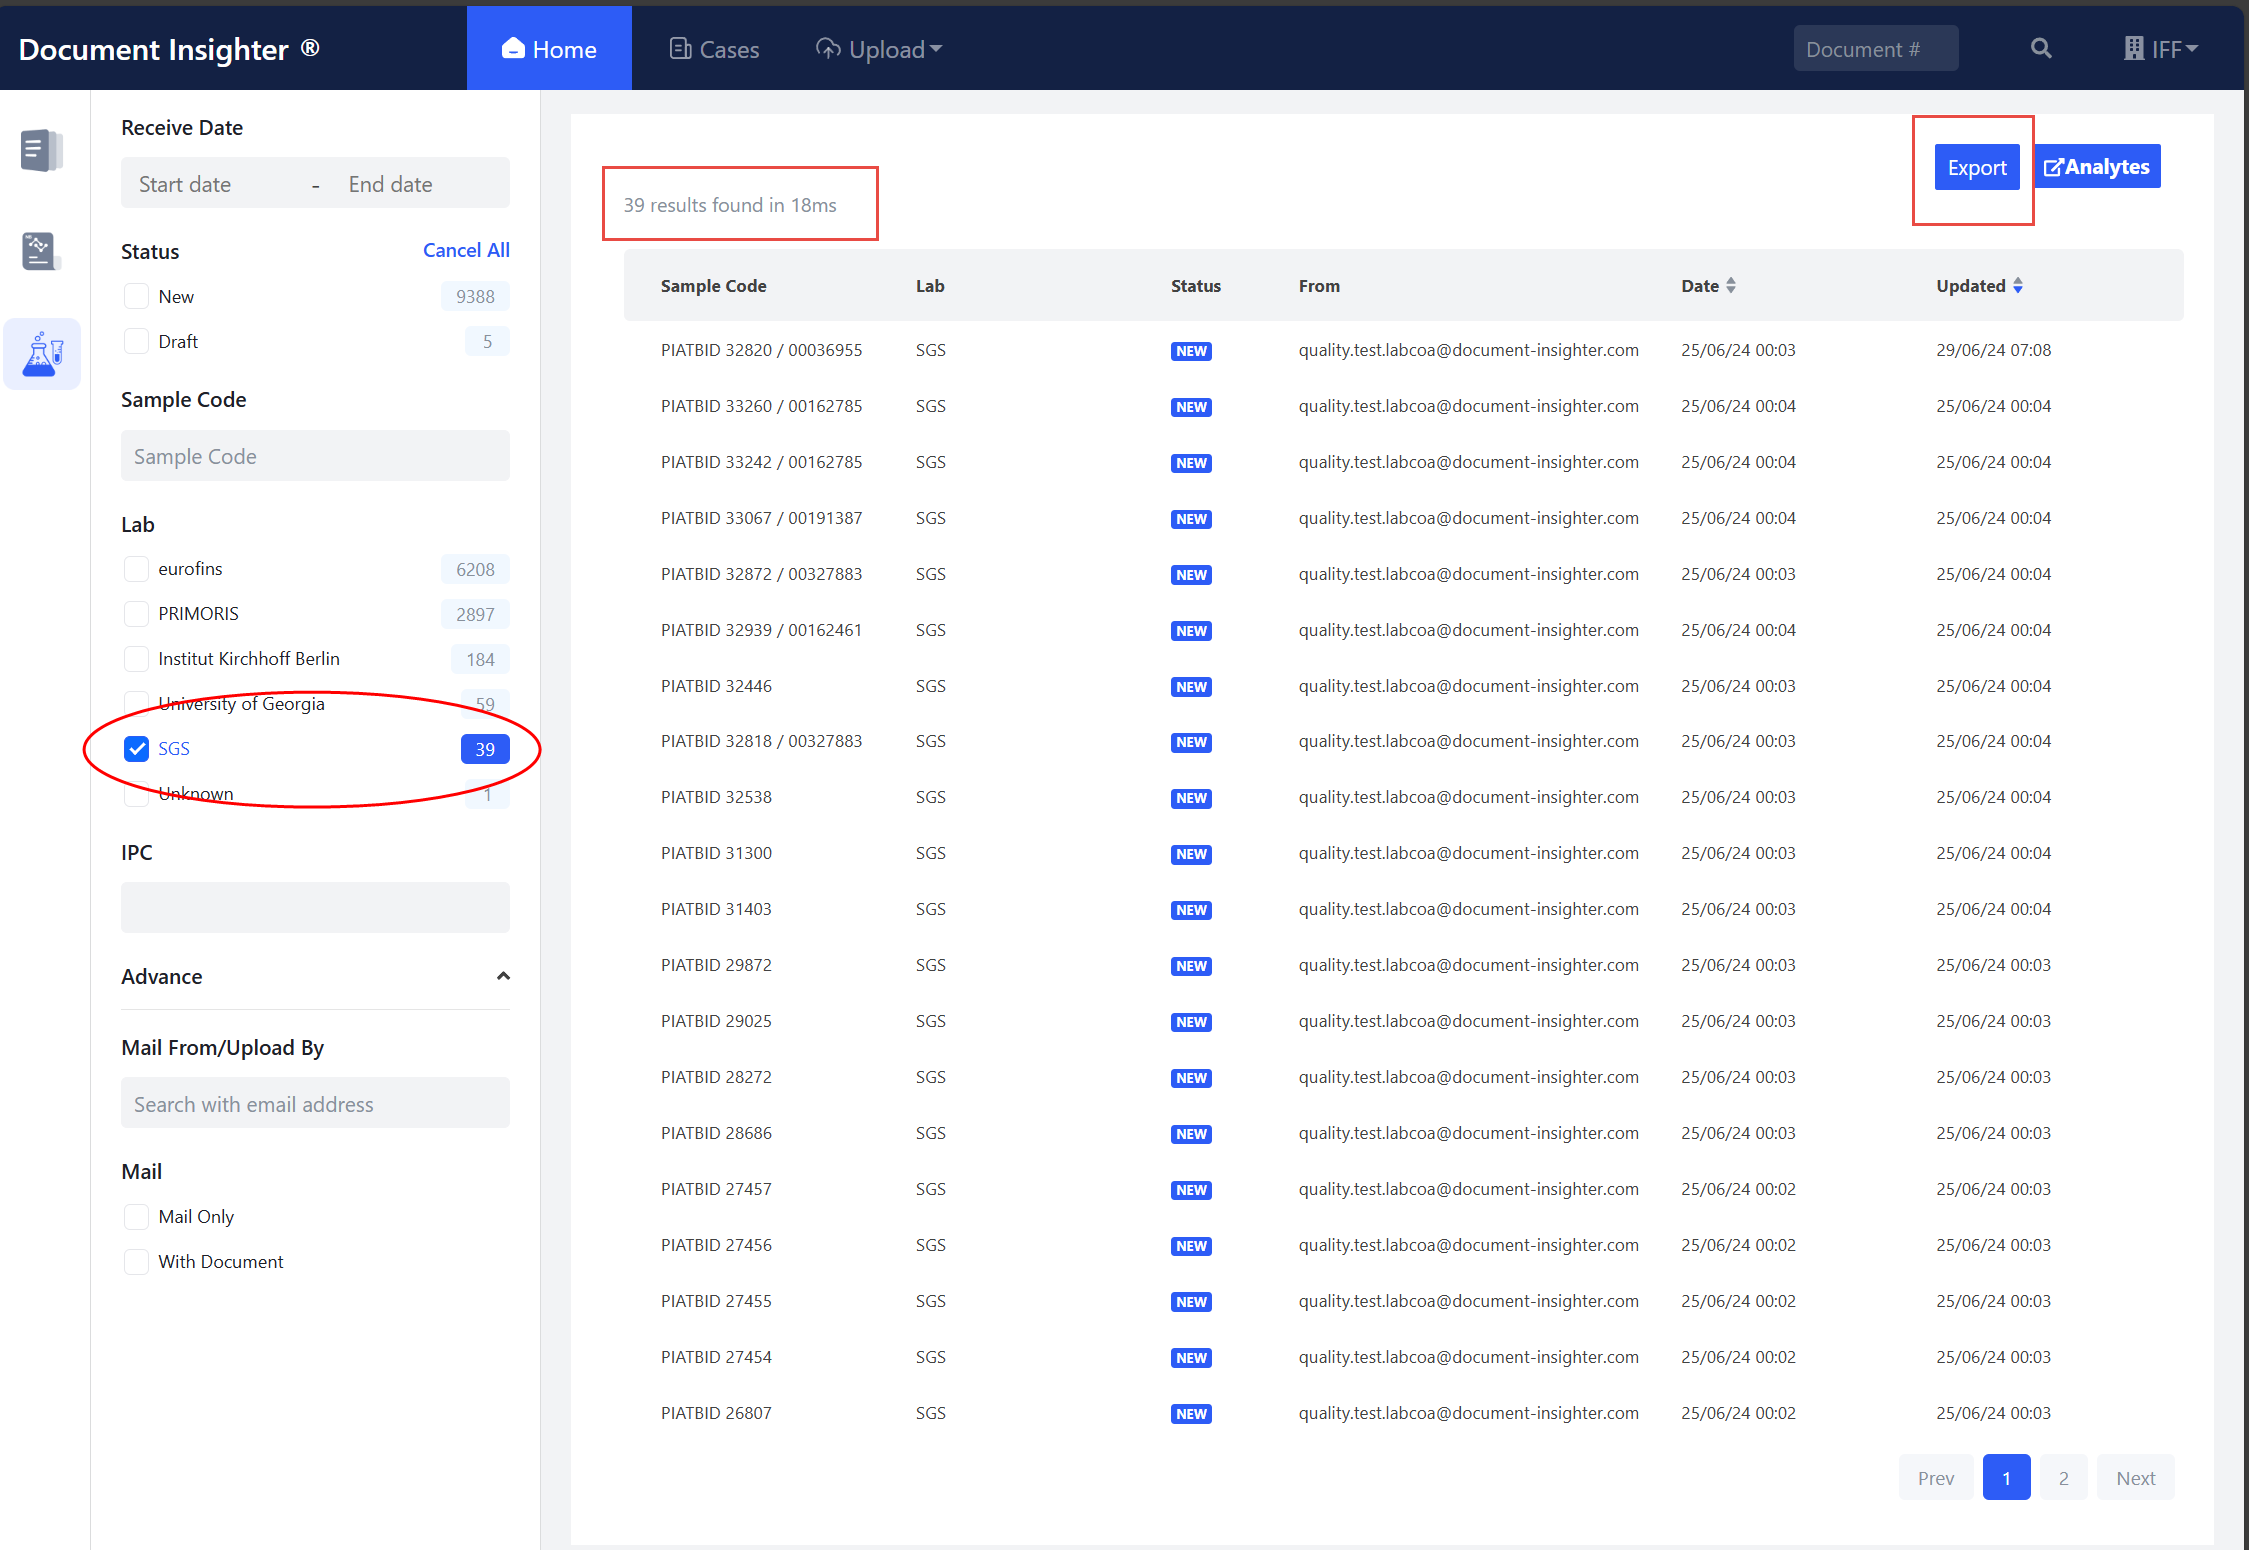
2.3.1 Filter Panel
The left filter panel offers extensive filtering options for users:
- “Receive Date”: The date an email was received or uploaded."
- “Sample Code”: Sample code for the COA lab document
- “Lab”: Issuing Lab for the COA
- “Status”: Default value is “NEW”. If user revised the results, it will become “MODIFIED”.
- “IPC”: IPC in the COA document, if present.
- “Mail From/Upload By”: Filter extractions by the uploader’s email address.
2.3.2 Batch Export Filtered COA Extraction Results to Excel
Users can click the “Export” button to batch export the filtered COA extraction results into an Excel file for further data analysis.
2.4 Review Page
2.4.1 Extracted Result Display
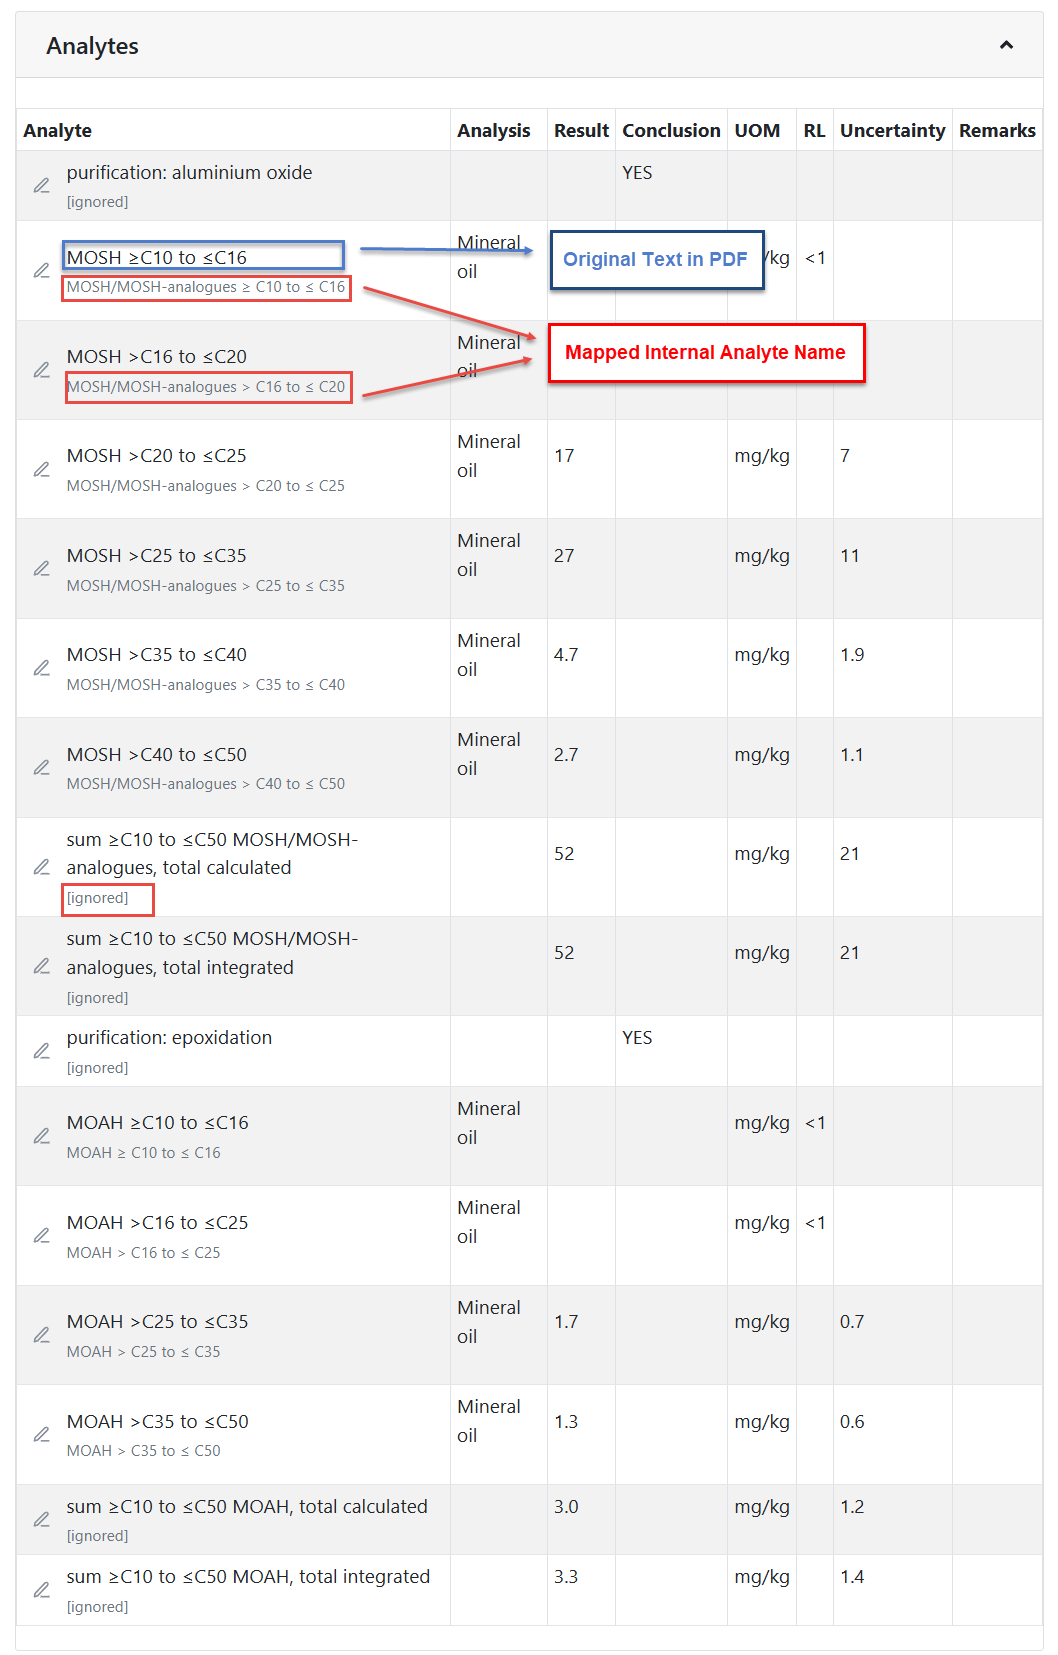
Extracted data, such as analytes, test results, and mapped internal analyte names, will be shown on the right side of the page. Clicking on this data will highlight the corresponding text in the document, enabling quick verification.
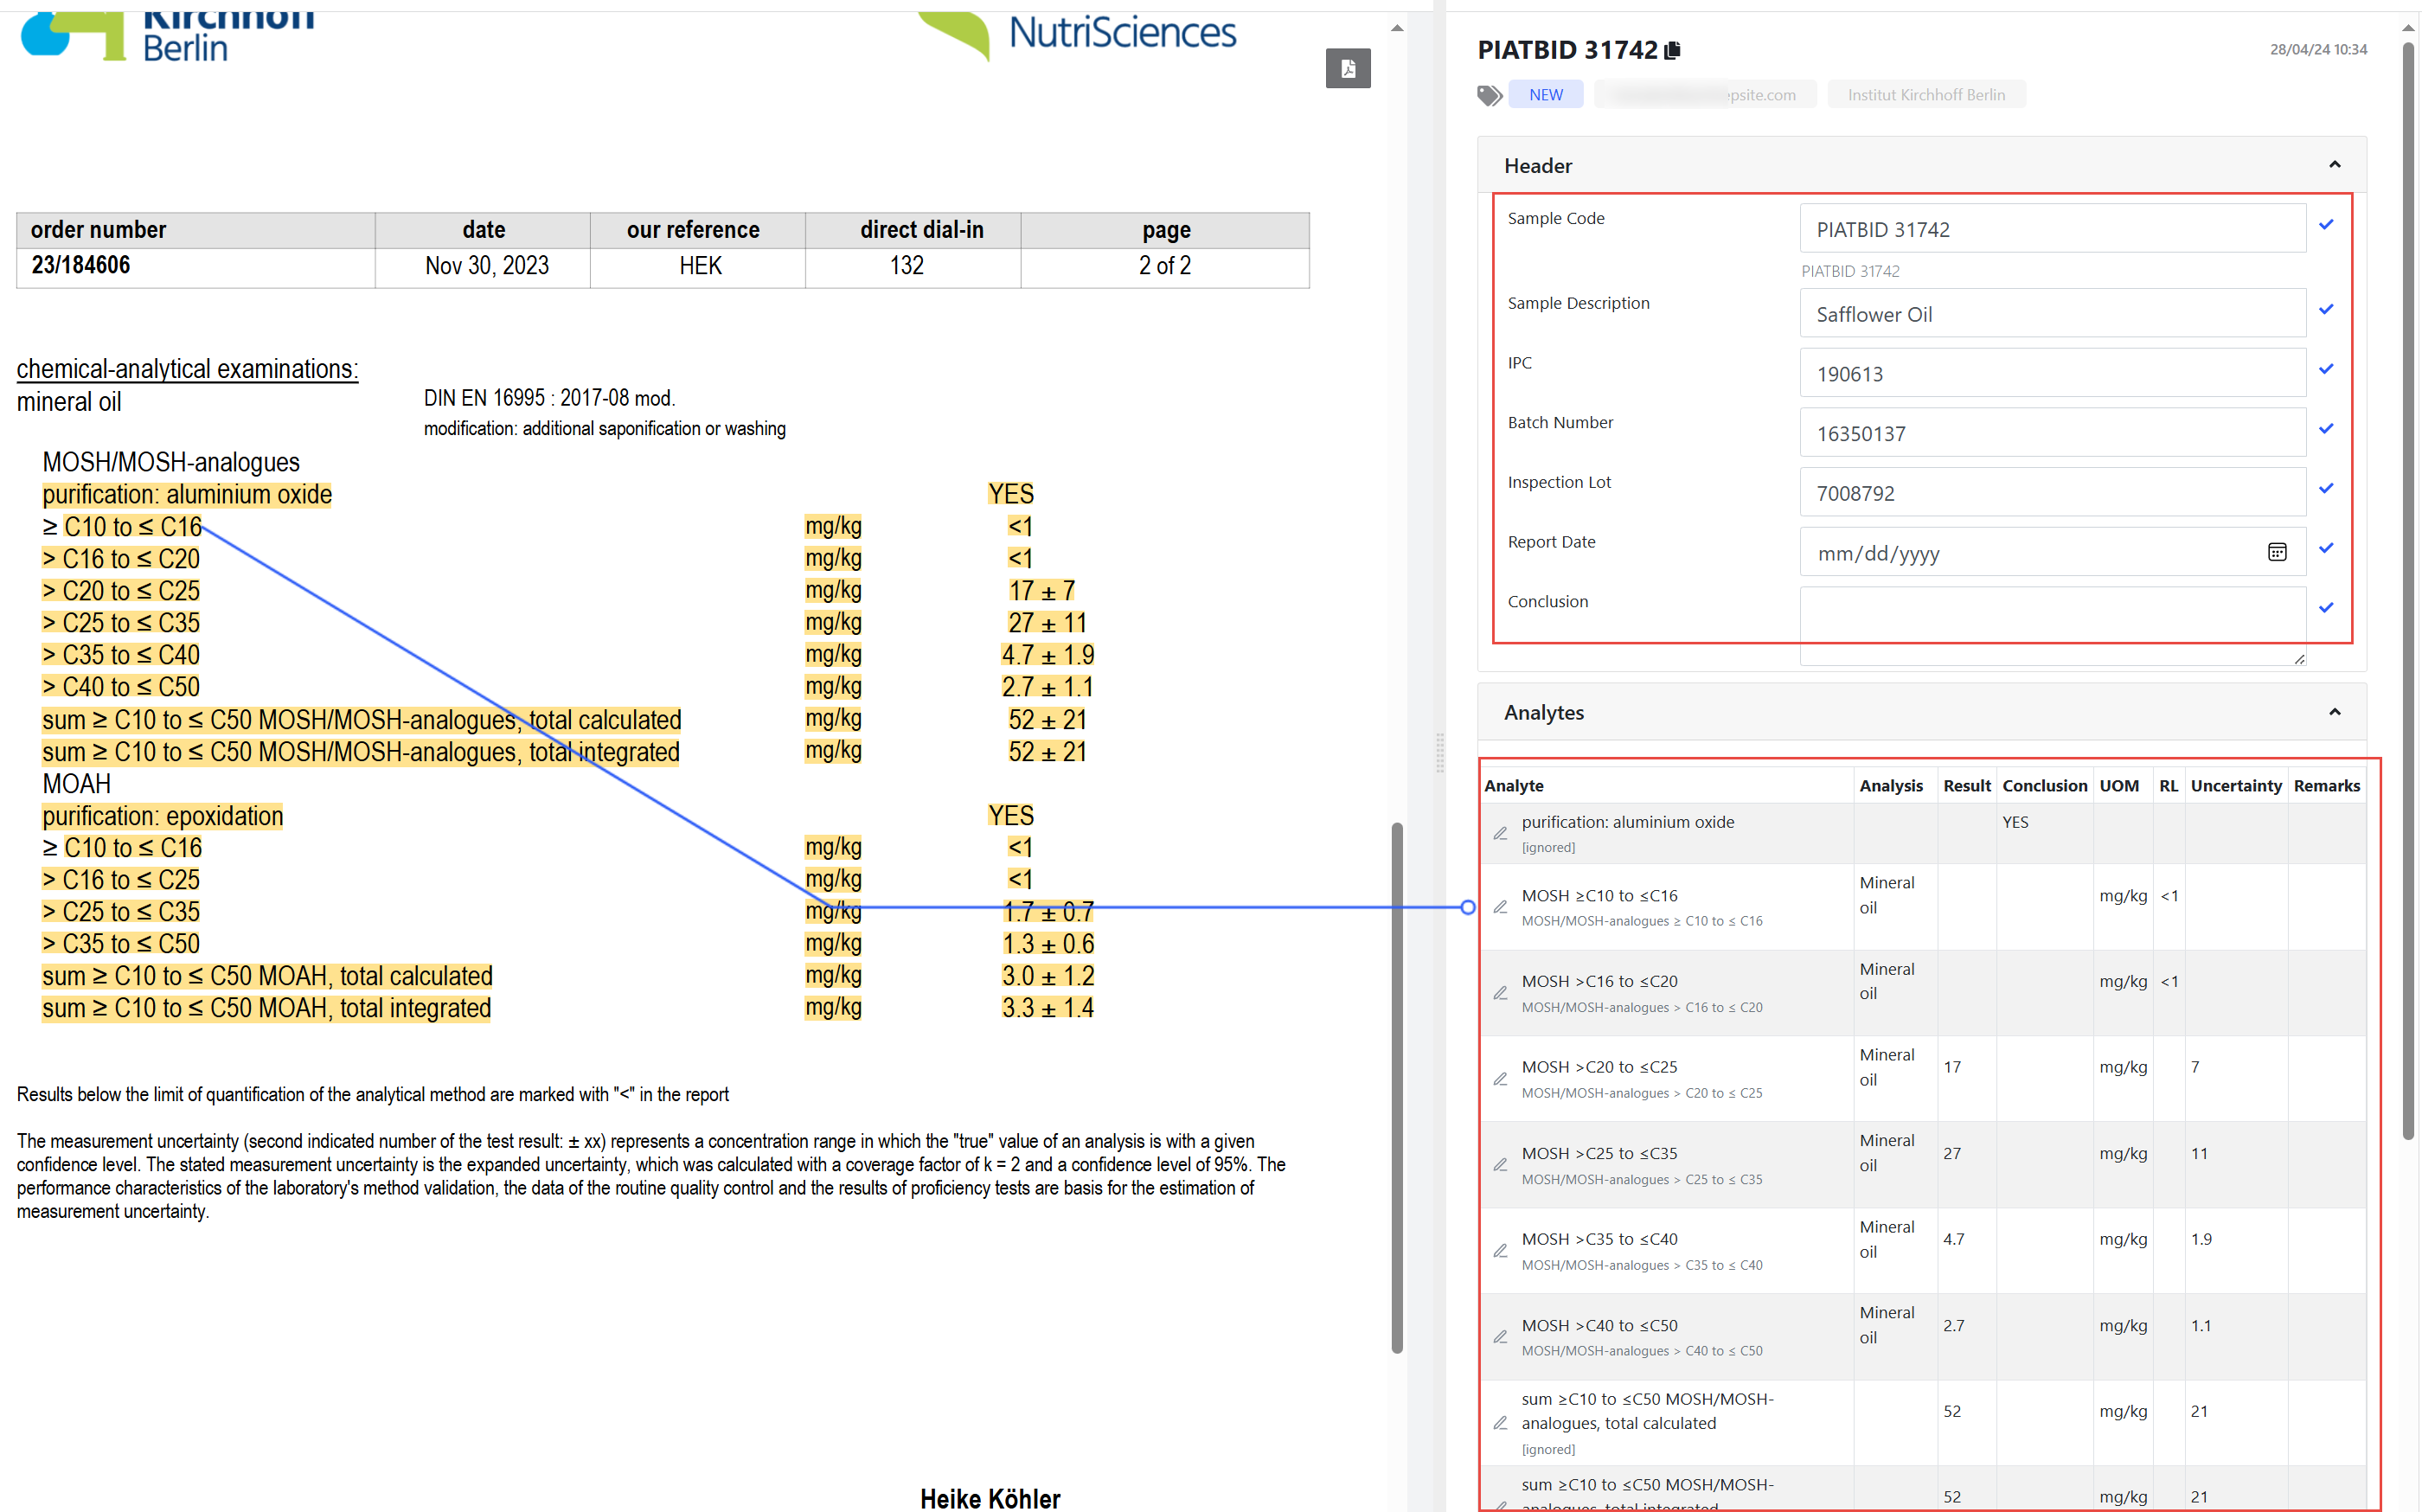
2.4.2 Ontology Result
Our Ontology Engine and Analytes Management System will automatically map the extracted test parameters to the IFF internal standard analyte and the related analysis. The grey text under each extraction result is the IFF internal analyte name mapped by the system.
2.4.3 Revise Extracted Results
Click the edit icon to open the edit panel and revise the extracted results.
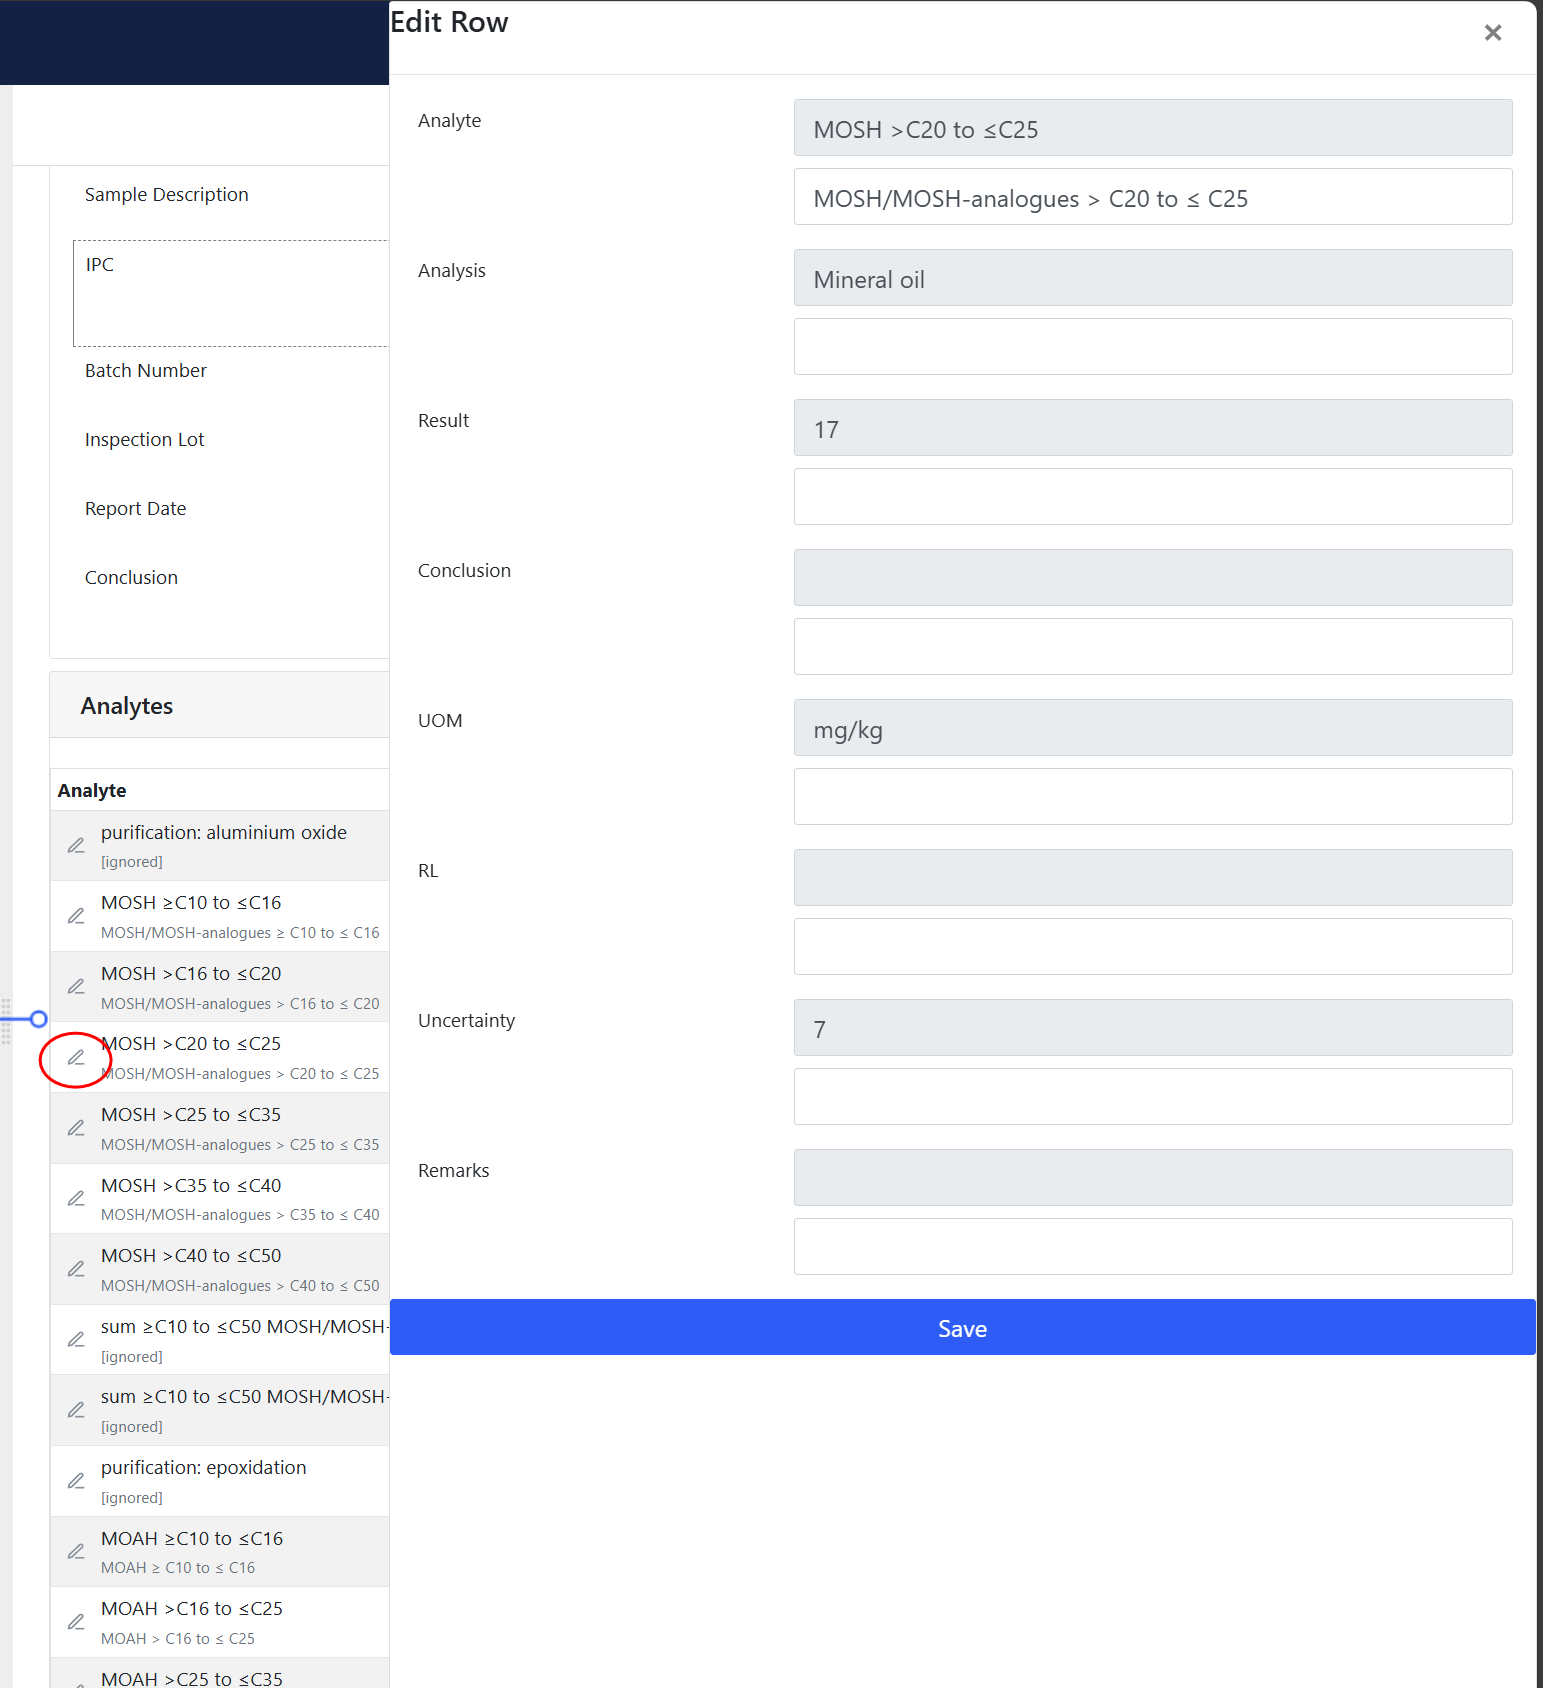
After clicking the “Save” button, a green check mark will appear behind the edited item. Hovering over the icon will display the last revision information.
2.4.4 Issue Report
The system will gather user feedback on extraction issues as follows:
- Send email directly to support@godeepsite.com for issues like:
- Unable to access the Insighter web portal
- Insighter system-related questions or queries
- Other general issues*
- Report issue for a specific COA document:
Report issue manually by clicking the “Report Issue” button. Pick an issue category, like “IPC/Extraction” and leave your comment in the dialog.
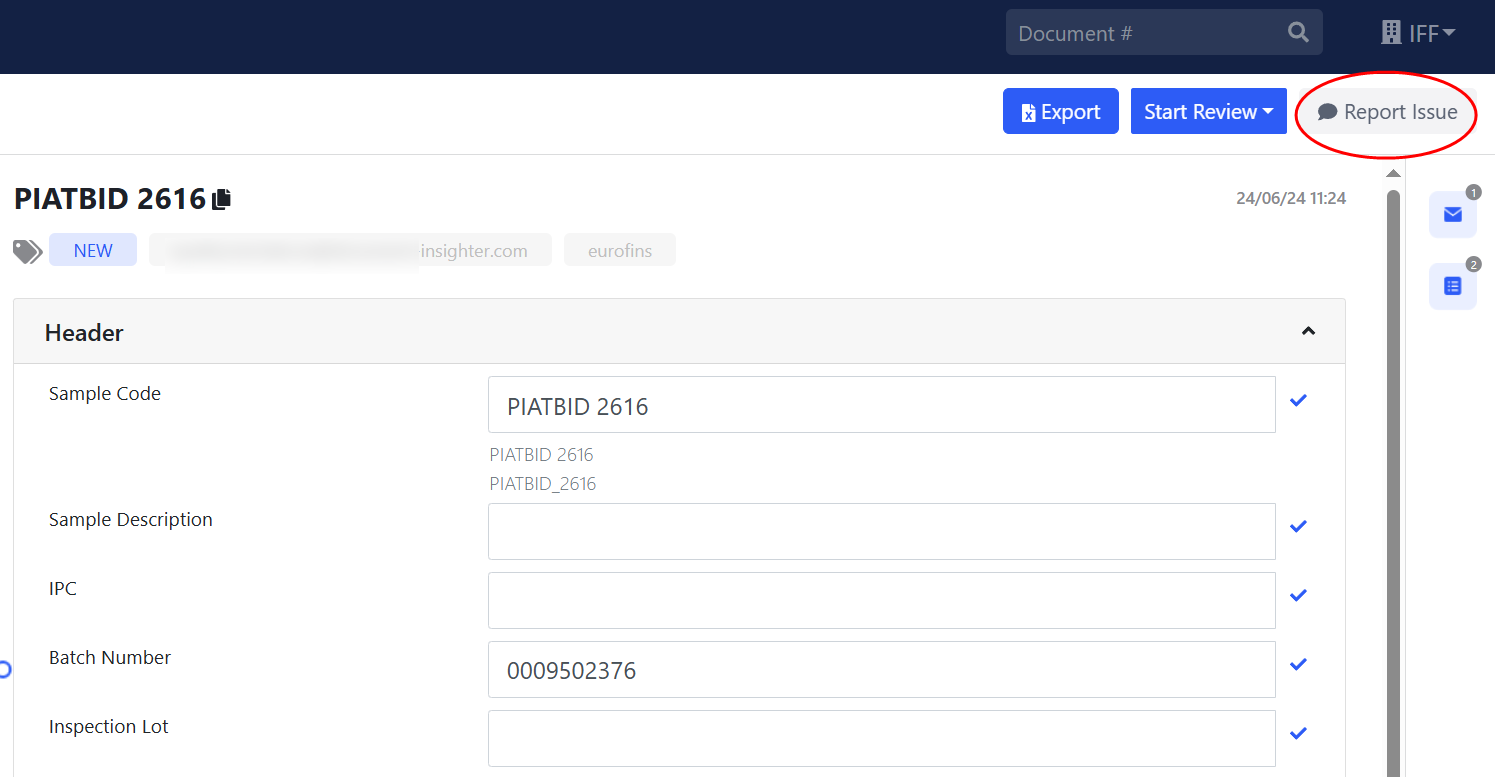
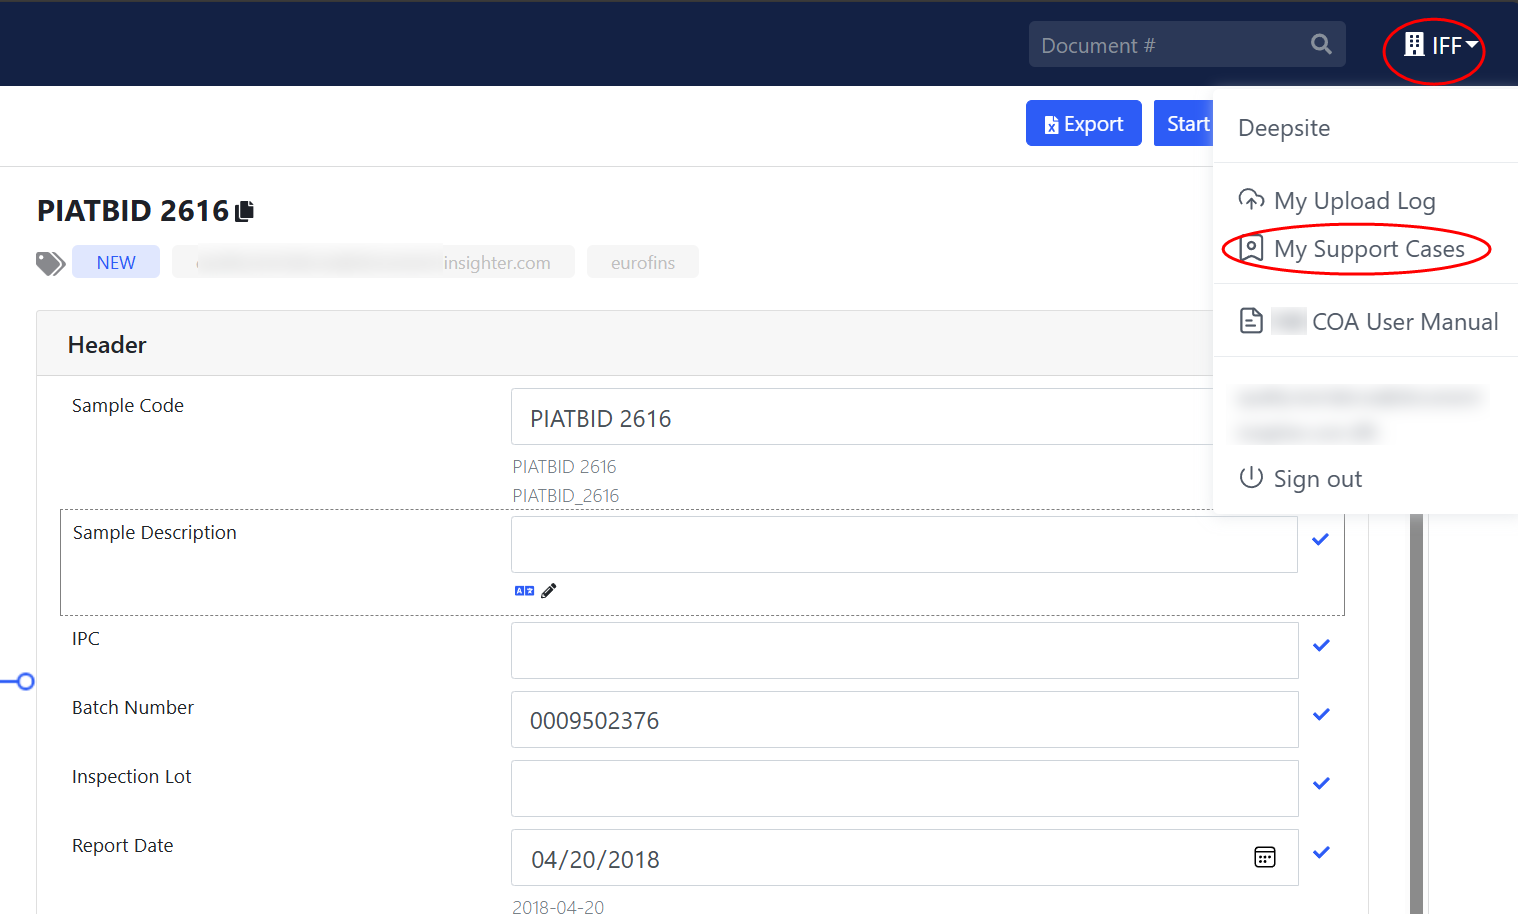
- Users can check their support case statuses by clicking “My Support Cases.” The issue is forwarded to our Technical Support team, who will follow up and update you within 4 days.
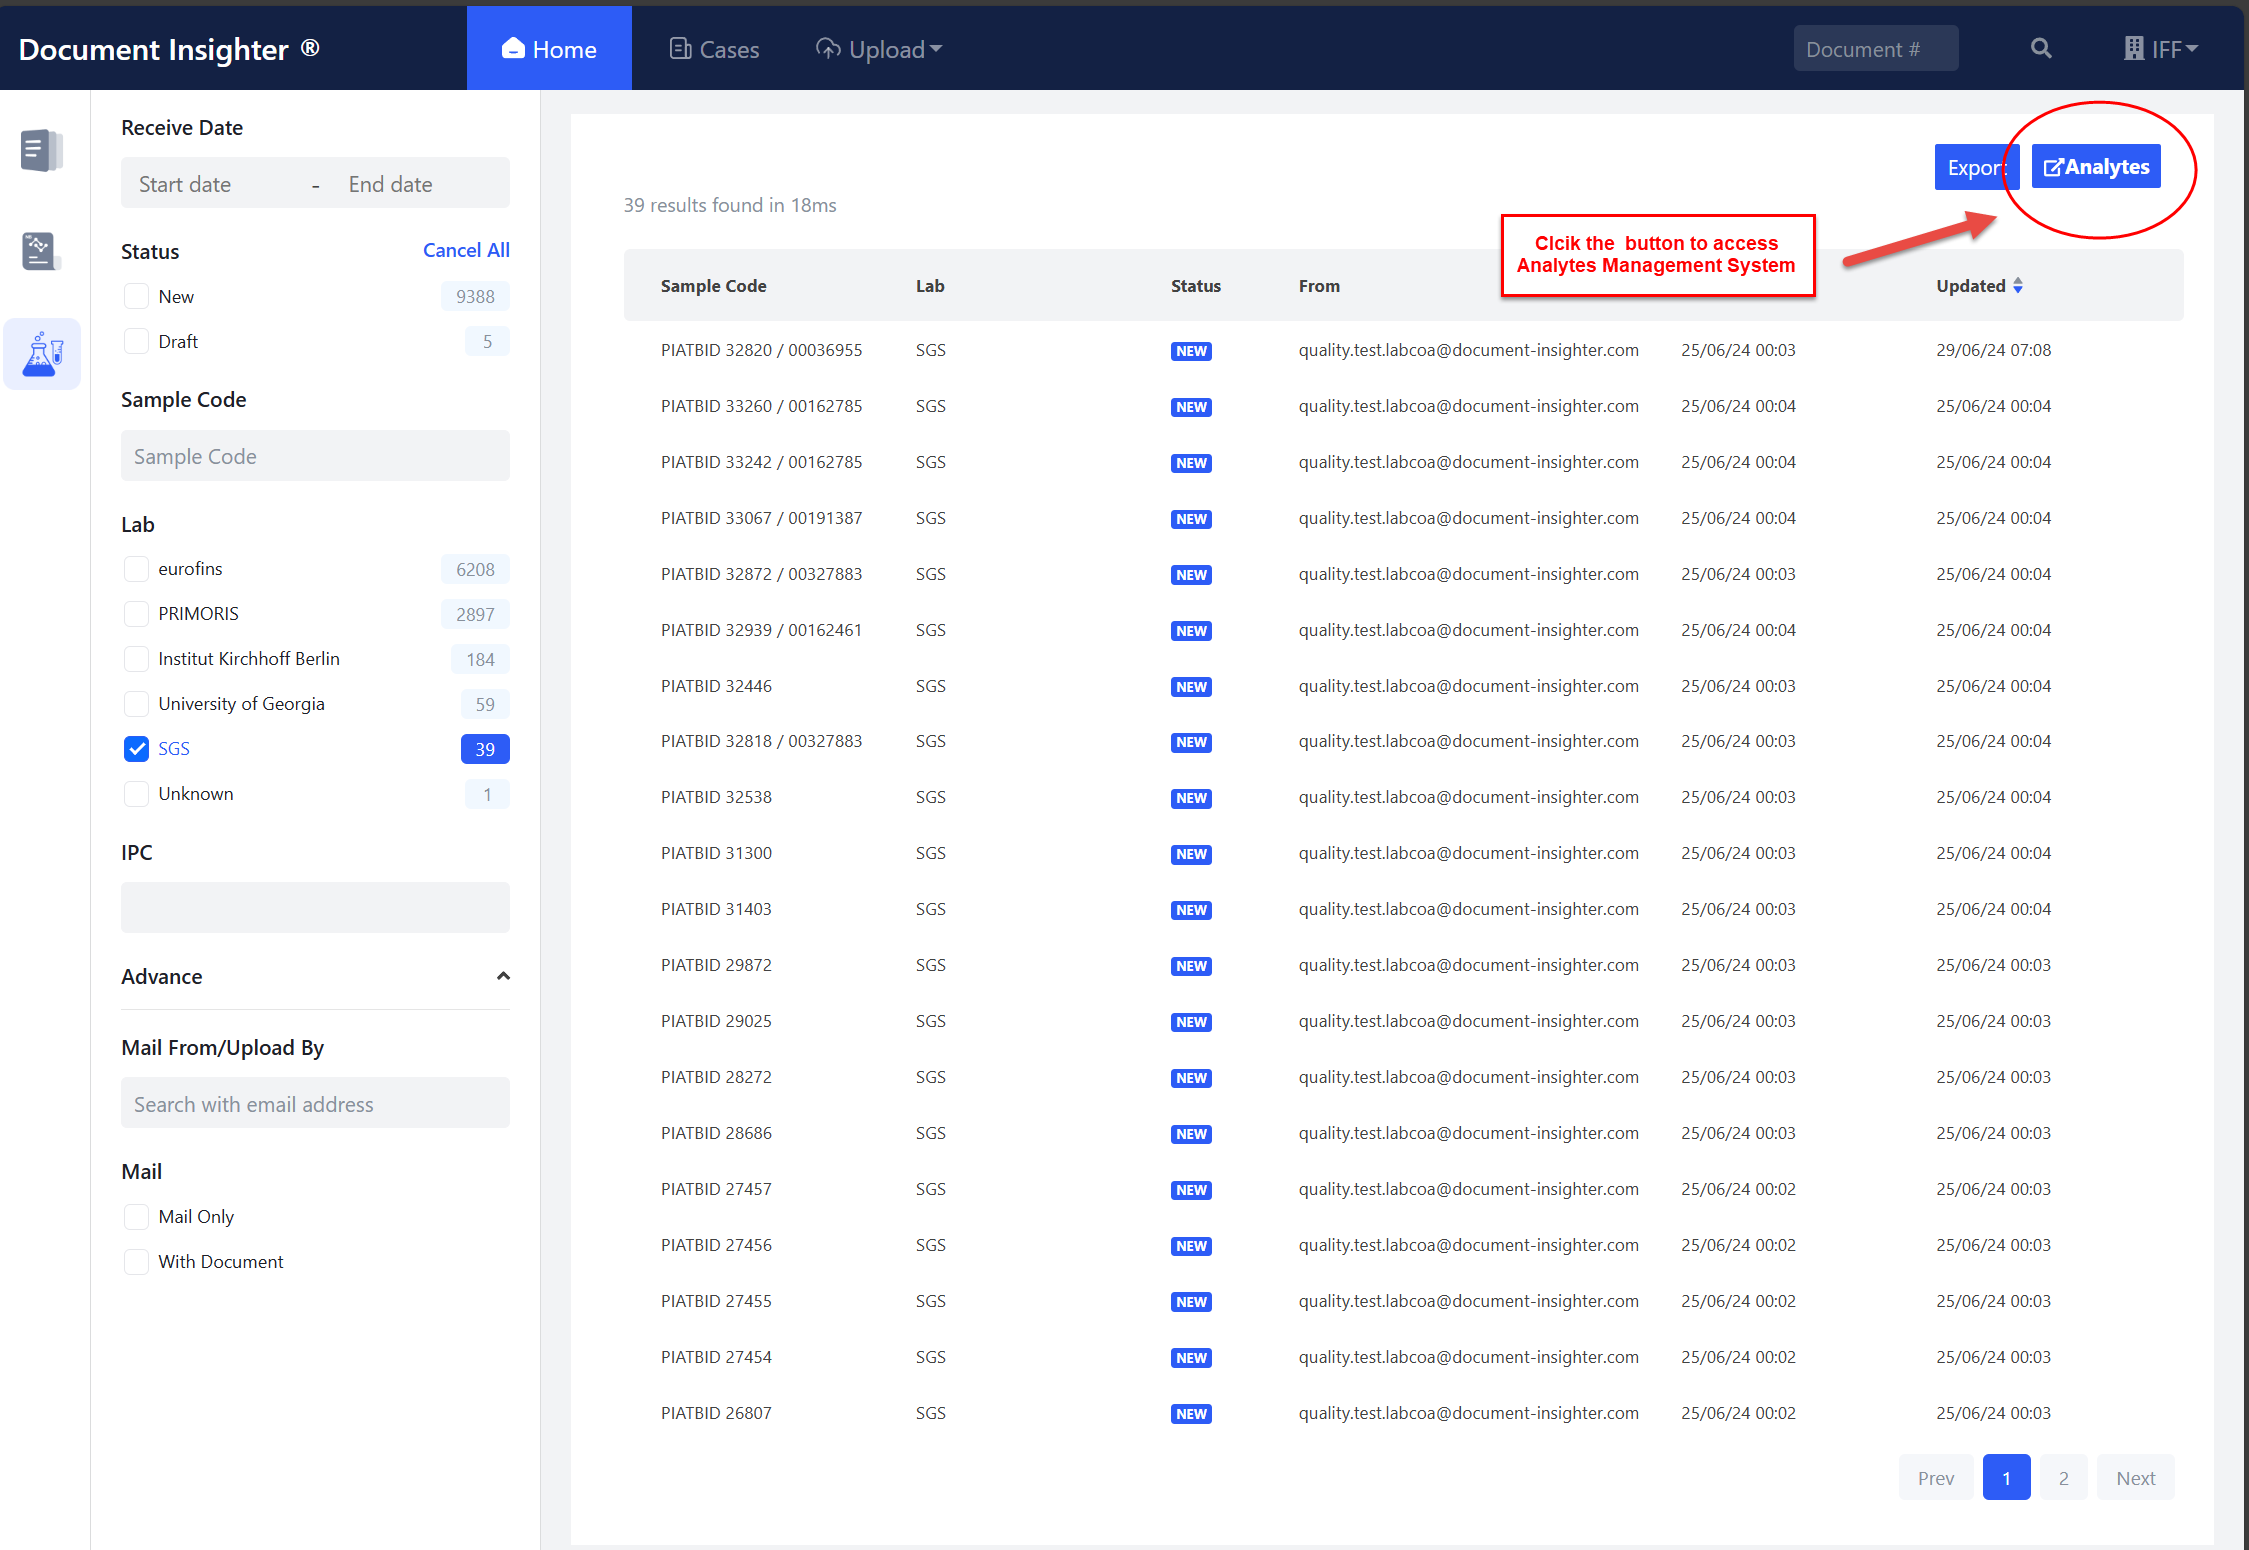
2.5 Analytes Management System
We offer a standalone Analytes Management System to manage the mapping relationships between all External Analytes and IFF Internal Analytes.
2.5.1 Role Types
Upon successful login, your assigned roles will be displayed next to your email in the top-right corner. Each role will have a corresponding badge. Users of various roles will have different permissions:
| Role Type | Access | User Profile |
|---|---|---|
| Management | Manages system settings | technicians |
| VQ (Vendor Quality) | revise/approves external analytes and requests internal analyte creation | users/technicians |
| LIMS | Reviews proposed analytes and finalizes their mapping relationship/Approves internal analytes/Creates new internal analytes | users/technicians |
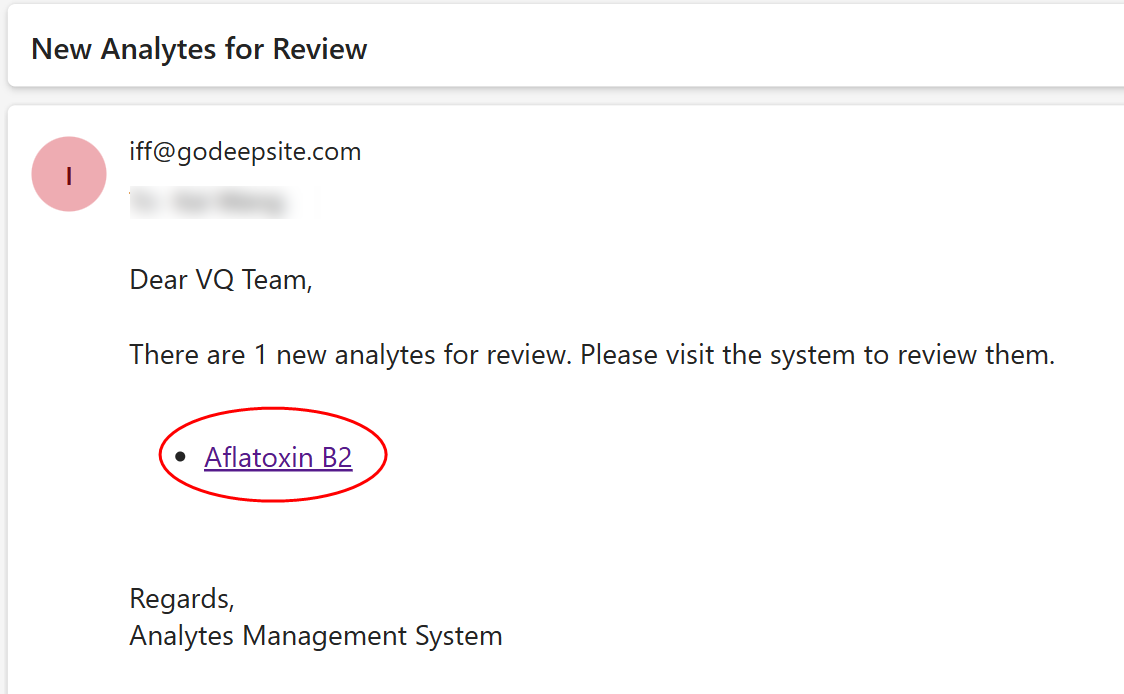
2.5.2 Email Notification System for the Mapping Tasks
Users from VQ team can receive email notifications through this system to promptly handle new tasks where external analytes did not mapped to IFF internal analytes. Users can also request the LIMS team to create new internal analytes if the needed ones don’t exist via the system, and LIMS team will receive notifications to follow up on these requests.
2.5.3 VQ Team Workflow
2.5.3.1 Access Analytes Management System
After receiving the email notification, user can directly access the “Analytes Management System” via the link in the email, or navigate to the system after clicking the button on the homepage.
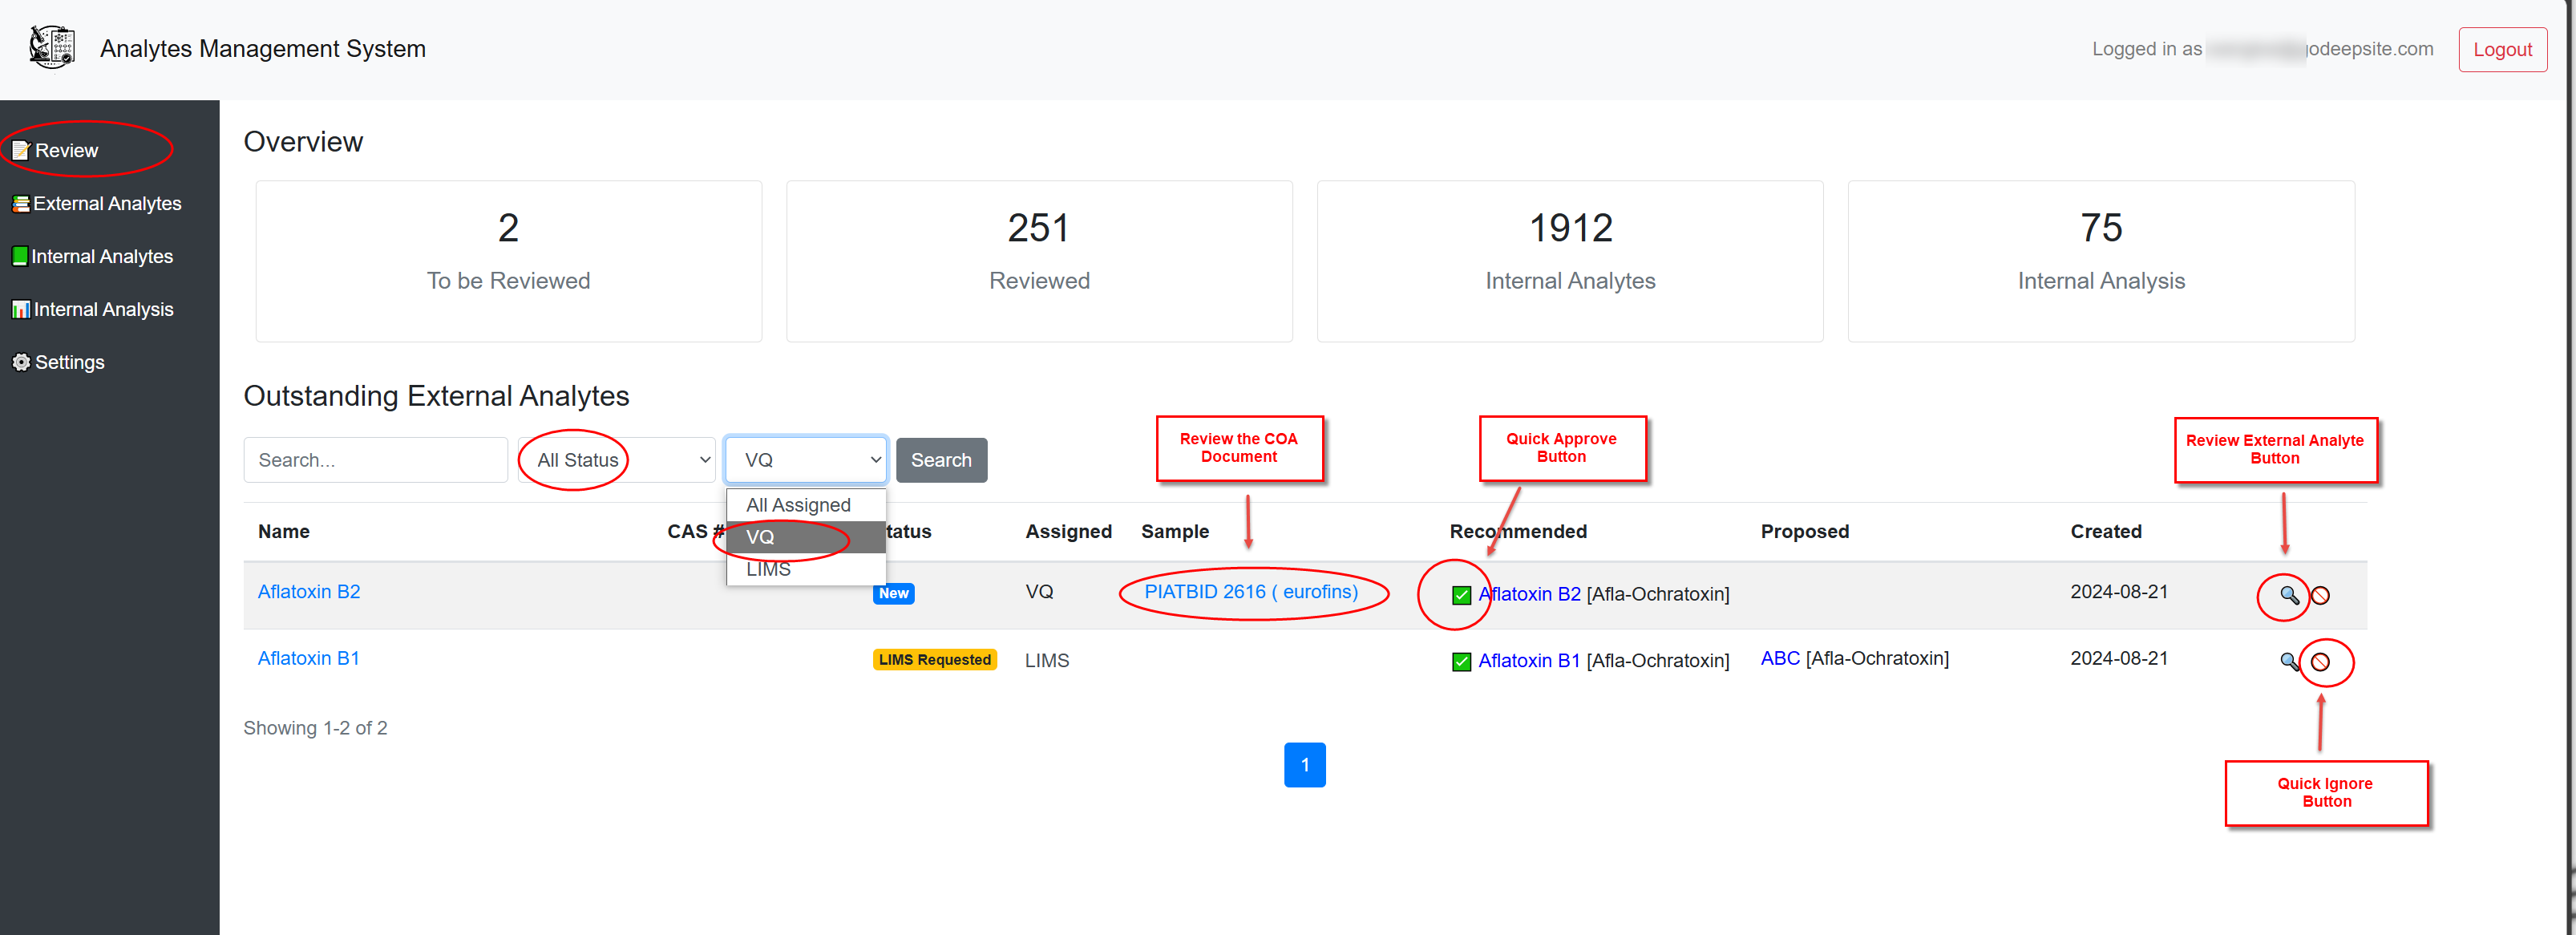
2.5.3.2 Quick Approve
Select the “Review” tab on the left to display all pending tasks on the right. The VQ team can use the filter panel to sort tasks assigned to “VQ” or filter by status “New” to complete the Internal Analytes mapping tasks. Clicking the hyperlink in the “Sample” column directs users to the Document Insighter Portal to view related external lab COA documents and extractions.
Our AI Ontology Engine offers users relevant mapping suggestions. By clicking the “Quick Review” button, users can quickly confirm and complete the task.
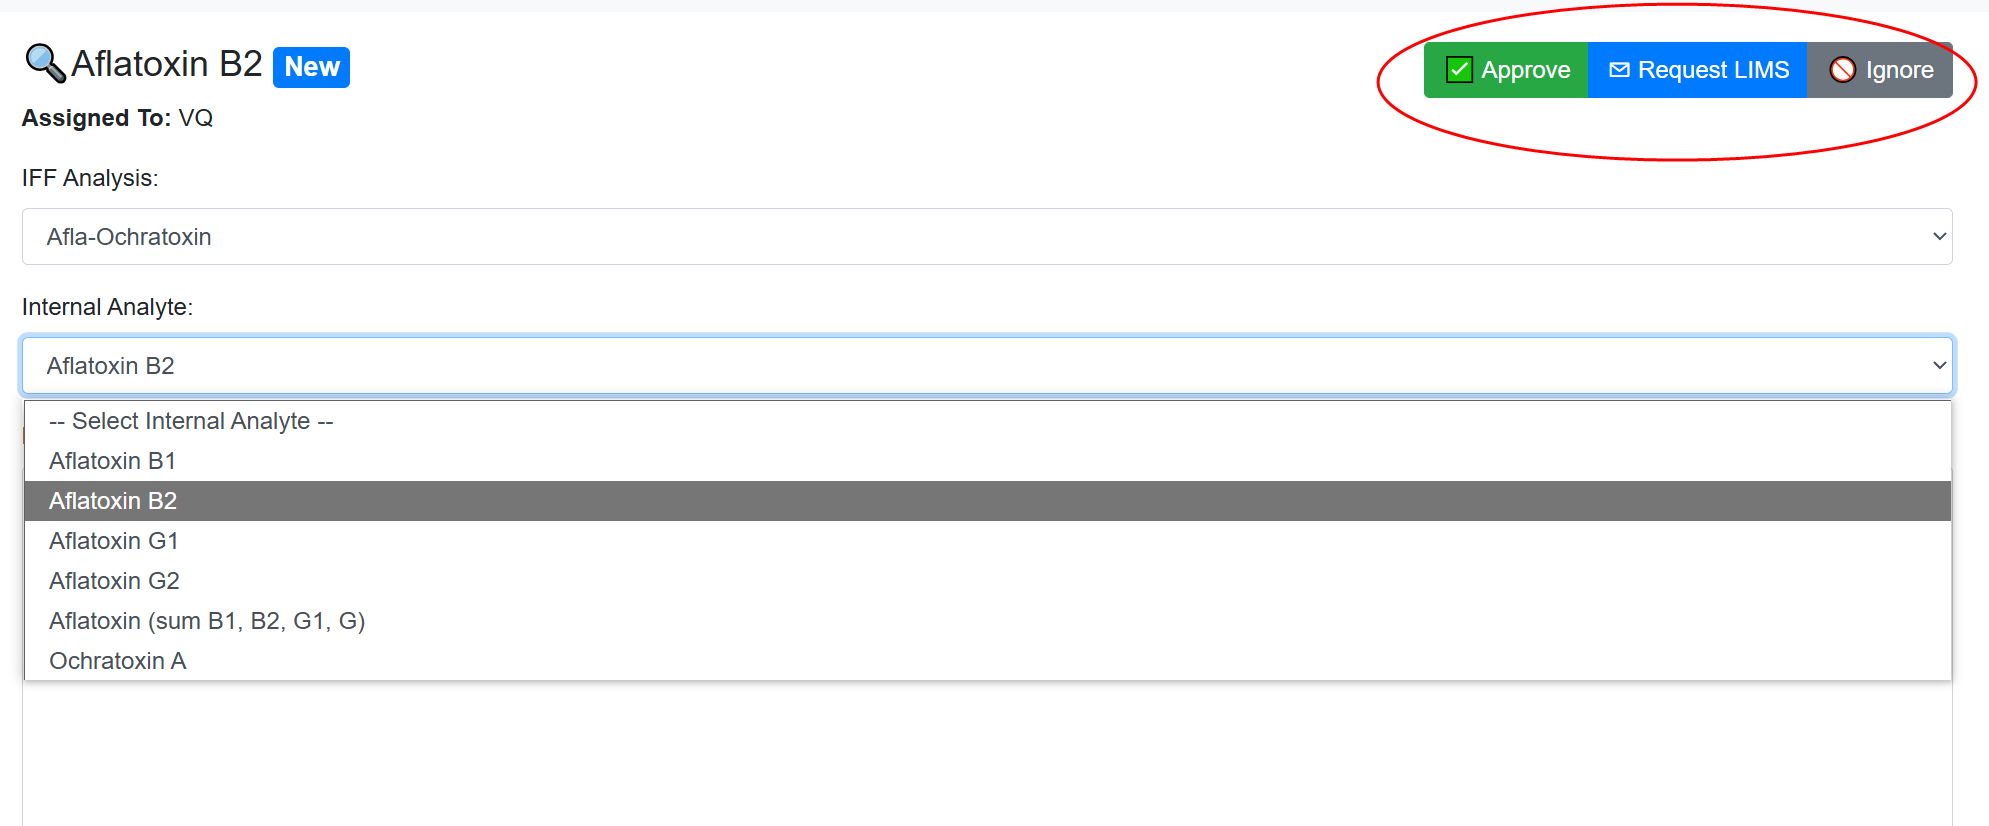
2.5.3.3 Select the Internal Analysis and Analyte
If no AI suggestion is provided, users must manually select a suitable internal analysis and analyte for the unmapped external analyte. Click the “Review External Analyte” button and pick the suitable Internal Analysis and Analyte from the dropdown list. After that, click the “Approve” button to complete the task.
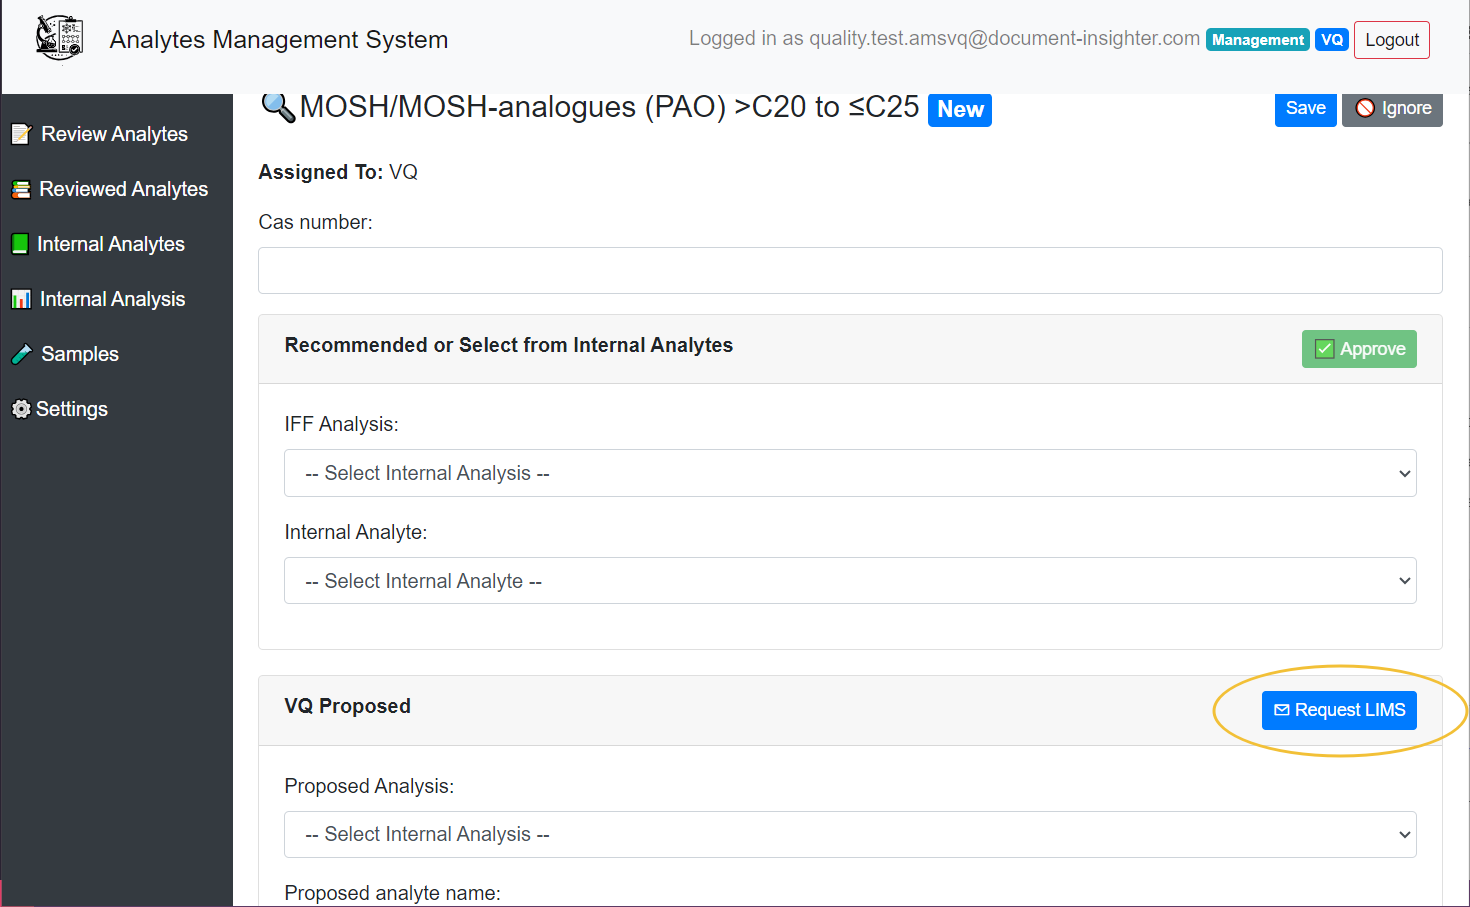
2.5.3.4 Request LIMS for Creating New Internal Analyte
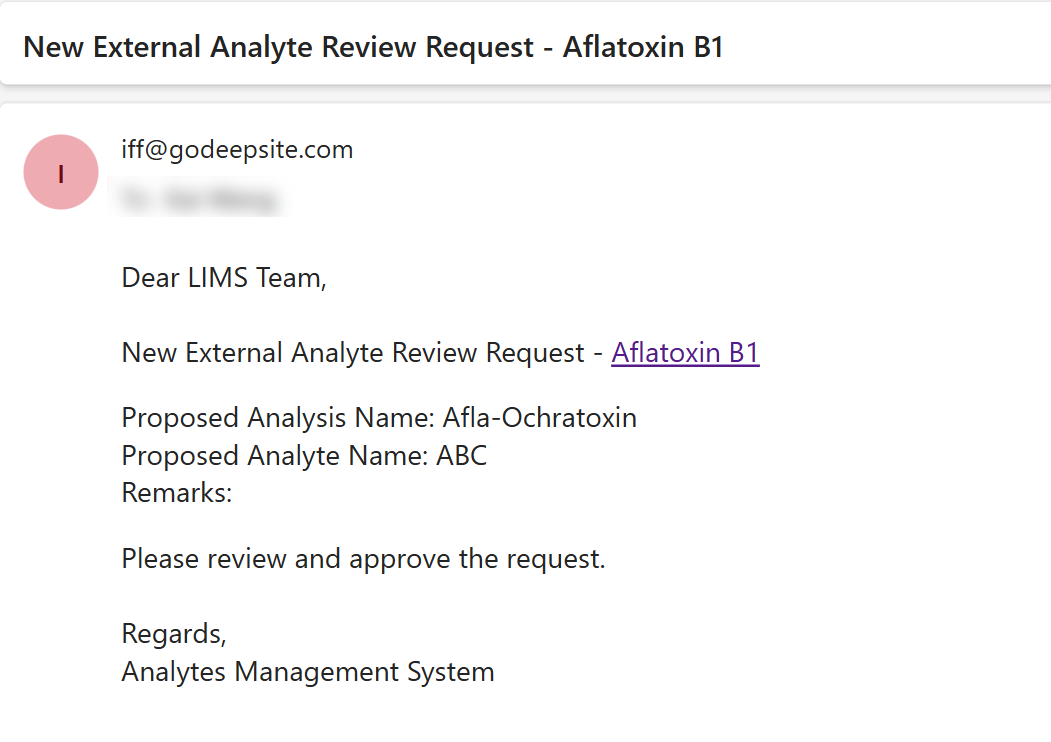
If the needed internal analyte don’t exist, VQ team users may request the LIMS team to create new internal analytes by click the “Request LIMS” button and A notification email will later be sent to the LIMS team to follow up on the case.
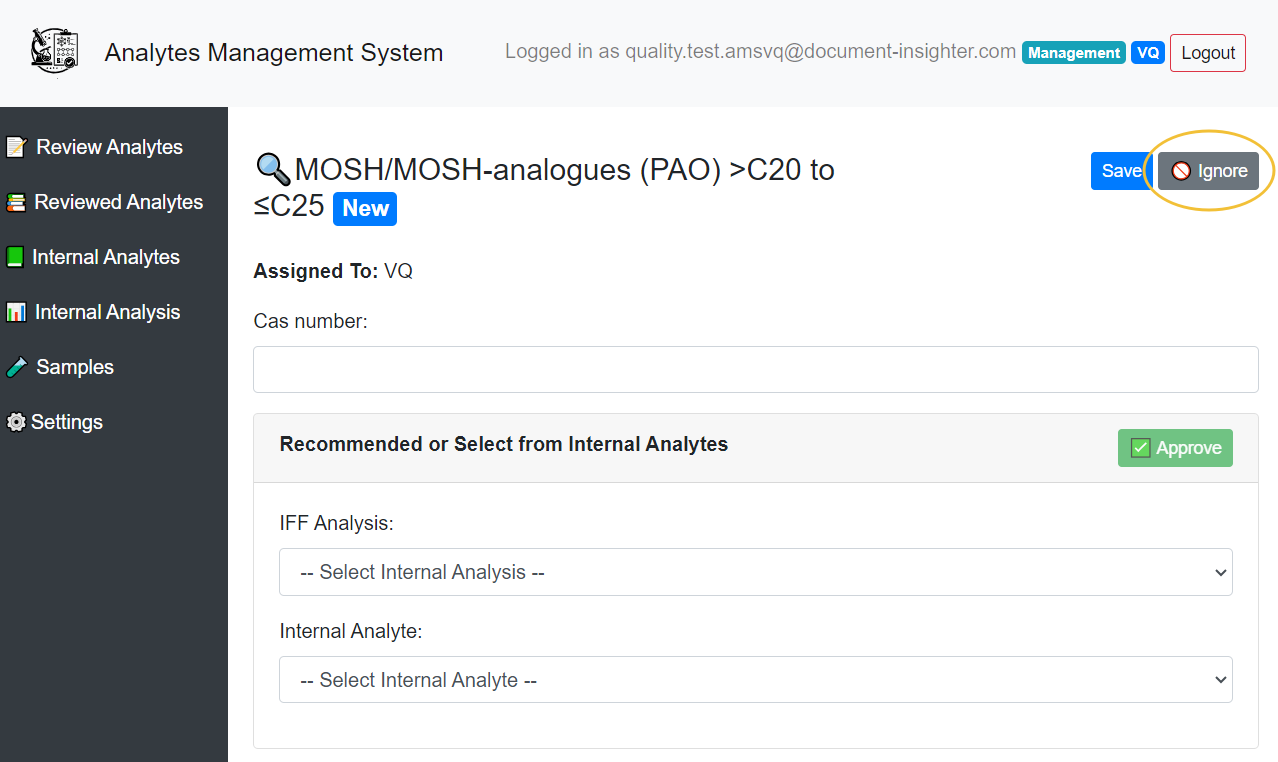
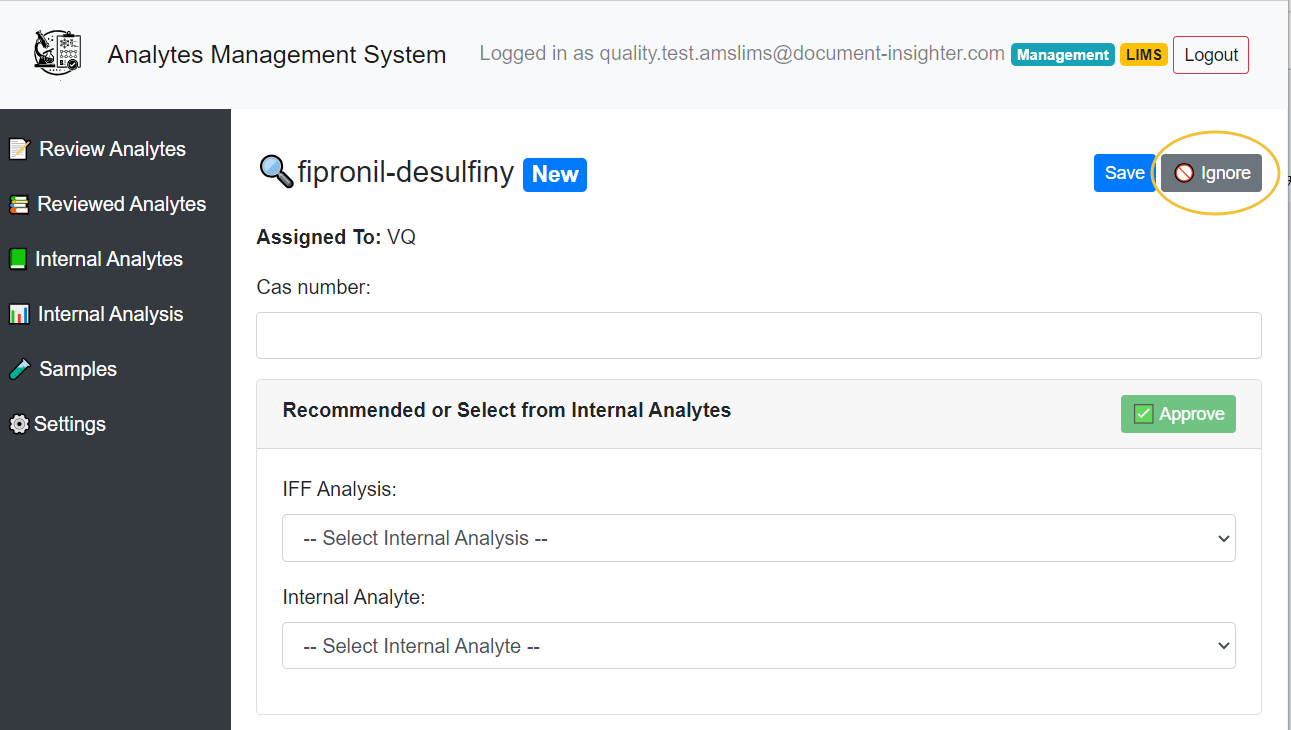
2.5.3.5 Ignore the External Analyte
If the VQ team user finds the unmapped External Analyte is not relevant to IFF and don’t require new internal Analytes in LIMS, they can click “Ignore” to skip the task, preventing the system from creating a related mapping task.
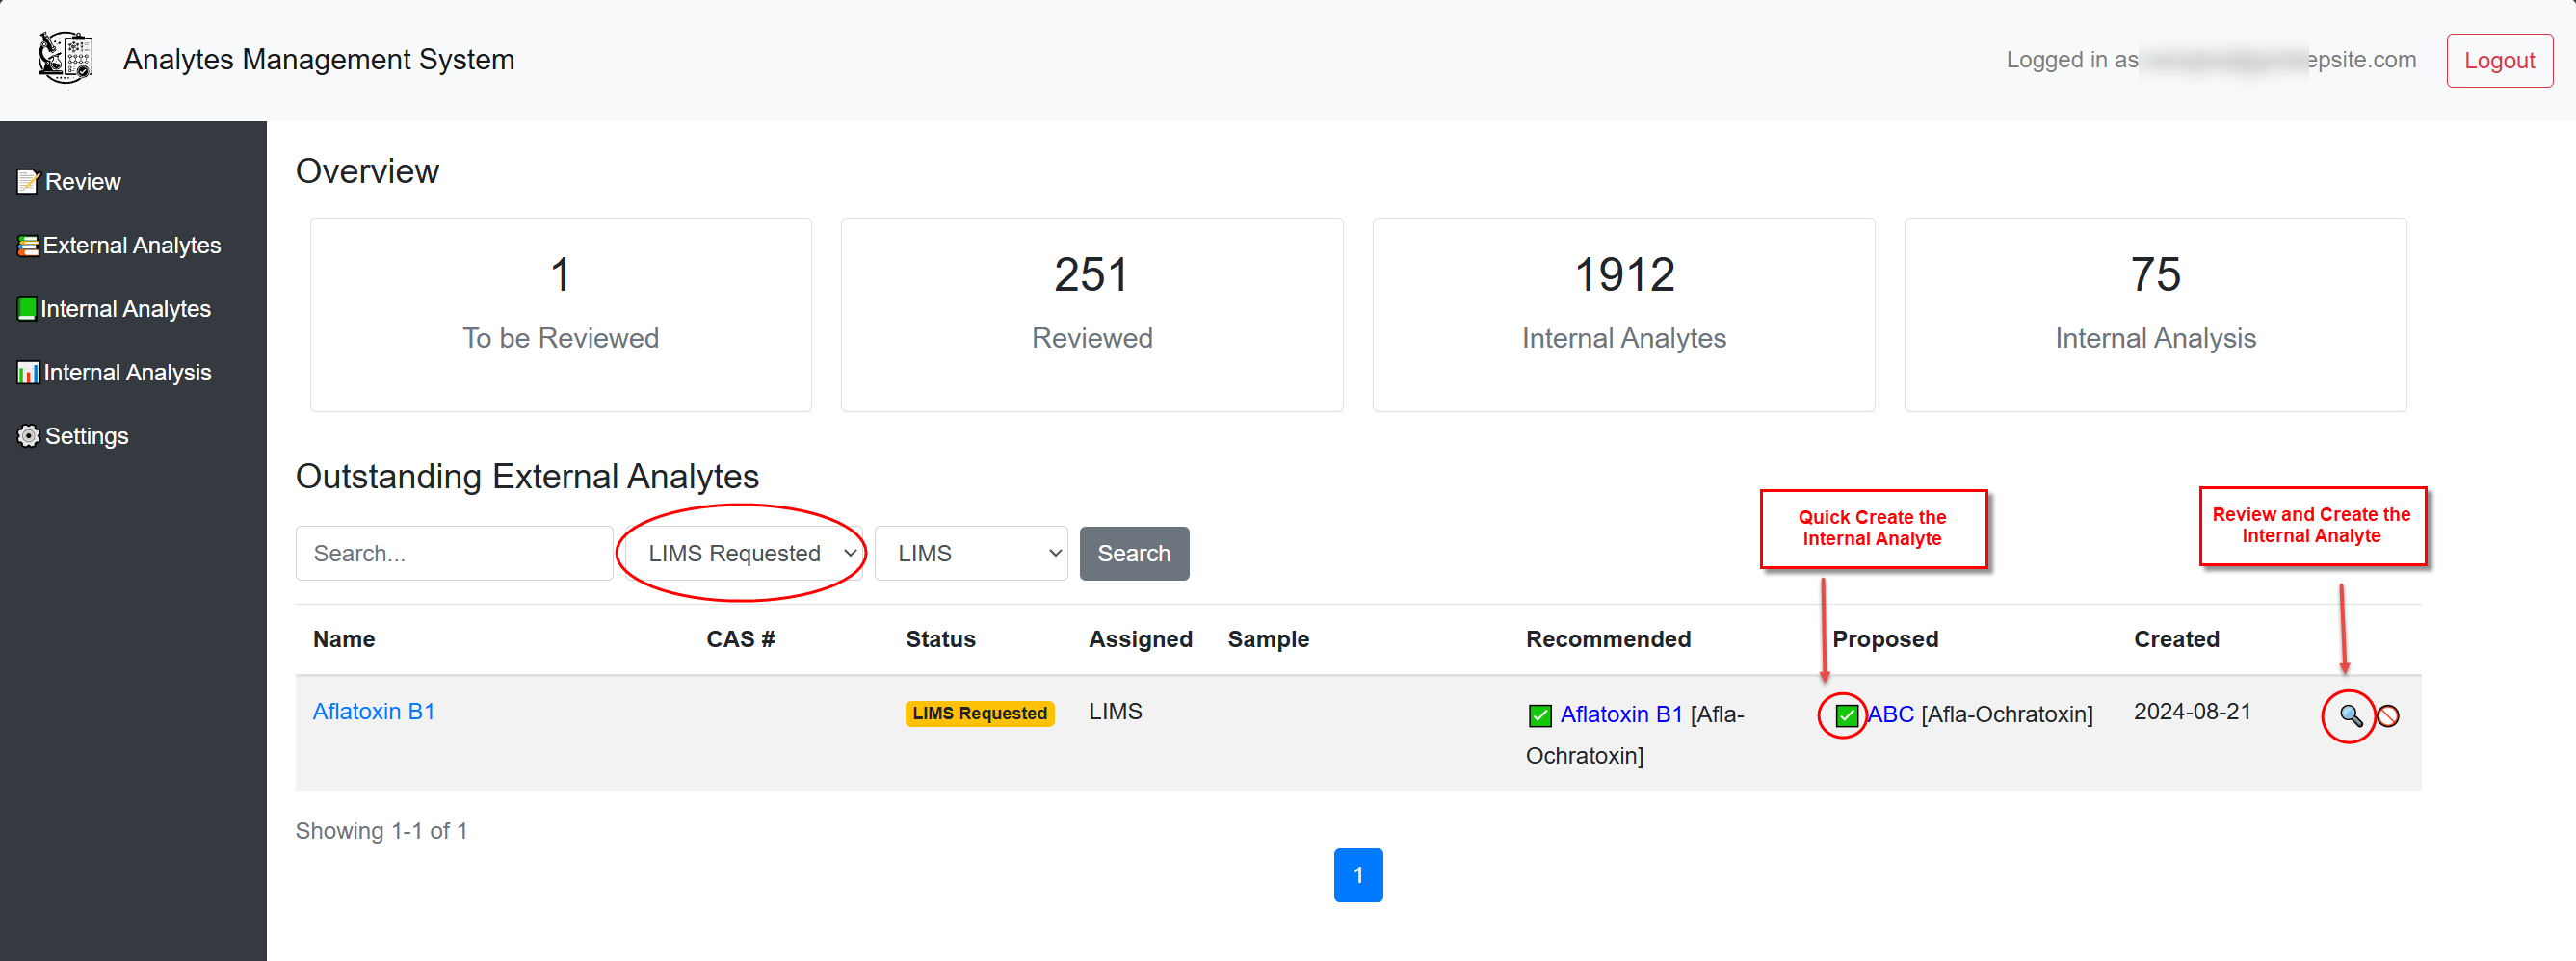
2.5.4 LIMS Team Workflow
2.5.4.1 Access Analytes Management System
After receiving the email notification, users from LIMS team can directly access the “Analytes Management System” via the link in the email, or navigate to the system after clicking the button on the homepage.
2.5.4.2 Review the COA Document and Extraction
Clicking the hyperlink in the “Sample” column directs users to the Document Insighter Portal to view related external lab COA documents and extractions.
2.5.4.3 Follow Up the Request for Creating Internal Analyte
After creating the analyte for the request in the LIMS, then back to the Analytes Management System, LIMS team users can use the filter panel to sort tasks assigned to “LIMS Requested” or filter by status “LIMS” to complete the Internal Analytes Creating requests.

2.5.4.4 Ignore the External Analyte
If the LIMS team user finds that the analyte mentioned in the received request isn’t suitable for creating a corresponding internal one at the moment, they can click “Ignore” to skip the task, preventing the system from creating a related mapping task later.
2.5.5 Sample Metadata Management
This section is intended to assist users, specifically VQ and LIMS roles, in managing sample metadata in the system.
- VQ Role: Responsible for reviewing sample metadata, confirming notifications about missing metadata, and requesting updates from the LIMS team.
- LIMS Role: Responsible for adding and updating sample metadata, syncing statuses, and exporting metadata files to SharePoint.
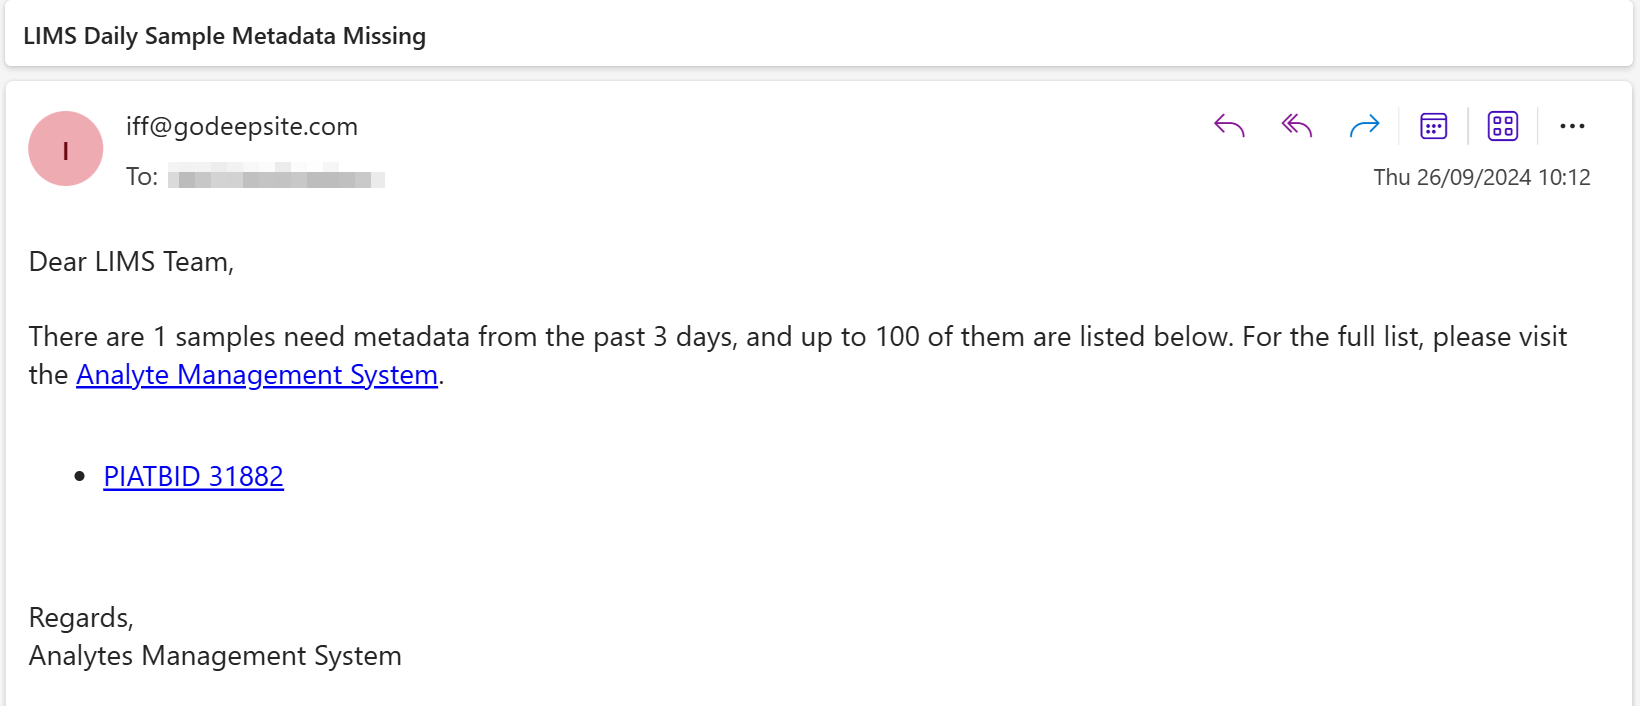
2.5.5.1 Daily Notification: Sample Metadata Missing (VQ)
- Sample Metadata Missing Email Notification:
- Users under the VQ role will receive a daily email notification listing the current external lab COA extractions with missing sample metadata.
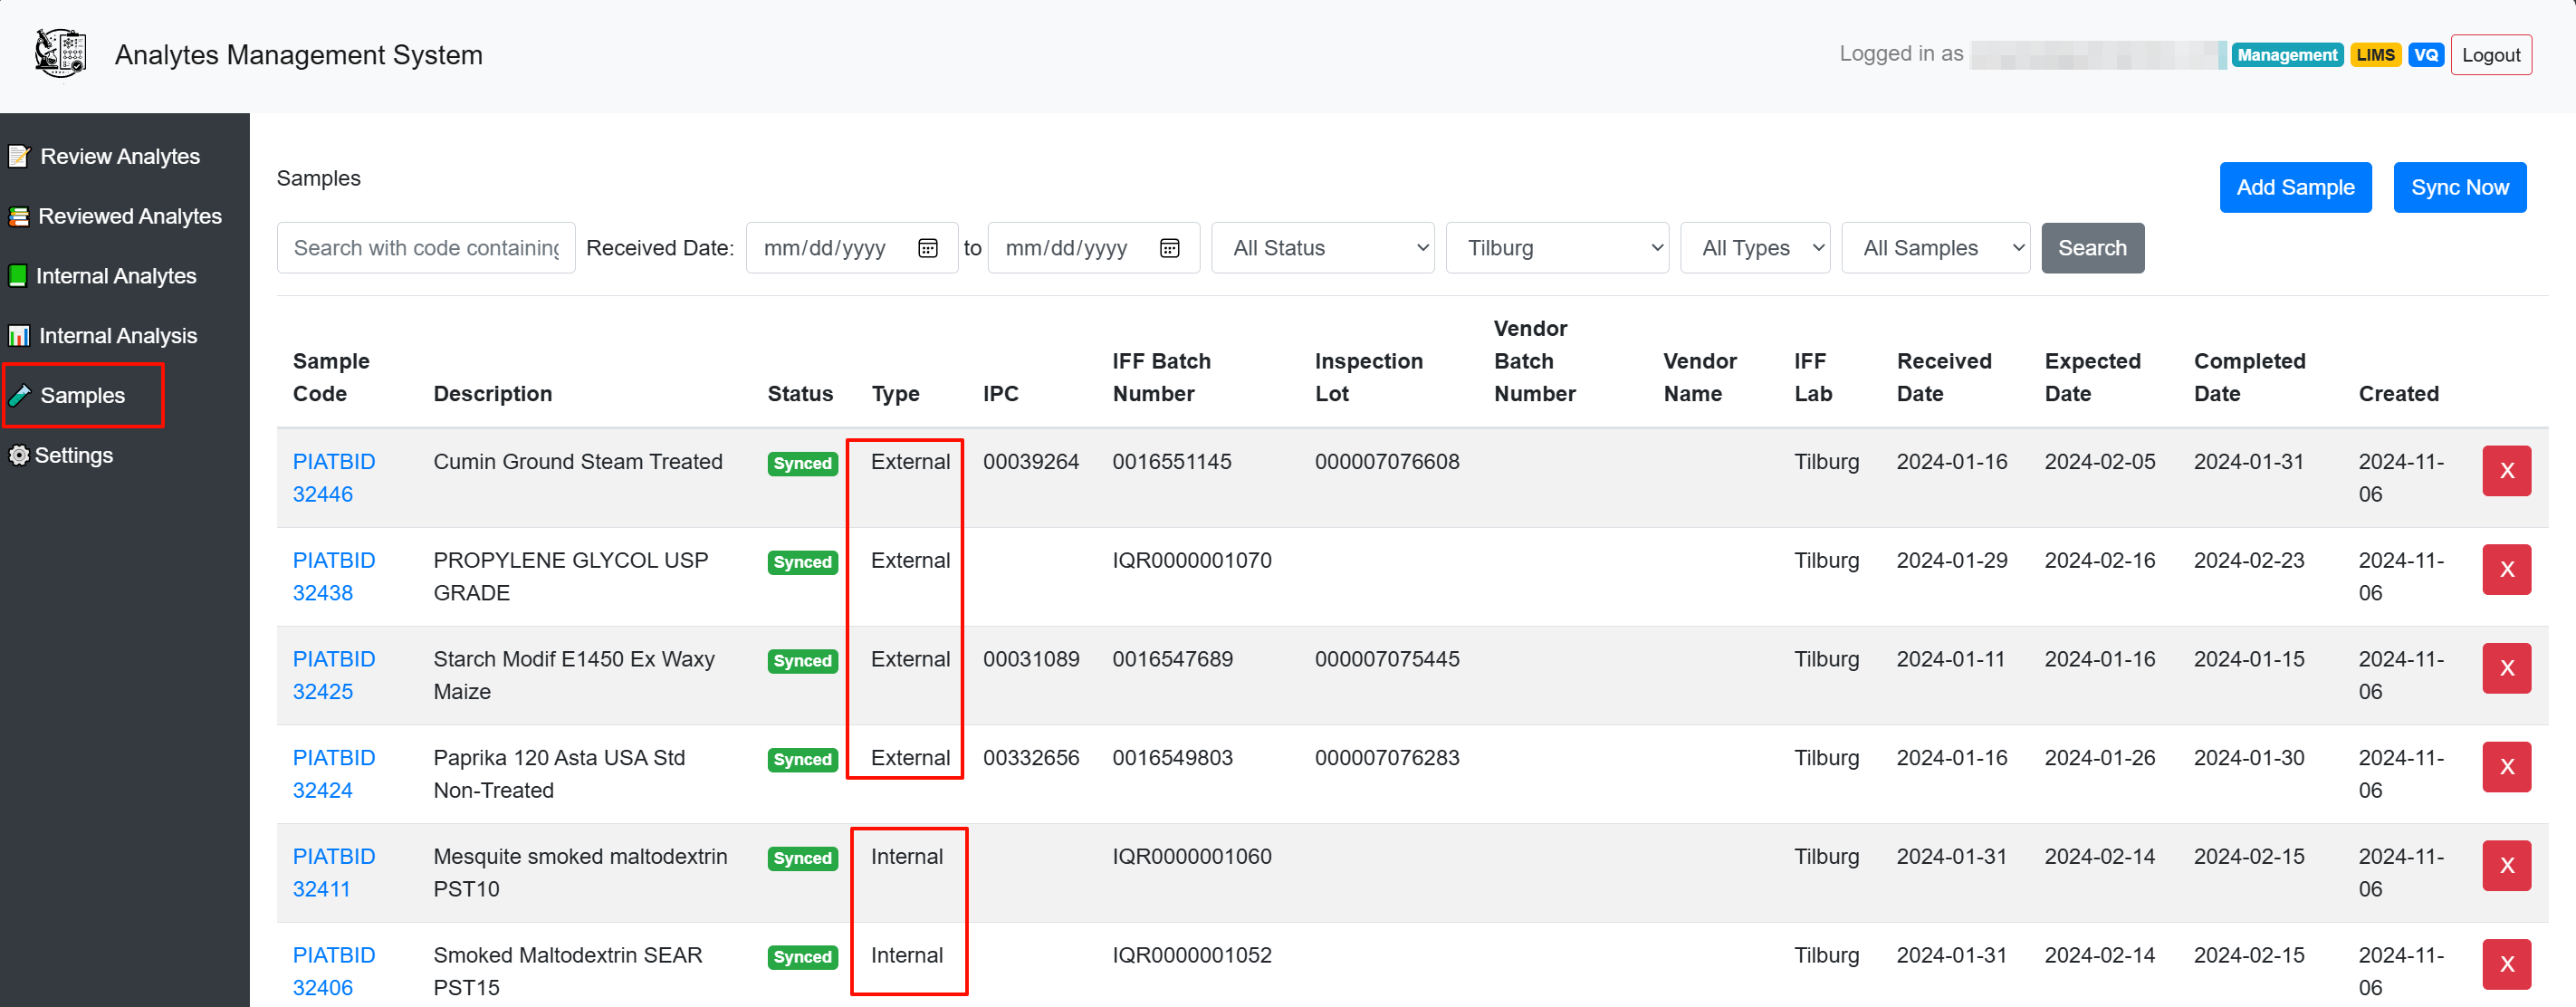
2.5.5.2 Reviewing Synced Sample Metadata (VQ)
- Review Samples:
- Detail View Access:
- Access the detailed view from the link provided in the notification email or directly within the AMS interface.
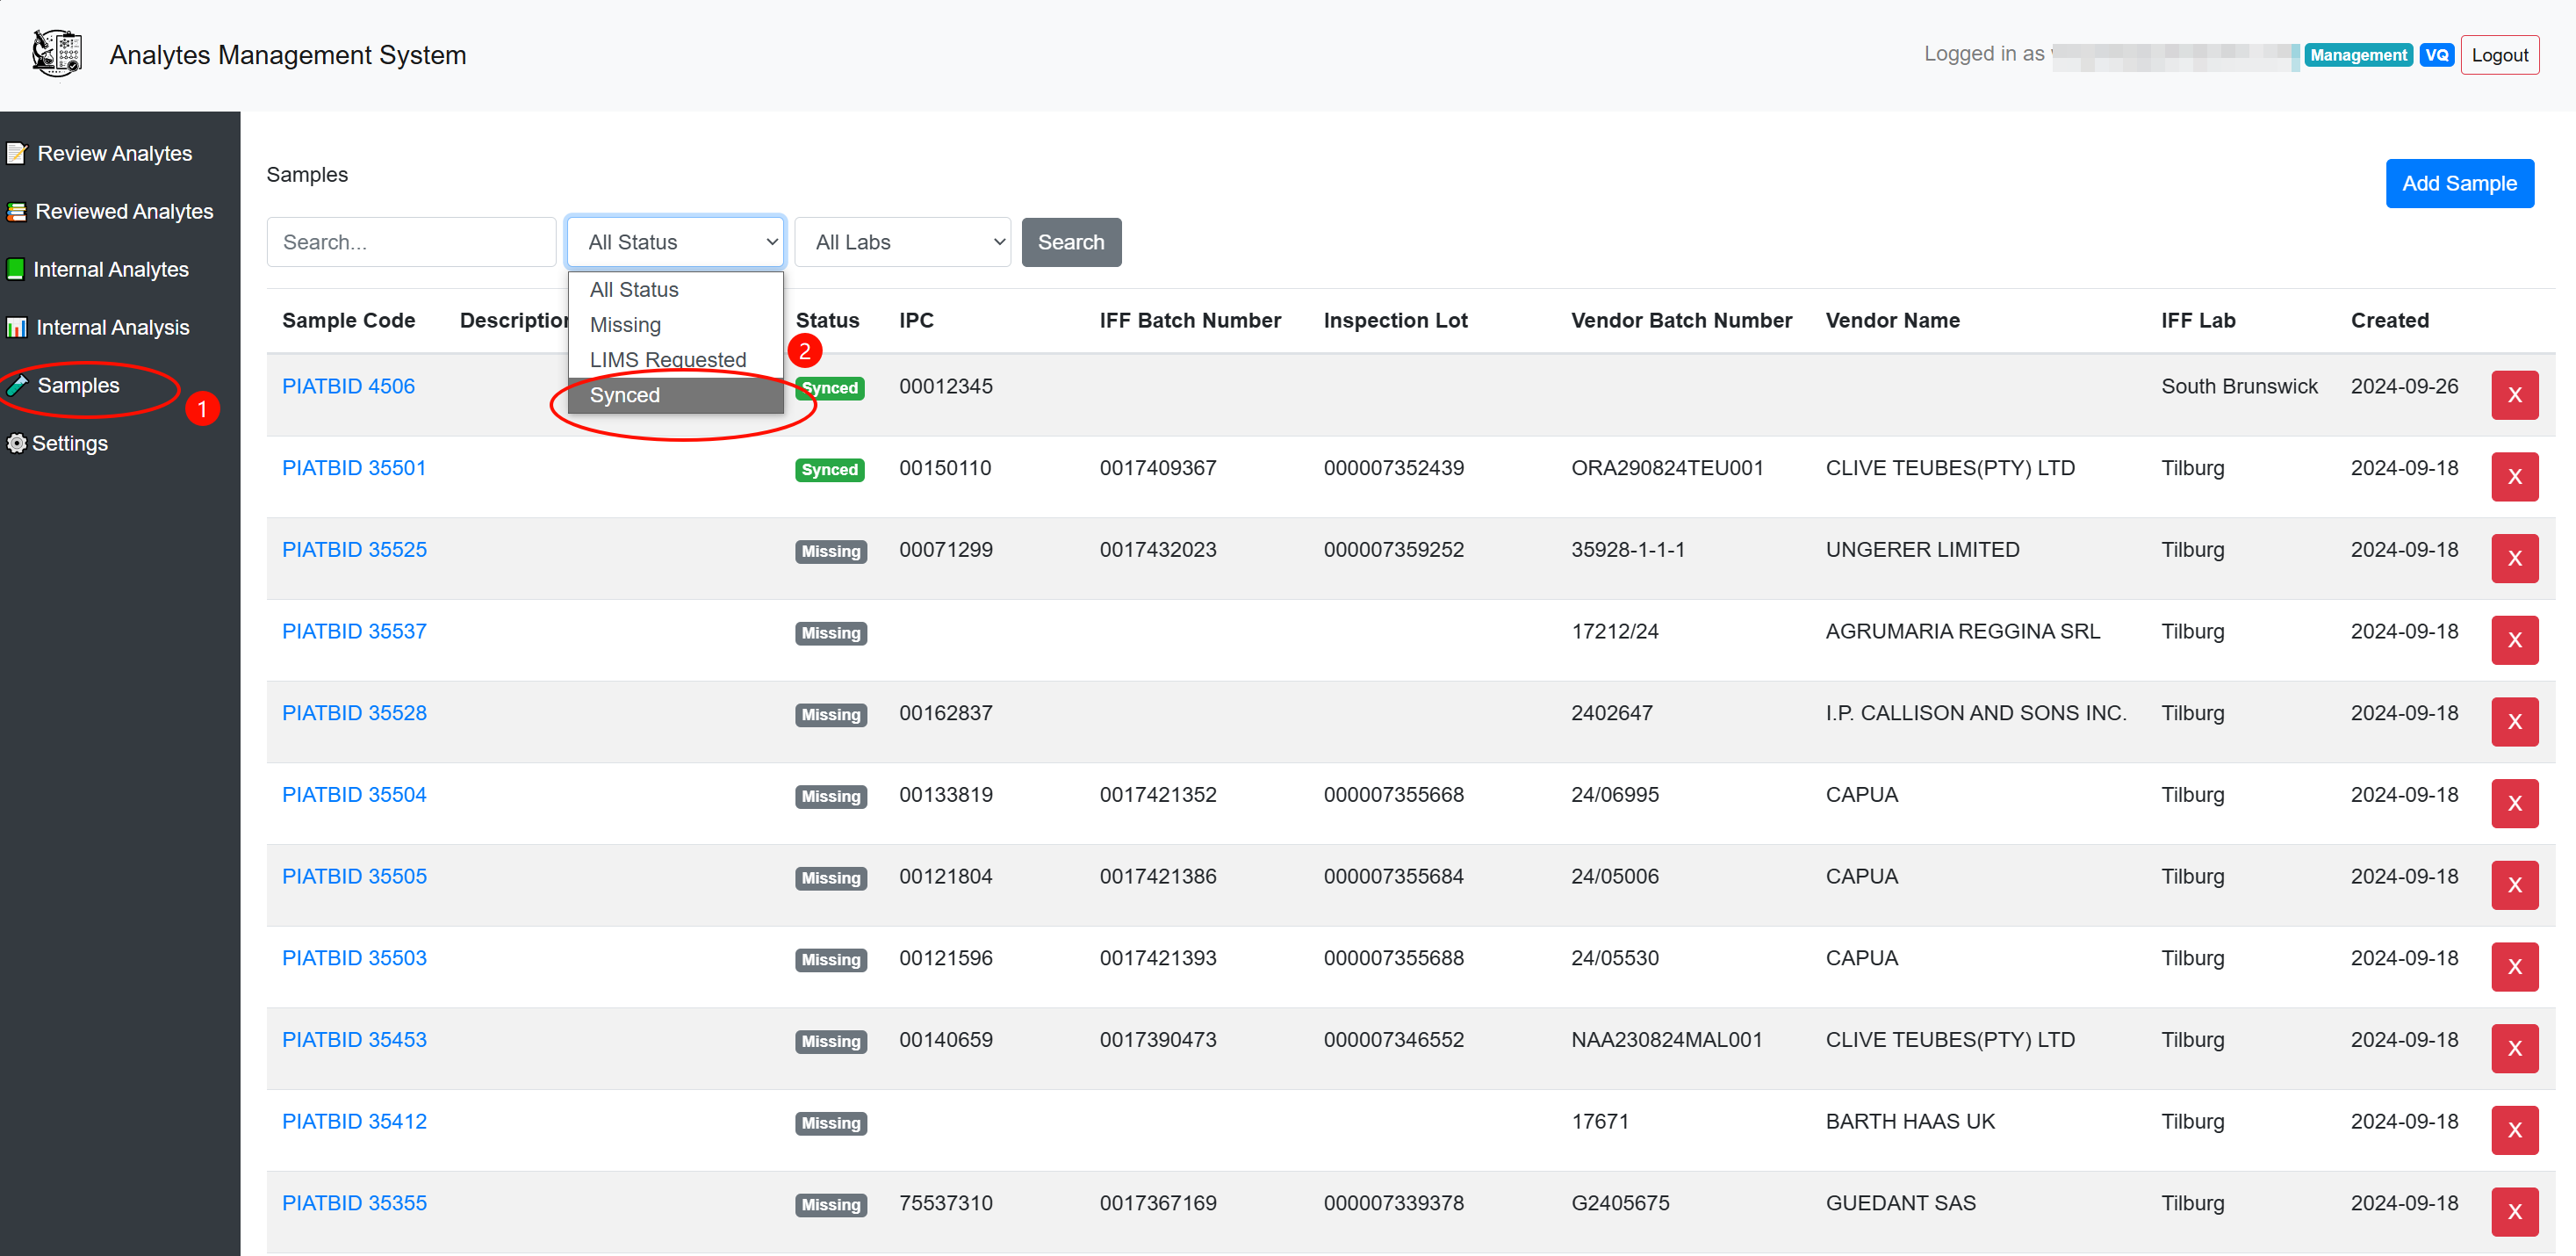
- Navigate to the ‘Samples’ tab:
- Filter the status to display ‘Synced’ samples.
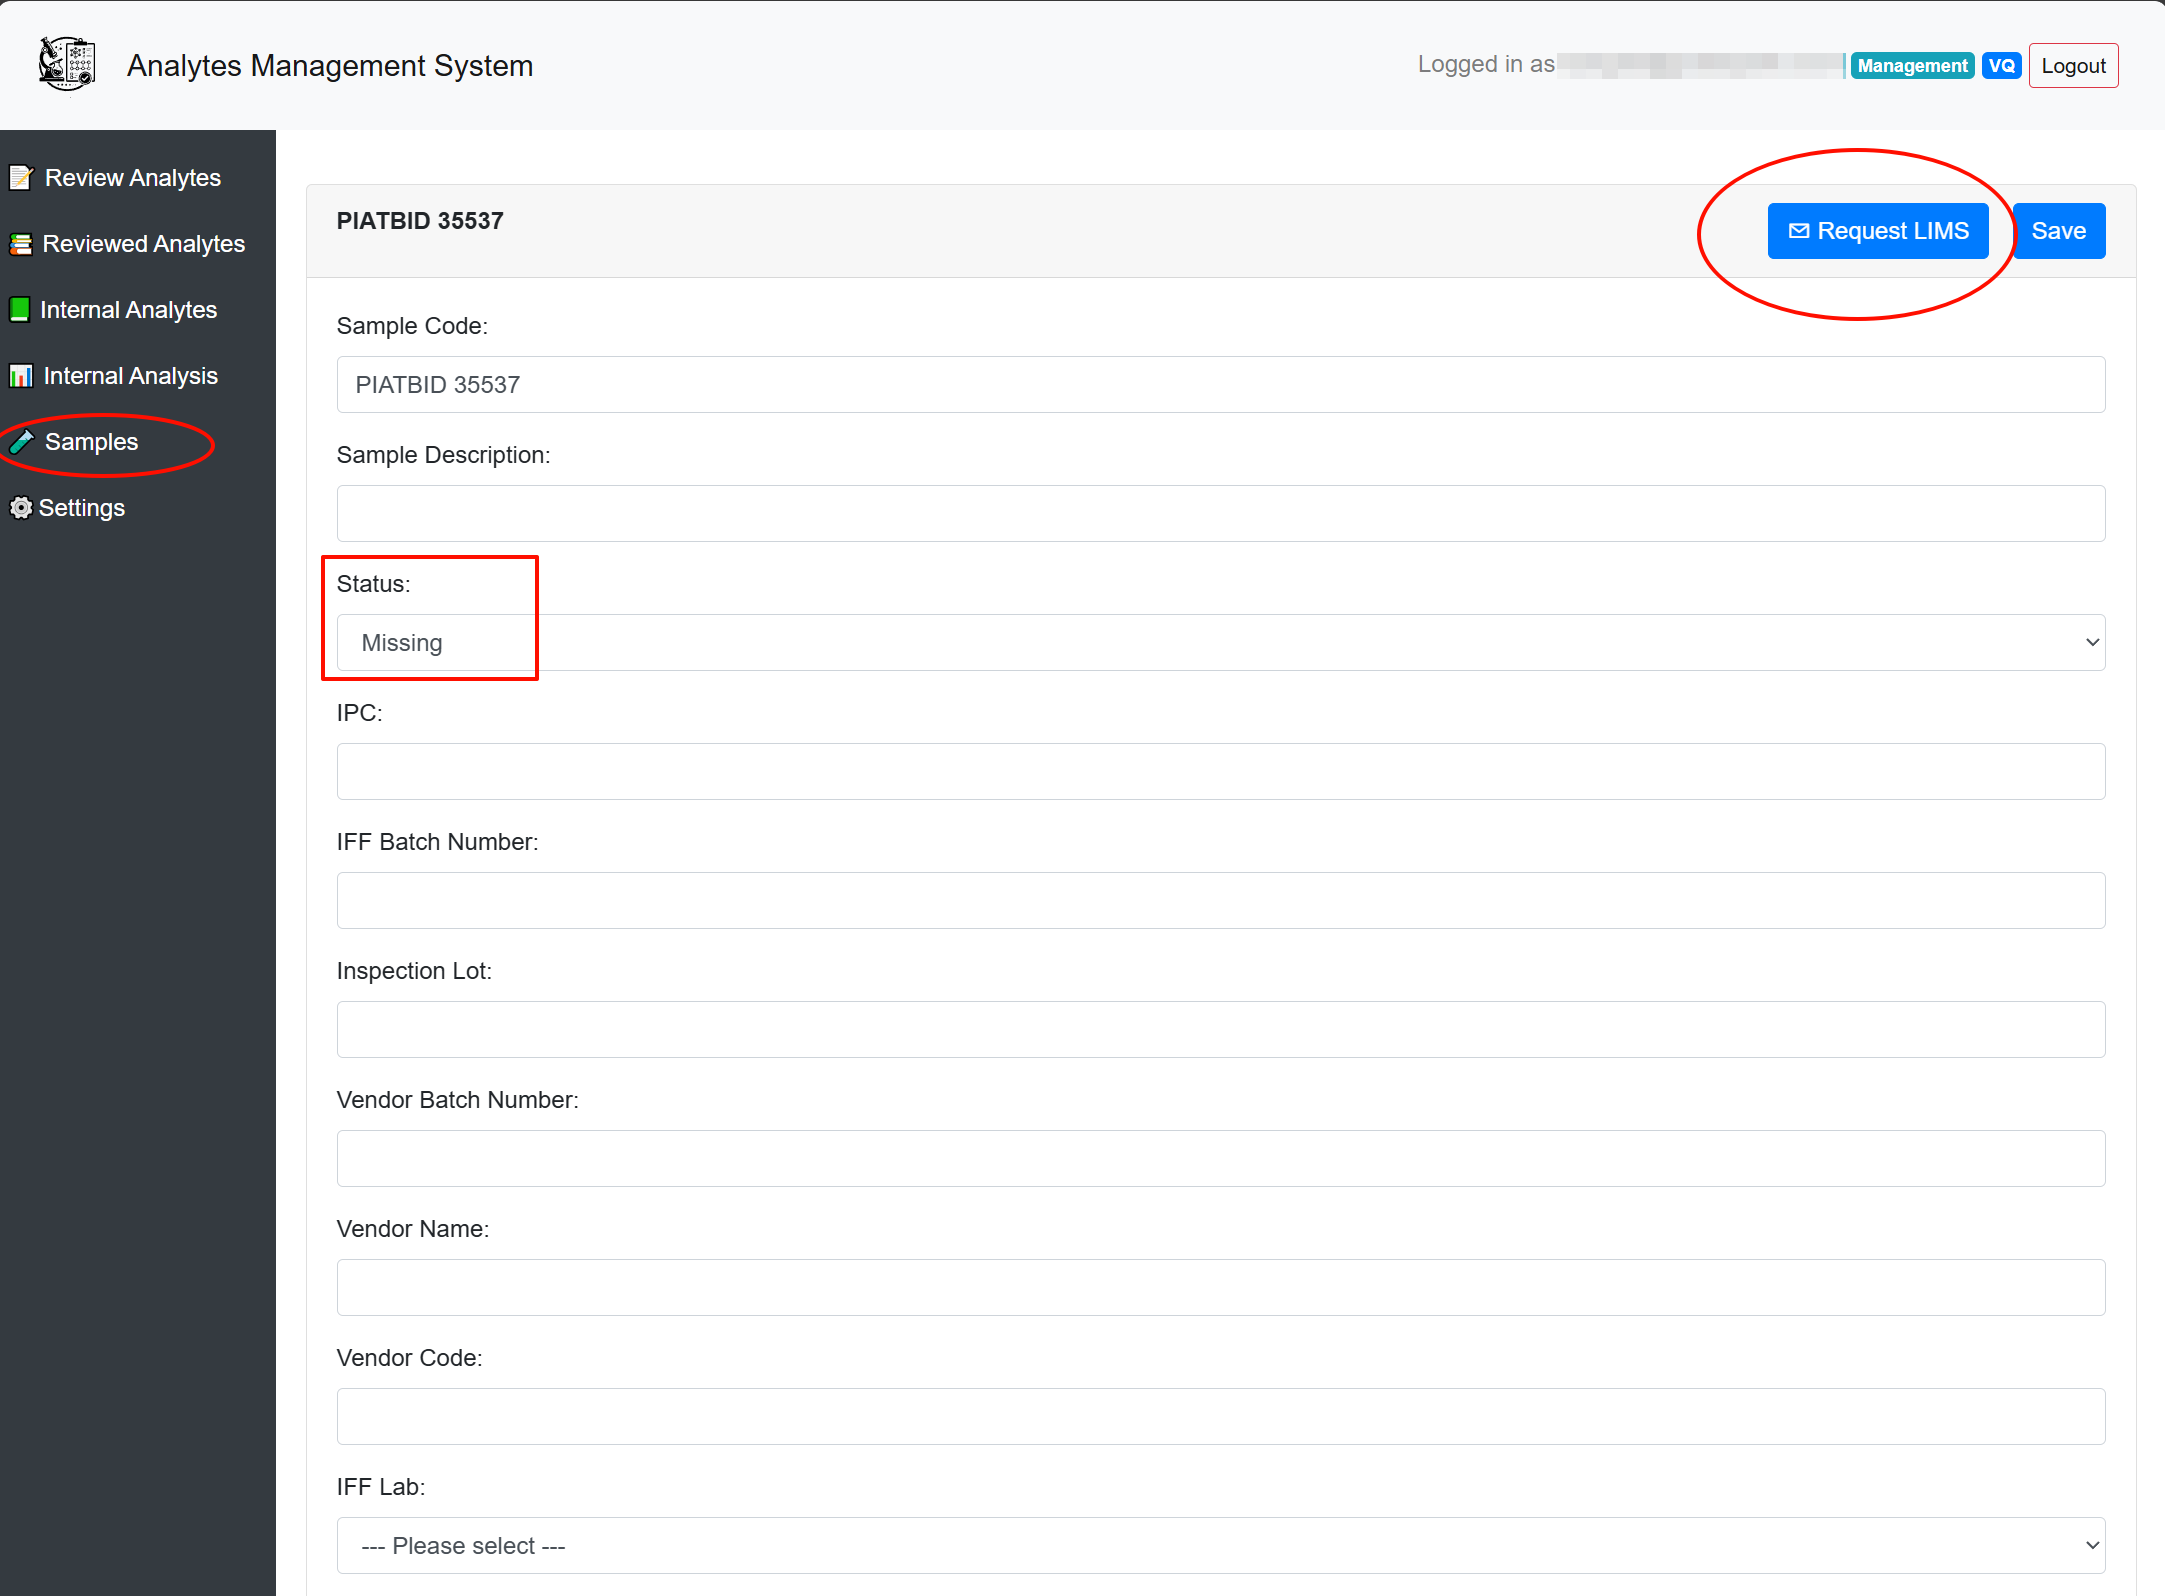
- Edit and Save Metadata:
- Click on the ‘Save’ button to confirm or modify sample metadata.
- Detail View Access:
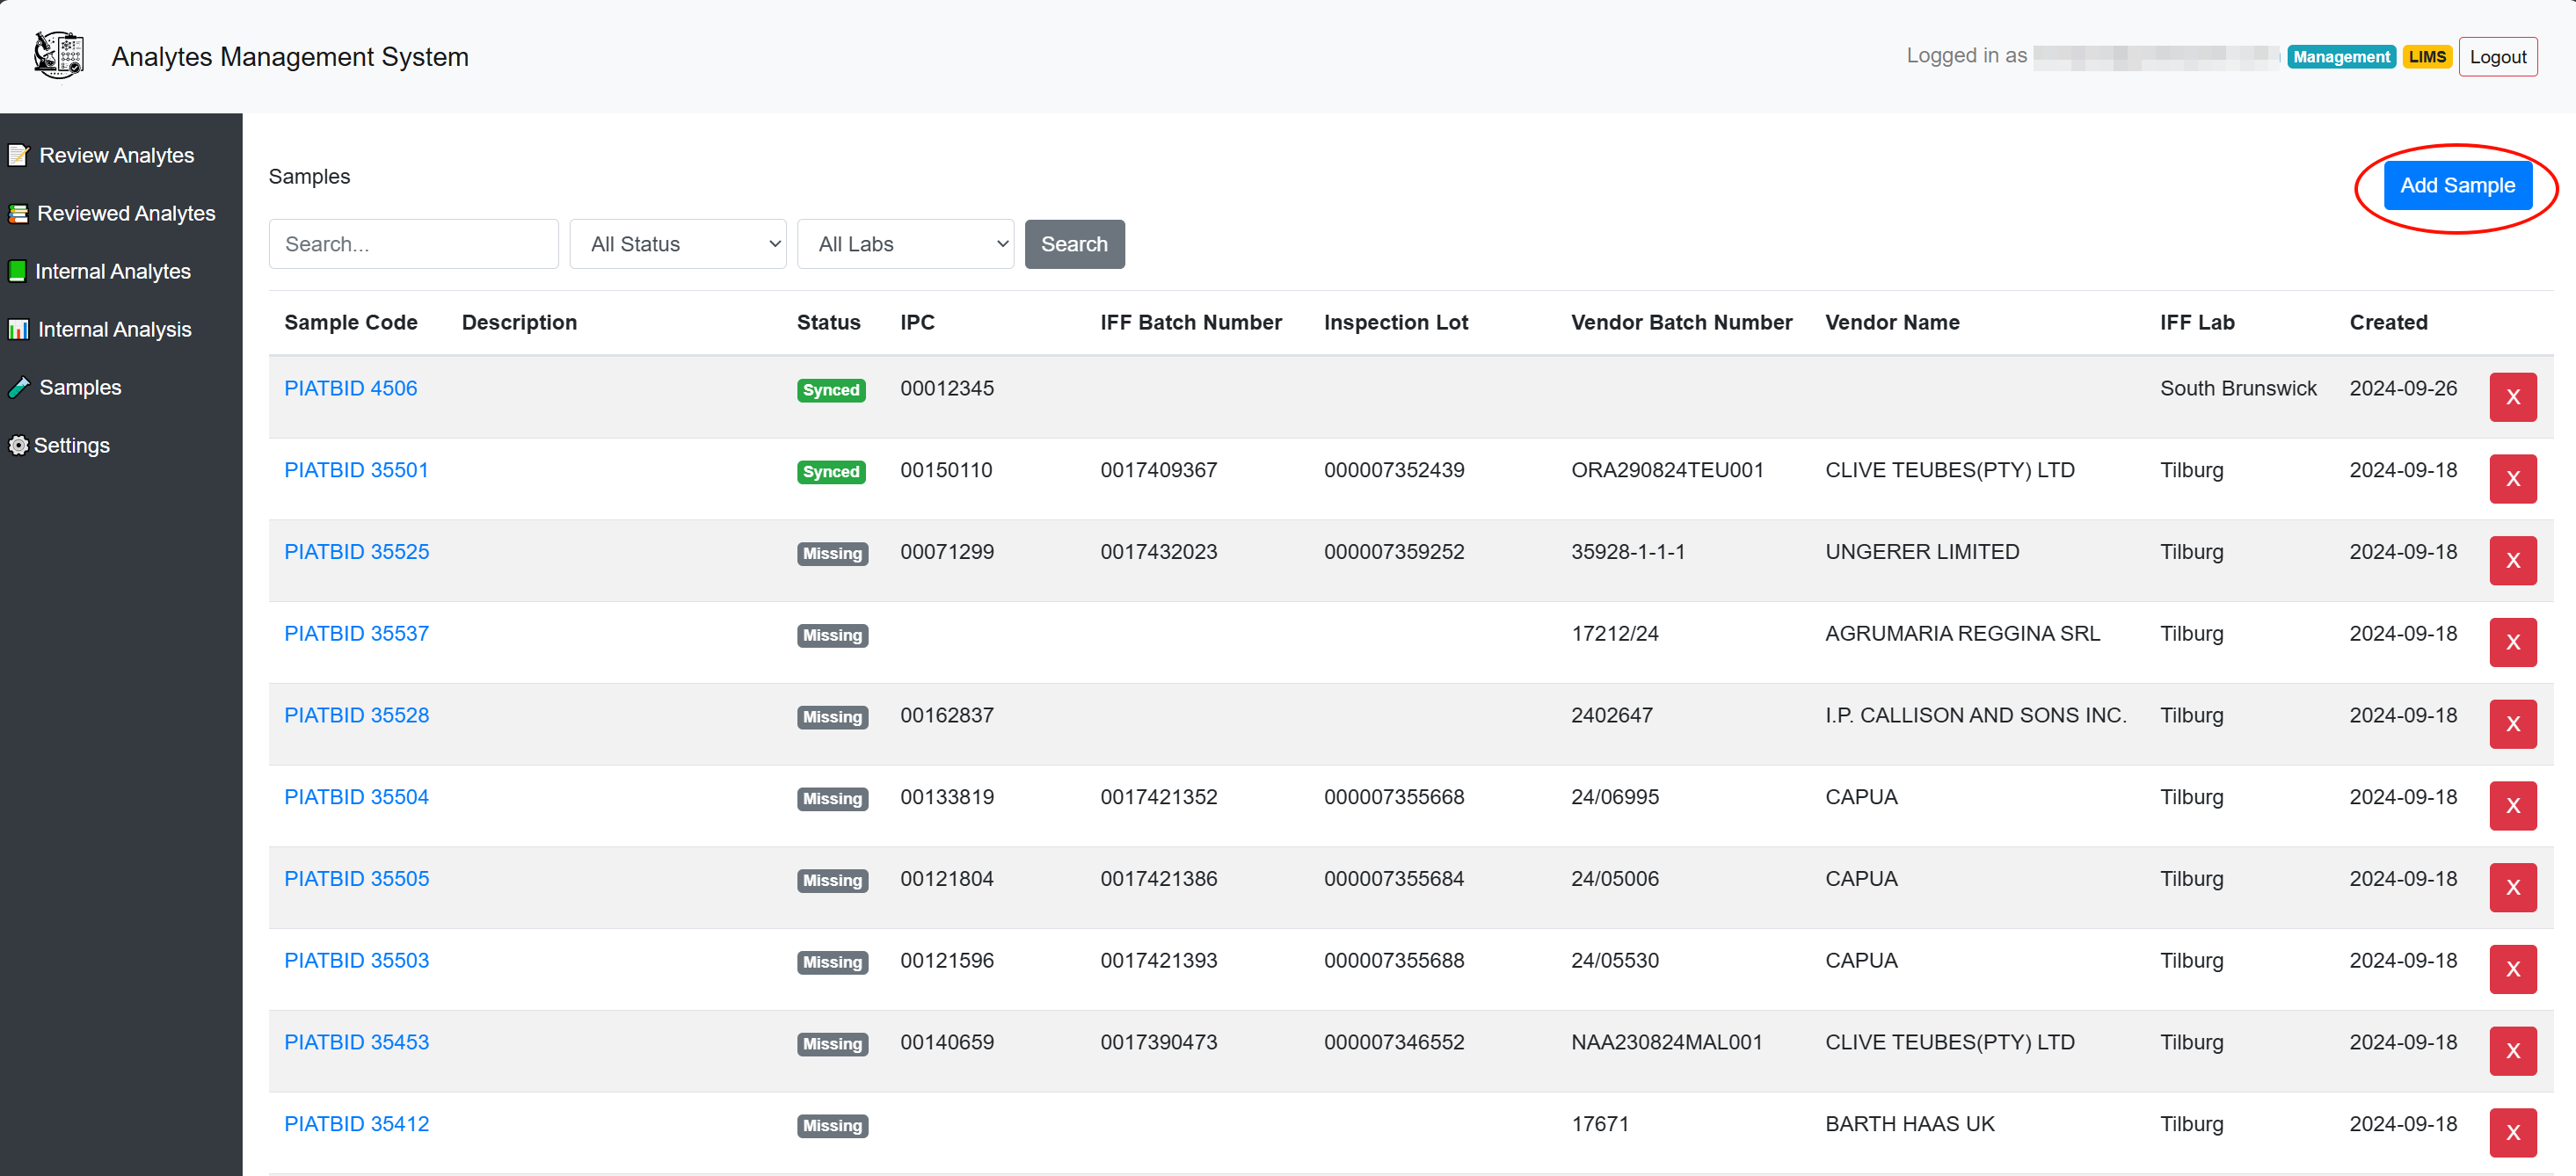
2.5.5.3 Handling Missing Sample Metadata (VQ)
- Filter Missing Samples:
- Navigate to the ‘Samples’ tab:
- Filter the tab to display samples with ‘Missing’ metadata status.
- Navigate to the ‘Samples’ tab:
- Request LIMS Update:
- For each case with missing metadata, click the ‘Request LIMS’ button to send a request to the LIMS team for sample metadata updating.
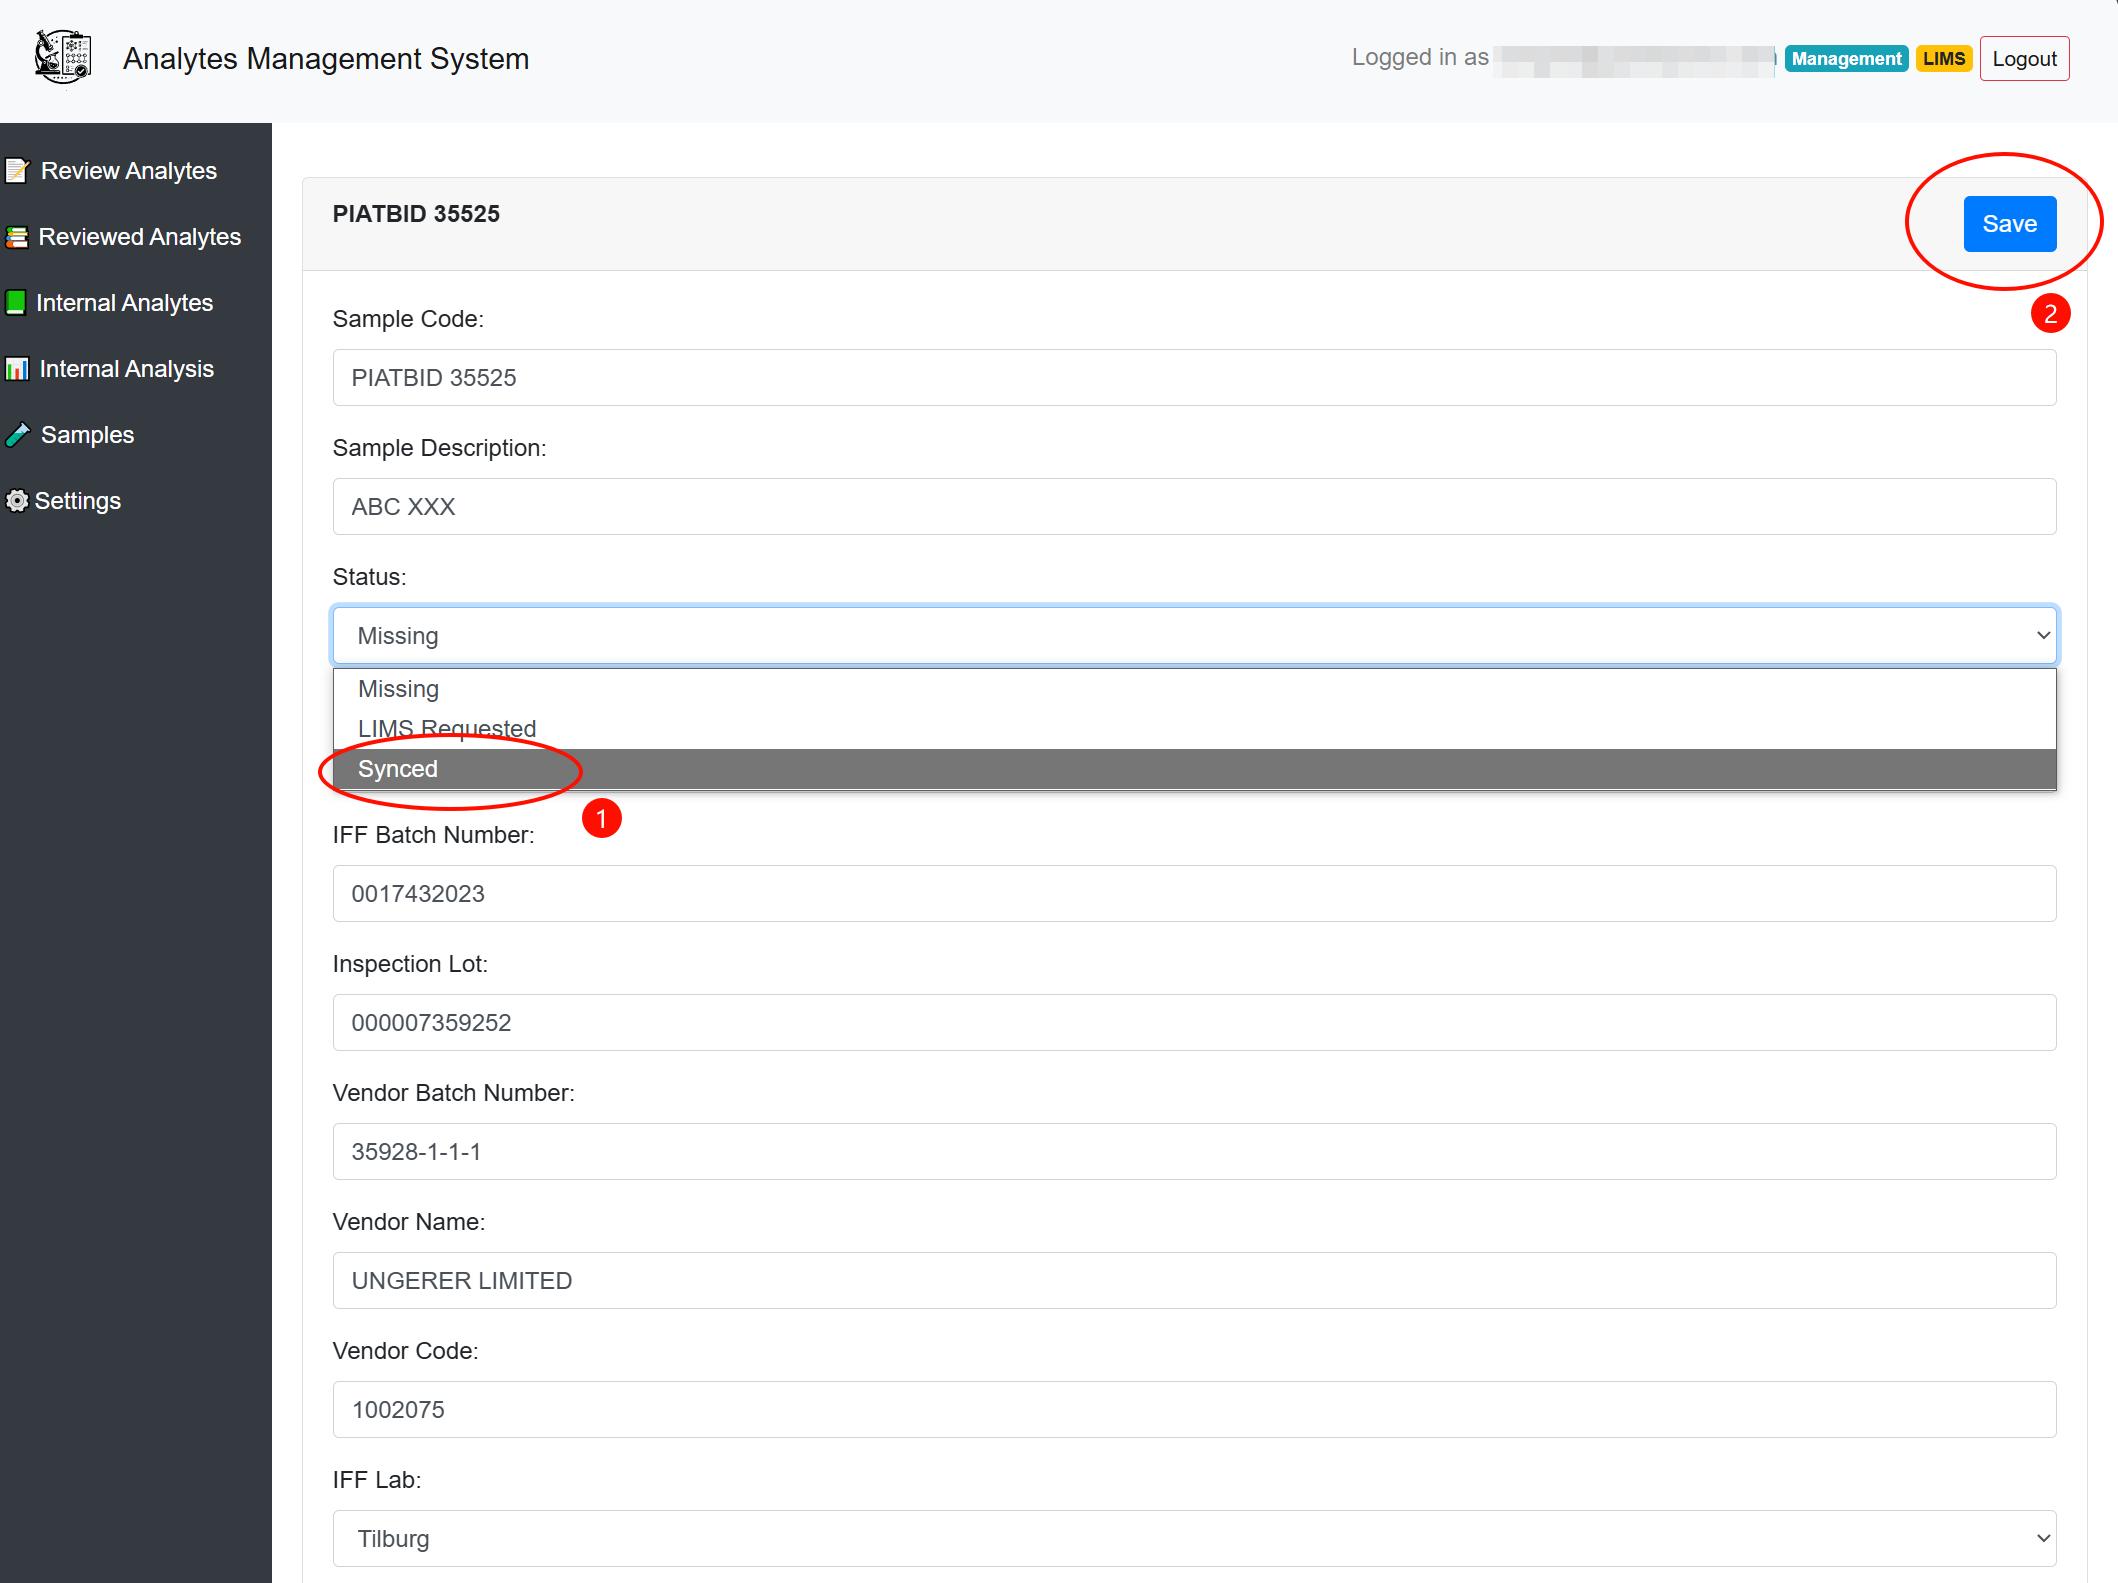
2.5.5.4 Following Up Requests and Updating Metadata (LIMS)
- Add or Update Sample Metadata:
- Adding New Samples:
- Click ‘Add Sample’ to input new sample metadata.
- Select ‘Synced’ as the status before creating the sample entry.
- Click ‘Add Sample’ to input new sample metadata.
- Updating Existing Samples:
- Manually enter any missing metadata for samples and change their status from ‘Missing’ to ‘Synced’.
- Adding New Samples:
- Batch Export Metadata to SharePoint:
- Export the required sample metadata into an Excel file.
- Save the Excel file to the designated SharePoint folder (TB, SB, or SC). Note: The system processes this file and ingests the information automatically every day at 01:00 AM UTC.
- Export the required sample metadata into an Excel file.
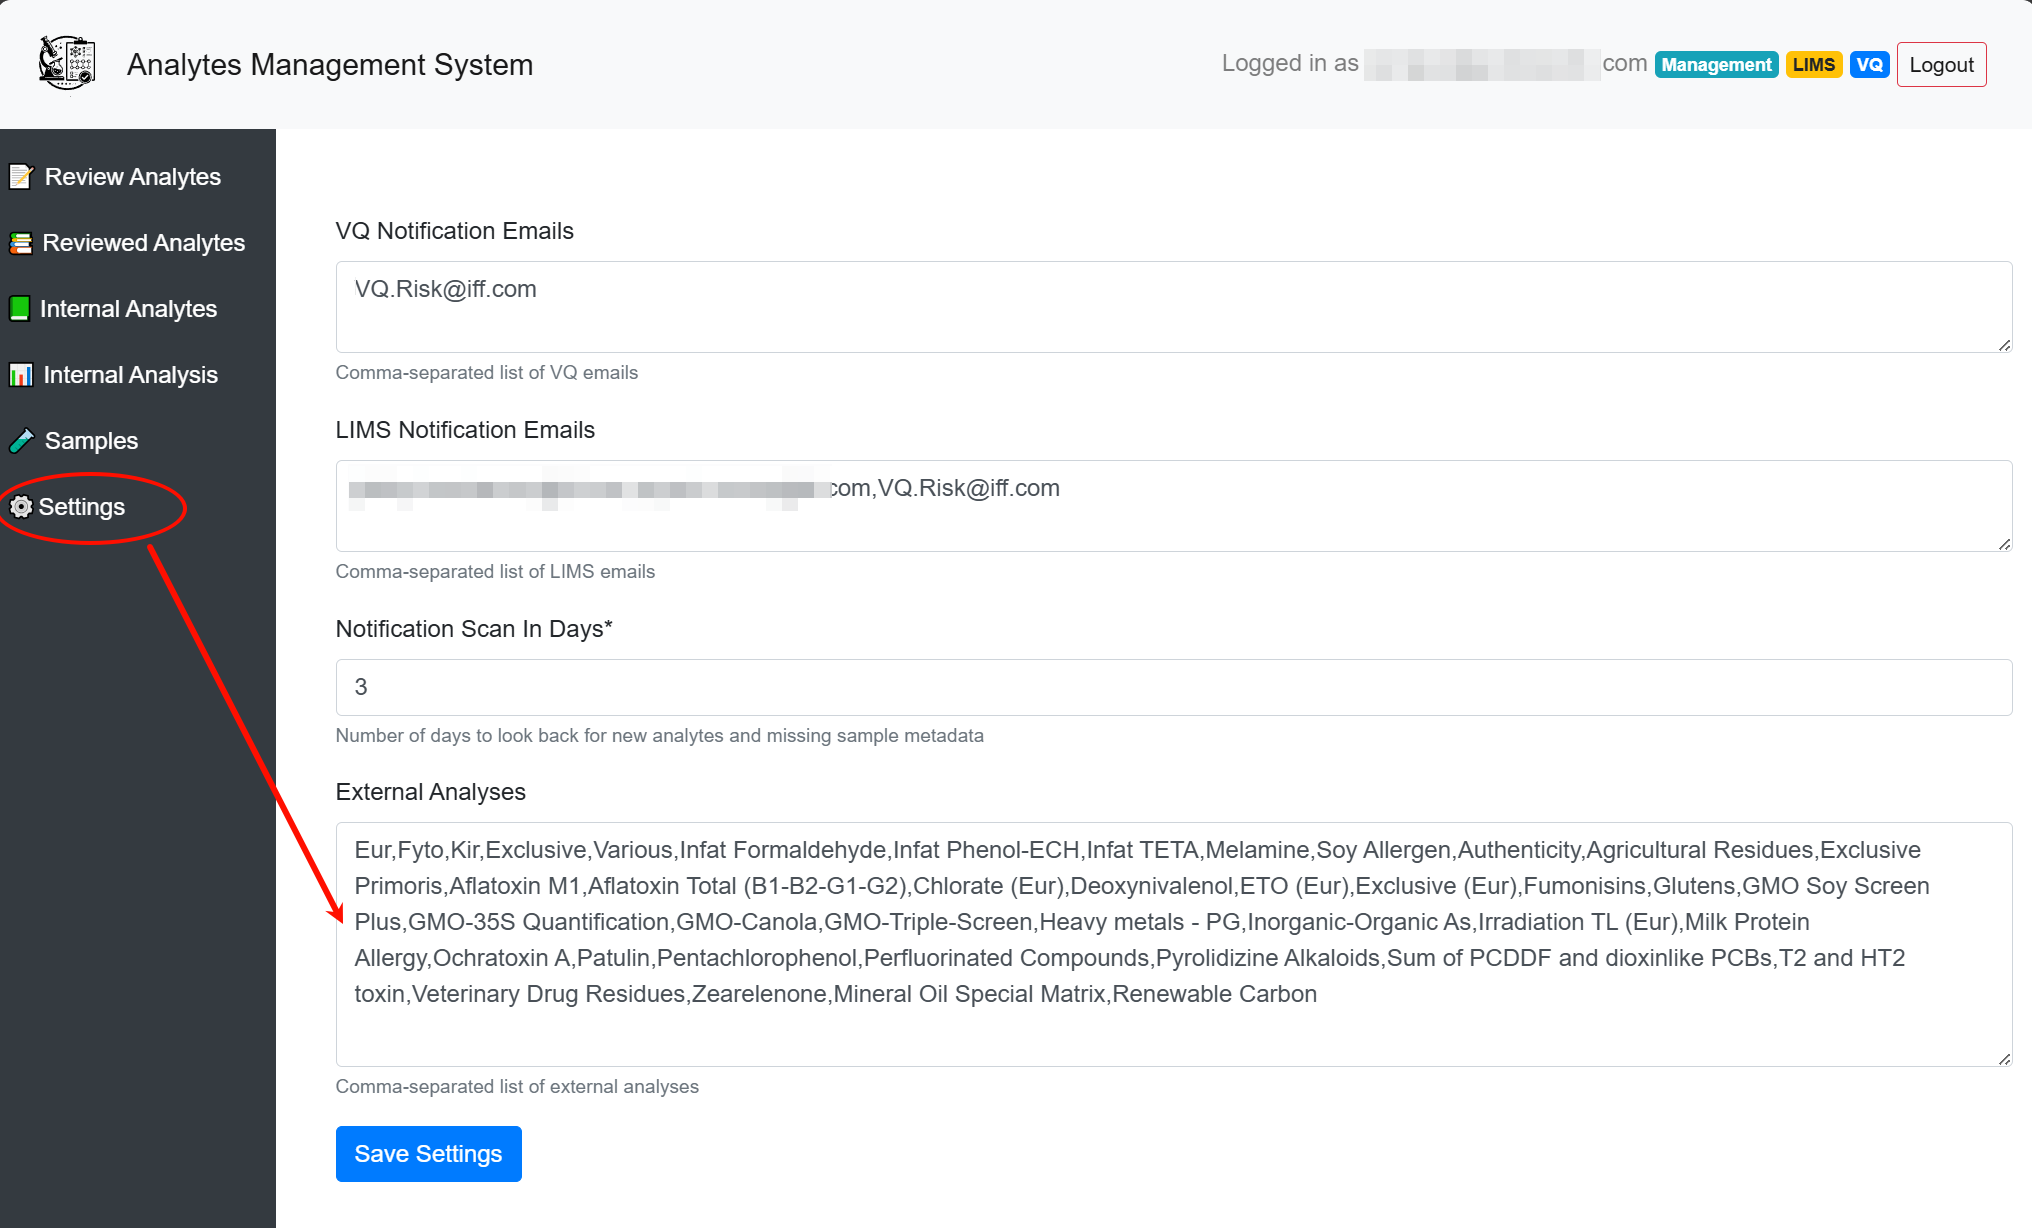
2.5.5.5 External Analysis List Maintenance
Users with admin role can edit and maintain the External Analysis List on the “Settings” page as shown. New Lab Analysis can be added to this list, and the system will automatically refer to it to check whether the latest synchronized sample metadata is marked as “External.” For samples marked as “External,” the system will expect to receive a COA document from an external lab. If the relevant COA is not received within the given timeframe, users will be notified of the situation via email.
 # Uploading Documents
2.6 Uploading via Insighter Portal
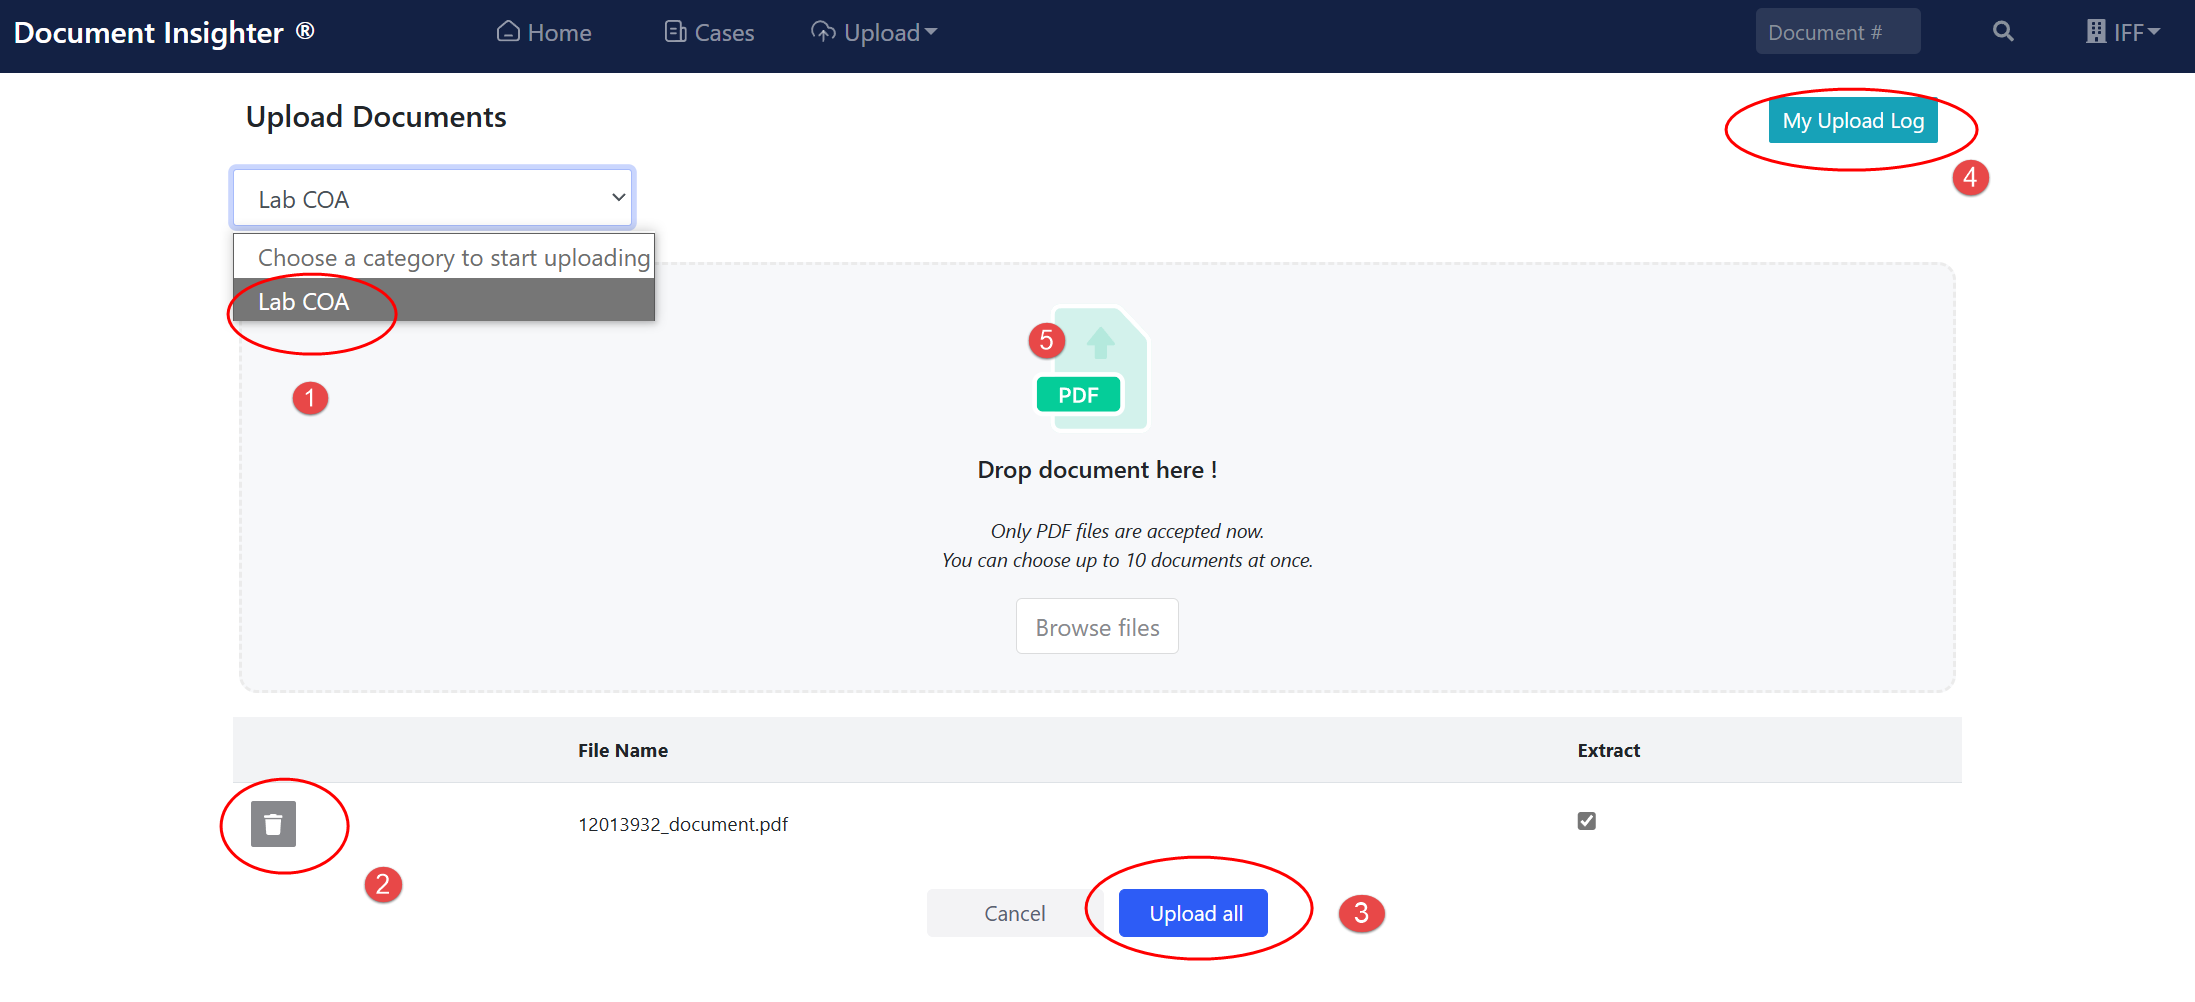
The system supports users upload COA documents manually. On the homepage of the Insighter portal, users can click the “Upload” button to manually upload documents:
① Users need to first select the type of file they want to upload; ② Users can also delete the files from the uploading list. ③ Once the list is ready, click the “Upload” button to complete the uploading process. ④ Click “My Upload Log” to review all the process status of documents user uploaded. Please note that: • Only PDF files are accepted now. • Users can choose up to 10 documents at once.
 # Technical Support
Help desk information including responsible technical contact phone numbers for assistance is currently available at the following period.
- Phone Support: 9:30 – 18:00 HKT, Mon to Fri
- Email Support (service desk connected): 24-Hours as per Section 3.3 of this agreement.
3 Appendix
3.1 Email Limitation and Requirements
Do not send the same COA document to this mailbox multiple times.
Please note that our system can read PDF/JPG/PNG/TIF format and the COA documents should be attached directly to the email. The size of one e-mail can’t exceed 5MB. Our system is not able to open attached emails and Zip folders.