1 General Information
1.1 Purposes
This User Manual serves as a comprehensive guide to the DEEPSITE Document Insighter® system. It aims to familiarize users with the system’s interface and management functions, enabling them to log in, navigate, and effectively utilize the system. Additionally, this manual offers solutions to common issues that may arise during system usage, and provides instructions on accessing resources and obtaining assistance.
1.2 System Overview
Document Insighter® is a cutting-edge digitizing solution powered by Advanced Content Intelligence. It offers a seamless service that allows users to effortlessly read documents, digitize images and tables, extract desired data, and perform various content-related tasks. Furthermore, Document Insighter® facilitates auto validation and ontology, enabling users to compare extracted data from documents with their enterprise SAP database. The system also supports user feedback and continuous learning, leveraging a cloud-based portal to enhance precision and accuracy.
2 Getting Started
2.1 Raising IFF ServiceNow Tickets for New Users Onboarding
This section aims to provide step-by-step instructions to ensure a smooth onboarding process for new users accessing Document Insighter via their IFF ID.By following these steps, you can easily request access to various systems and resources required for your role.
Step 1: Accessing IFF ServiceNow Ticket Rasing Page
Open your web browser and navigate to the IFF IT Service portal and click the “Software/Access Request” Button.

Then click “Ops/Global Quality” Button.

Then click “COA Extraction Toll Access (DEEPSITE Document Insighter System)” Button.

Step 2: Filling out the Ticket Form
Choose “Packaging” as the “Target Document Type”.

Choose Role Types
Role Type Access User Profile Permission Level Viewer view access site users/technicians default Contributor edit/contribute access super users restricted Users belonging to different role types will have different permissions. Viewer can only access the portal/interface (read only), review, upload and download documents. Contributor can access the portal/interface, edit the extracted value, revise the harmonized result and manage the Cases. For the detailed permissions associated with different user role, please refer to the table below.
Main Functions Viewer Contributor Search and Filter √ √ Review and Download Spec PDF √ √ Edit Extraction Result of Spec √ Report Issue in Spec Page √ √ Upload Spec Documents √ √ Change Extraction Status √ Access and Review Case Page √ √ Upload Spec to a Case √ √ Save As/ Duplicate a Case √ Edit the Spec for a Case √ Change Case Status (Confirmed or Reviewing) √ Delete a Case √ Remove a clustered Spec from a Case √ Generate Export Digital Spec in Case Page √ √ Choose the desired drawings provided by AI √ Capture the desired drawings by system built in tool manually √
Step 3: Submit and Tracking Your Ticket
After submitting your request ticket, IFF Service Now team will process your request and then transfer it to DEEPSITE support team and our support team will receive the corresponding ticket as shown below:

Log on If required, you can communicate with the support team through comments or by updating your ticket.
2.2 Logging on
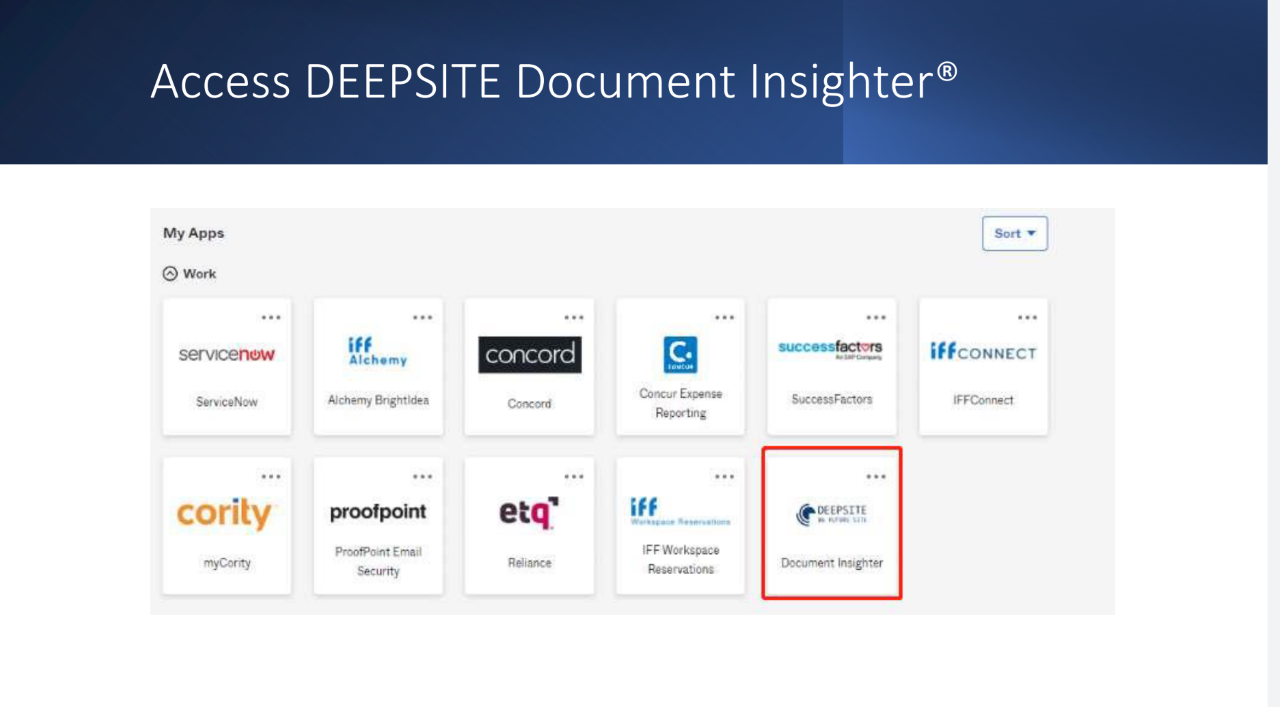
Clicking the “Document Insighter” icon in IFF Okta Dashboard page or you can enter the URL https://document-insighter.godeepsite.com in your browser to access the login page as shown:
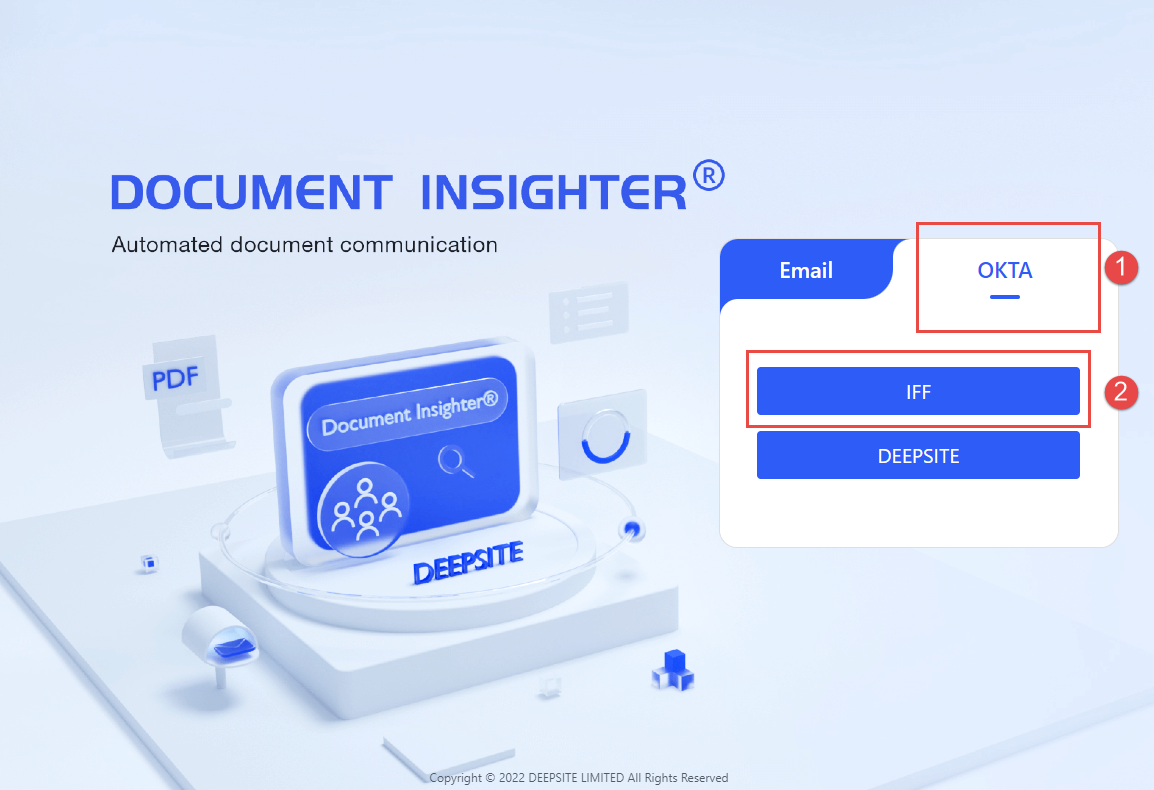
To access the DEEPSITE Insighter portal, follow these steps:
- Click on the “OKTA” button ①.
- From the options provided, select “IFF” ②.
- Enter your IFF ID and password in the designated fields.
Once you have completed these steps, you will be successfully logged in to the DEEPSITE Insighter portal.
2.3 Homepage
The system can archive data automatically with convenient and rich search capabilities. After logging in, click the “Home” button in the top ribbon to enter the home page, as shown.
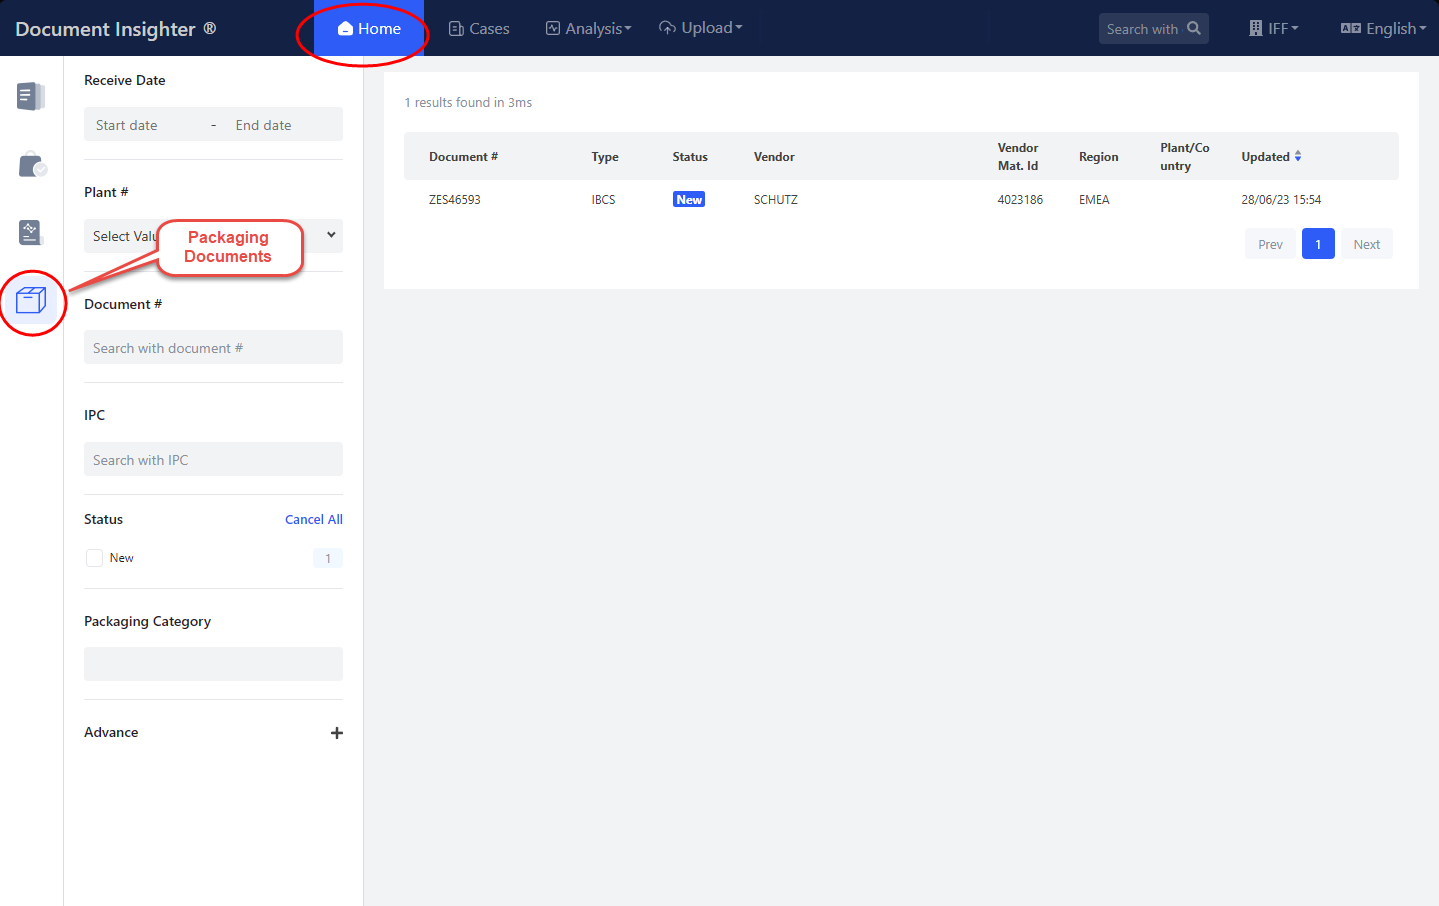
The left filter panel provides users with more detailed classification and filtering functions:
- “Receive Date”: The email received date or uploaded date.
- “Document #”: The number of processed document. By default, the Packaging Material ID is used as the Document #.
- “Plant #”: Filter all the extractions by IFF Plant ID.
- “Status”: Following up status such a “Posted”, “Modified”, etc.
- “Vendor Name”: Filtered by vender name.
- “Packaging Category”: Filter all the extractions by packaging document category, such as Drums, Cartons, Jerrycans etc..

2.3.1 Quick Search Area
Users can quick access the search function at the top ribbon from any page. After entering the Document # here, it will jump to the corresponding review page.

2.4 Spec Page
2.4.1 Display and download the original packaging documents
Upon successfully logging in, the Packaging document will be displayed on the left-hand side of the page. In addition, users can download a PDF version of the document by simply clicking the download button.

2.4.2 Extracted Result Display
The extracted data will be displayed on the right side of the page. Our Ontology Engine automatically maps the extracted values to the standard value option. To view the historical extracted records of the packaging document, click button ① in the image below. This feature is particularly useful when there are multiple versions of the document with the same Document #:


2.5 Main Functions for Spec Page
2.5.1 Revise Extracted Results
For the field that users (Contributor only) want to modify, they can clear the existing content, and the system will automatically display all available options for users to select again. Alternatively, users can directly enter the desired modification. After making the changes,
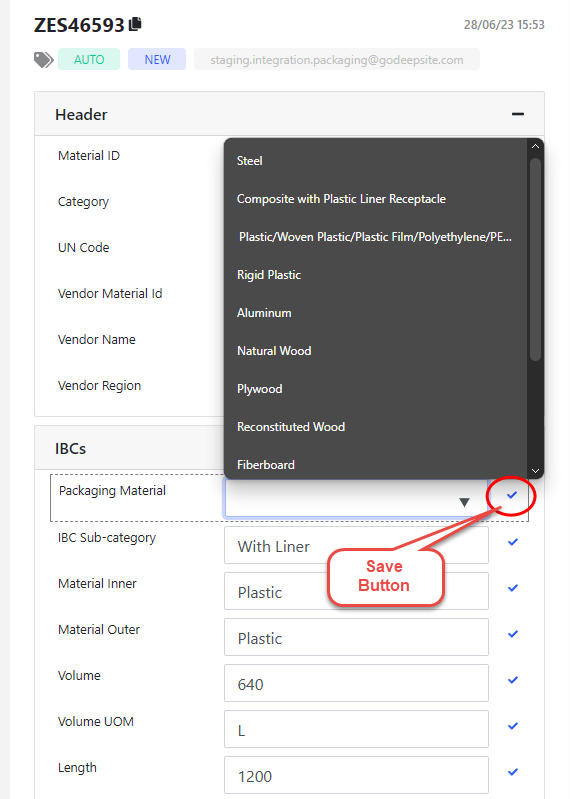
Revise Results Please remember to click on the blue checkmark icon on the right to save the changes to the field.
Once saved, the icon will change to the following style, and hovering the mouse over it will display the modification record.
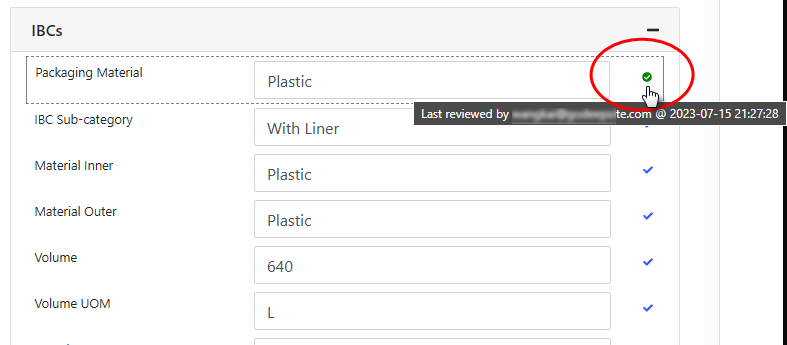
Revise Icon
2.5.2 Change Extraction Status
Once the user has made changes and saved some field values, the status will change from “New” to “REVIEWING”. If the user confirms that all extraction results are correct, they can confirm and lock the extraction by clicking the “Confirm” button located in the top right corner.
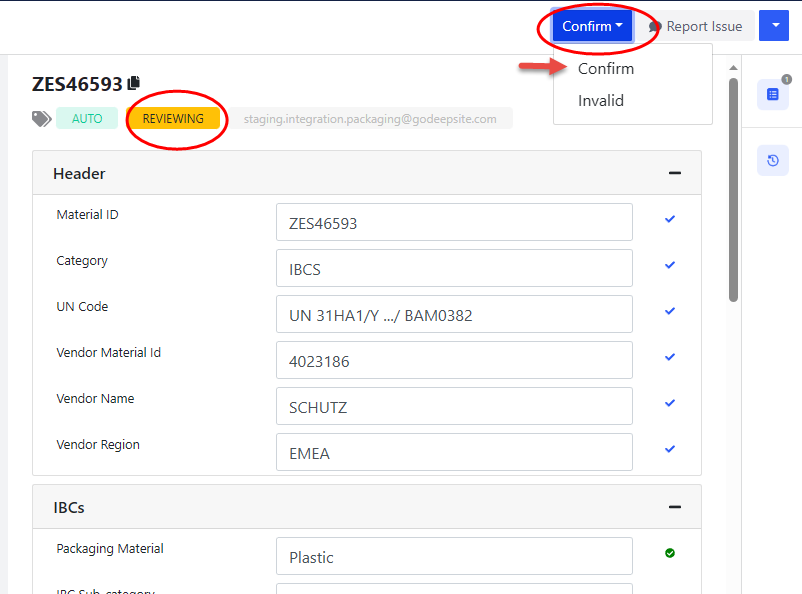
Change Status By clicking “Yes”, the extraction status will change from “Reviewing” to “Confirmed”, and all extraction values will be locked and cannot be edited.

Change Status Clicking the “Start Review” button at the same location again restores the ability to modify and edit, and the status will change back from “Confirmed” to “Reviewing”.
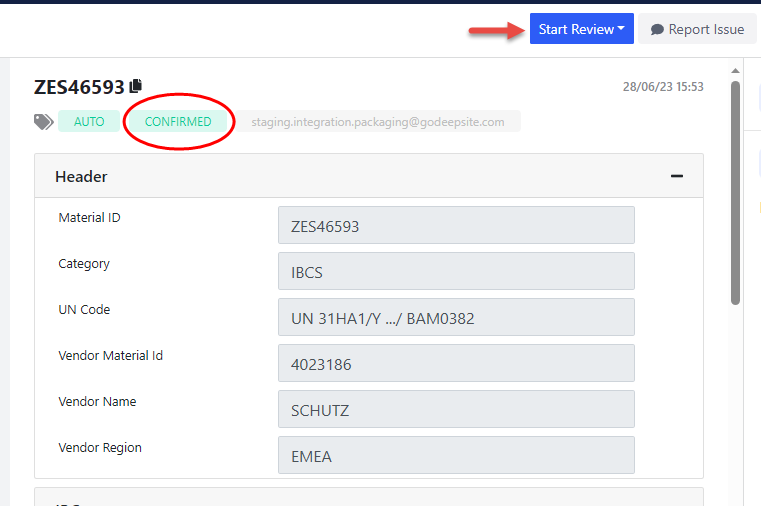
Change Status
2.5.3 Issue Report
For most cases, even in some new formats, our A.I. engine can automatically detect and extract the tables and data points that users are interested in. For some processing failure cases, the system needs to collect samples in order to finetune the model and continuously optimize model performance. The system will collect user feedback on extraction issues in the following ways:
- Send email directly to support@godeepsite.com for issues like:
* Cannot access the Insighter web portal
* Insighter system related question or queries
* Or other general issues- Report issue for a specific COA document:
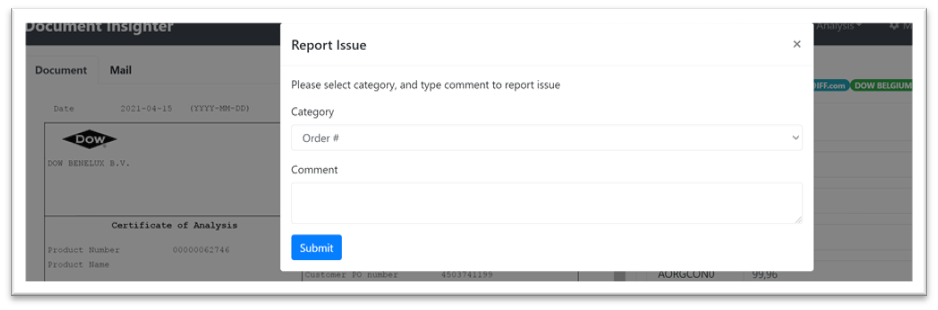
Report issue manually by clicking the “Report Issue” button. Pick an issue category, like “IPC/Extraction” and leave your comment in the dialog.
- Users can check the status of following up and review all the support cases/issues they reported by clicking the button ① to open the “My Support Cases” page.
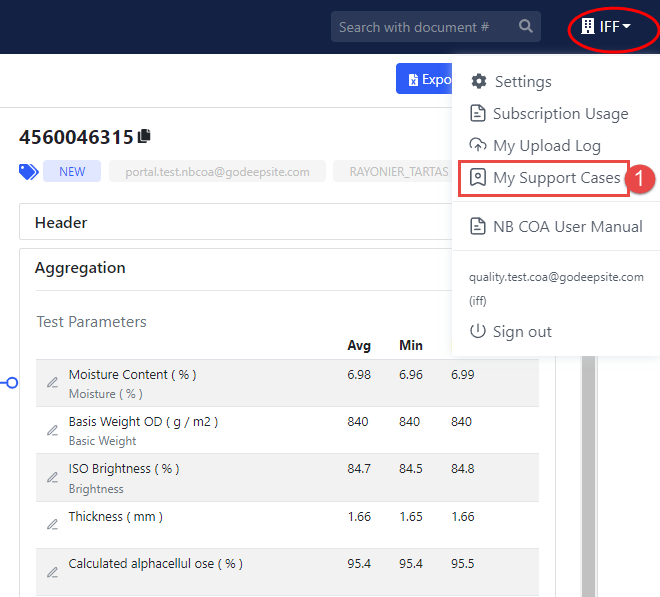
* The system will forward this issue to our Technical Support team, the team will follow up on the issue, and update you within 4 days.2.6 Case Page (Harmonized Result)
2.6.1 Harmonized Result Display
2.6.2 Filter Panel
2.6.3 Case Management/Manage Harmonization Results
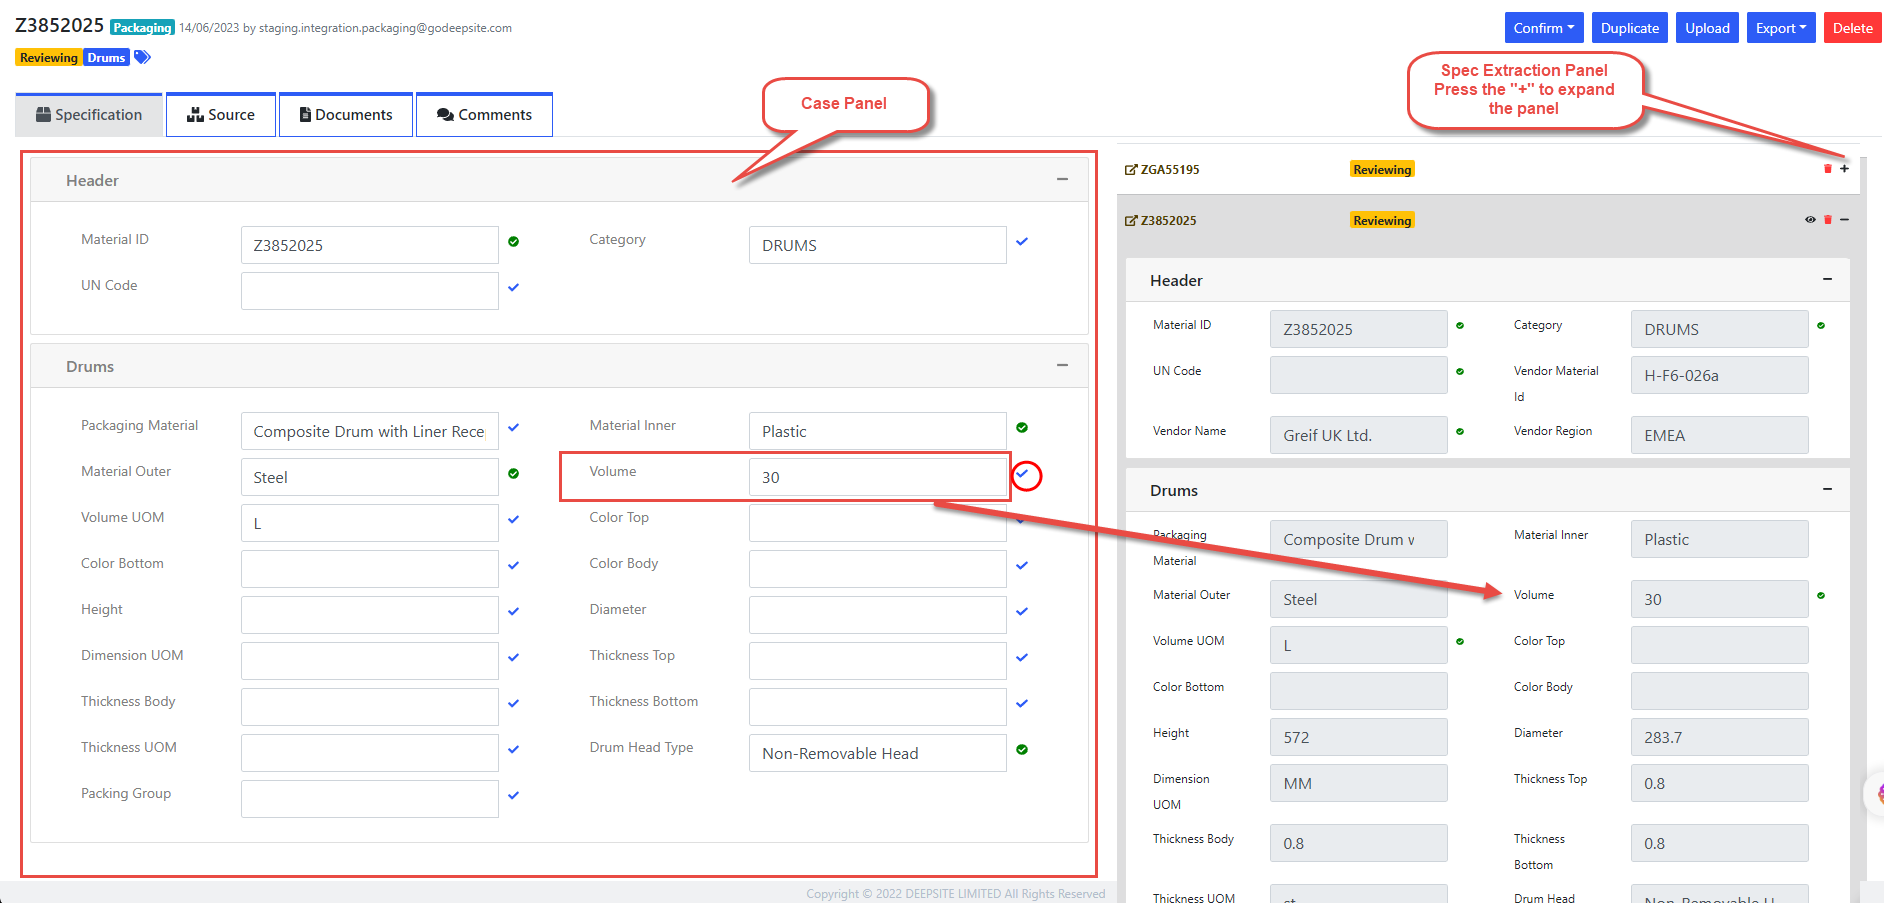
Edit result: Users can edit the extracted result and clicking the green checkmark icon on the right side to save the changes. Also users can pick extracted value from the right side Spec extraction panel.
Edit Result Save as: Users can save/duplicate the current result as a new case by clicking the “Duplicate” button.
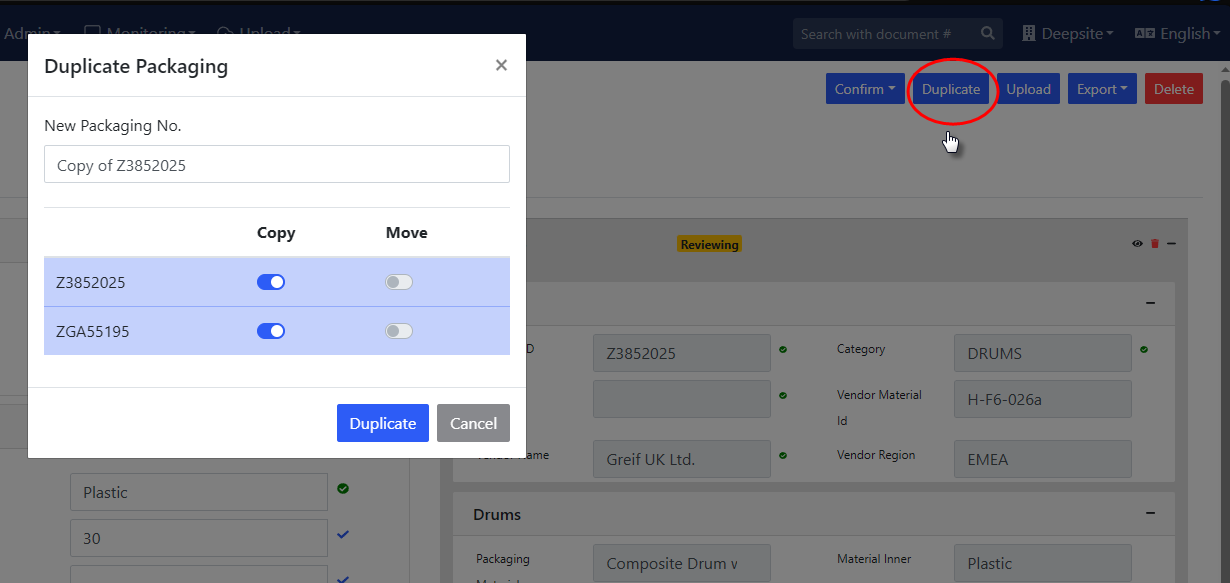
Duplicate Result Upload a new Spec to current Case: Users can upload a new packaging document to the current case by clicking “Upload” button and selecting “Packaging Spec” as extraction module. The system will automatically extract the data from the new document.

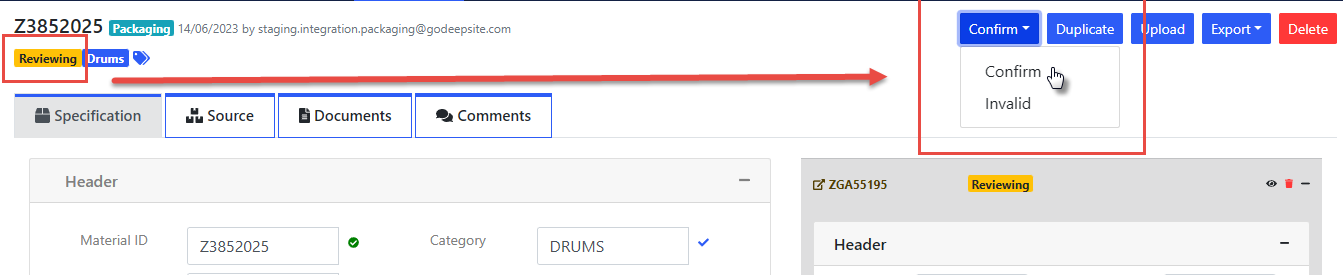
Upload Spec Change Status: Users can click the “Confirm” button to confirm the extraction result. The status will change from “Reviewing” to “Confirmed”, and all extraction values will be locked and cannot be edited. Clicking the “Start Review” button at the same location again restores the ability to modify and edit, and the status will change back from “Confirmed” to “Reviewing”. Also users can click “Invalid” button to mark the current case as invalid.
Change Status Delete a case: Users can delete a whole case from a packaging category by click the “Delete” button.
Remove a clustered Spec from a Case: Users can remove a clustered Spec from a case by clicking the “Dustbin” icon. Only the connection between the Spec document and the Case will be removed, the extraction of the Spec will not be deleted

Remove Spec
2.6.4 Export Harmonized Result
Generate and Export Digital Spec for a case or a single spec to a WORD file:
The system will generate a digital spec for the case and export it to a WORD file. The digital spec will include all the extracted data from the Spec documents in the case. The digital spec will be generated based on the template of the packaging category. If the template is not available, the system will generate a default template. The system will also provide a PDF version of the digital spec.
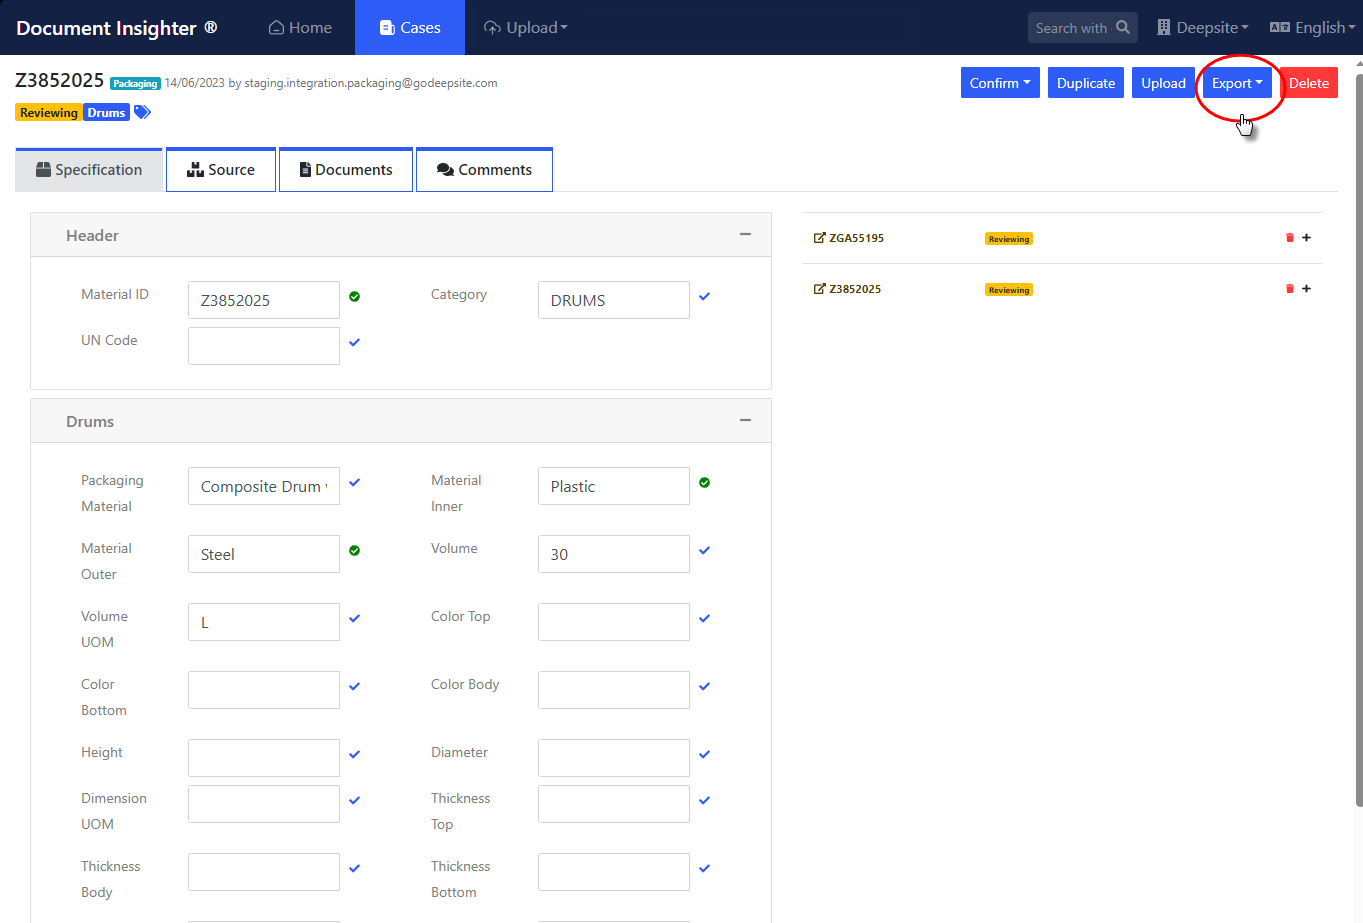
Export Case By default, the data in the case will be exported to the following template:
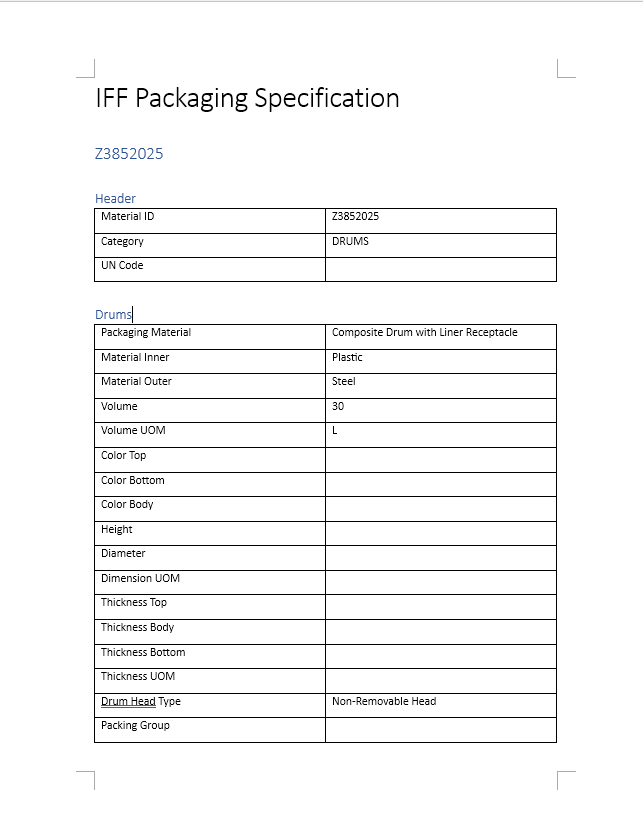
Word Template If users want to export the data from a single Spec document, they can click the “Export” button on the Spec extraction page:
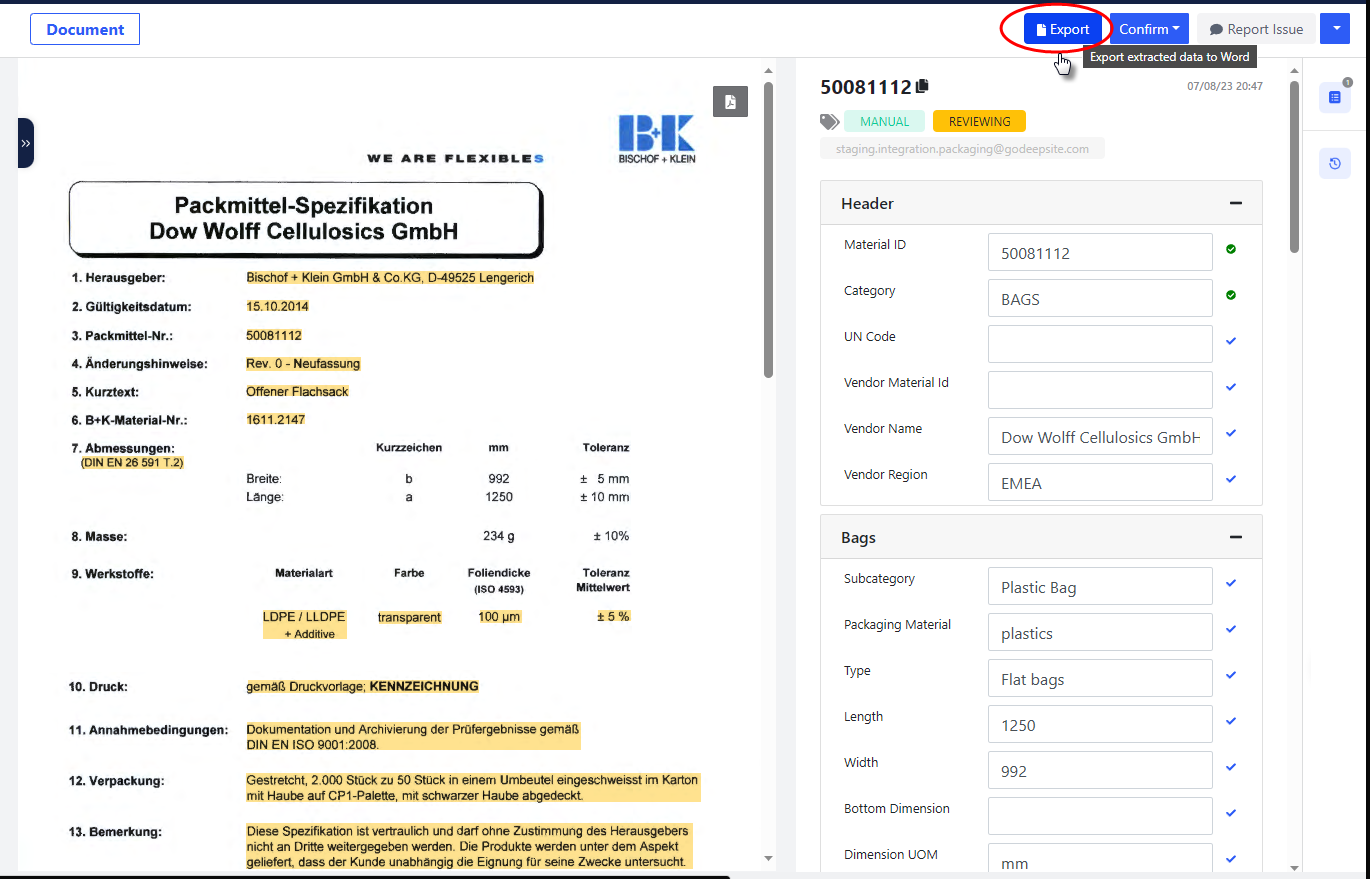
Export Spec Export Multiple Cases to a Excel file for preparing RFP/Bidding
Choose Design Drawings for a case from AI Drawings Cut Outing Tool
3 Manually Uploading Packaging Document
3.1 Uploading via Insighter Portal
On the homepage of the Insighter portal, users can click the “Upload” -> “Documents” ① button to access the packaging documents upload page:
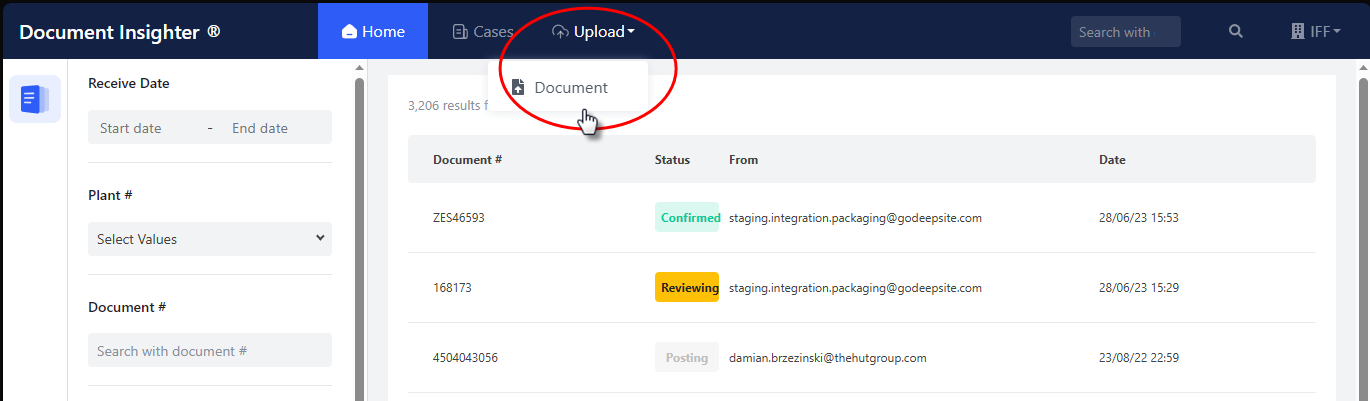
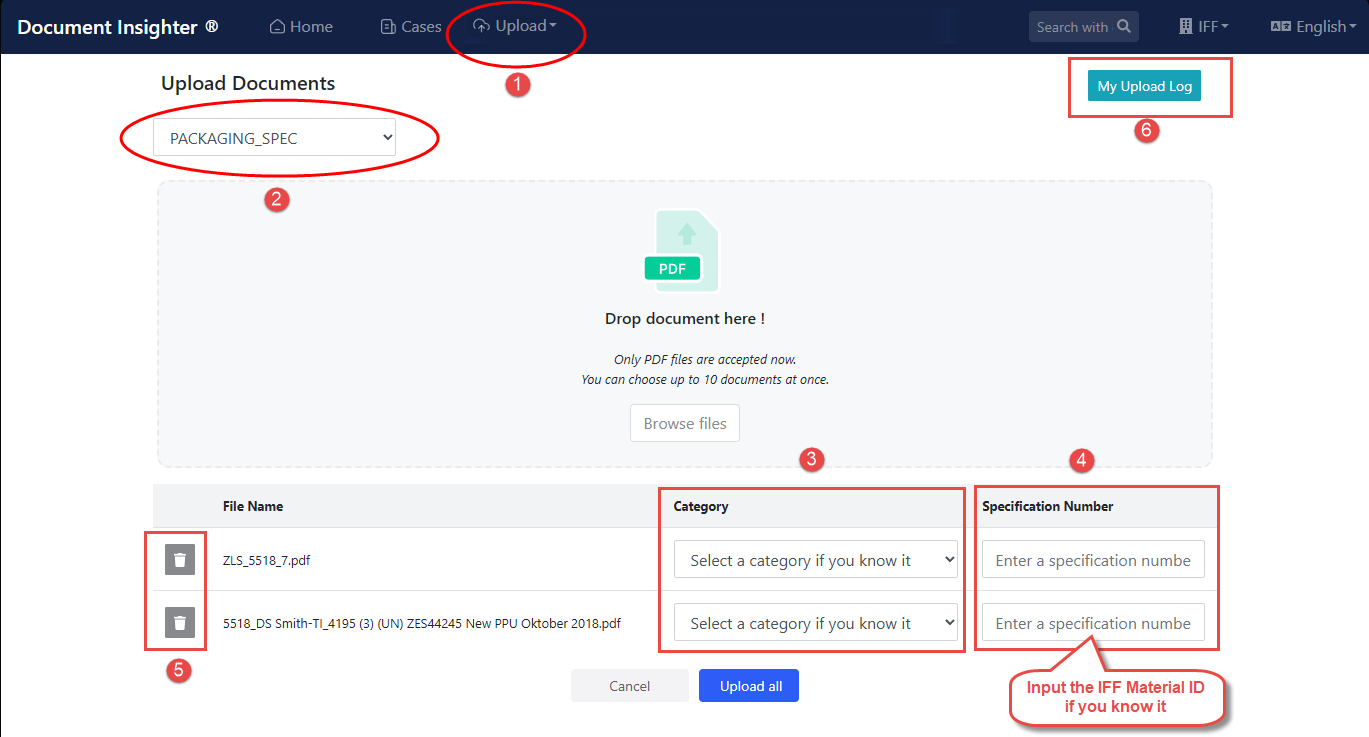
Select ‘PACKAGING SPEC’ ② from the dropdown menu, and then drag or manually choose the desired PDF file to upload. Before clicking ‘Upload’ to complete the file upload, make sure to select the corresponding ‘Packaging Category’ ③ for each file, such as ‘Drums’, ‘IBCs’, etc., and enter the relevant IFF Material Code/ID ④ as the default Document/Specification Number. Users can also delete ⑤ the files from the uploading list. View and the check the upload log by clicking the ‘My Upload Log’ ⑥ button.
Please note that:
- Only PDF files are accepted now.
- Users can choose up to 10 documents at once.
- The system tries to read order #, IPC, and batch # from the document automatically. If the above information is not present in the document, please fill them in the list below.
3.2 Check Uploaded Files Status
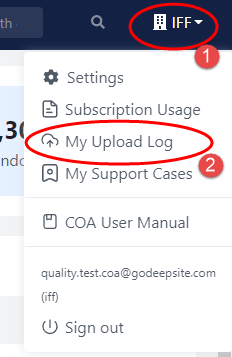
On the homepage of the Insighter portal, users can click the “Account” button, then click “My Upload Log” to review all the process status of COA documents they uploaded before:

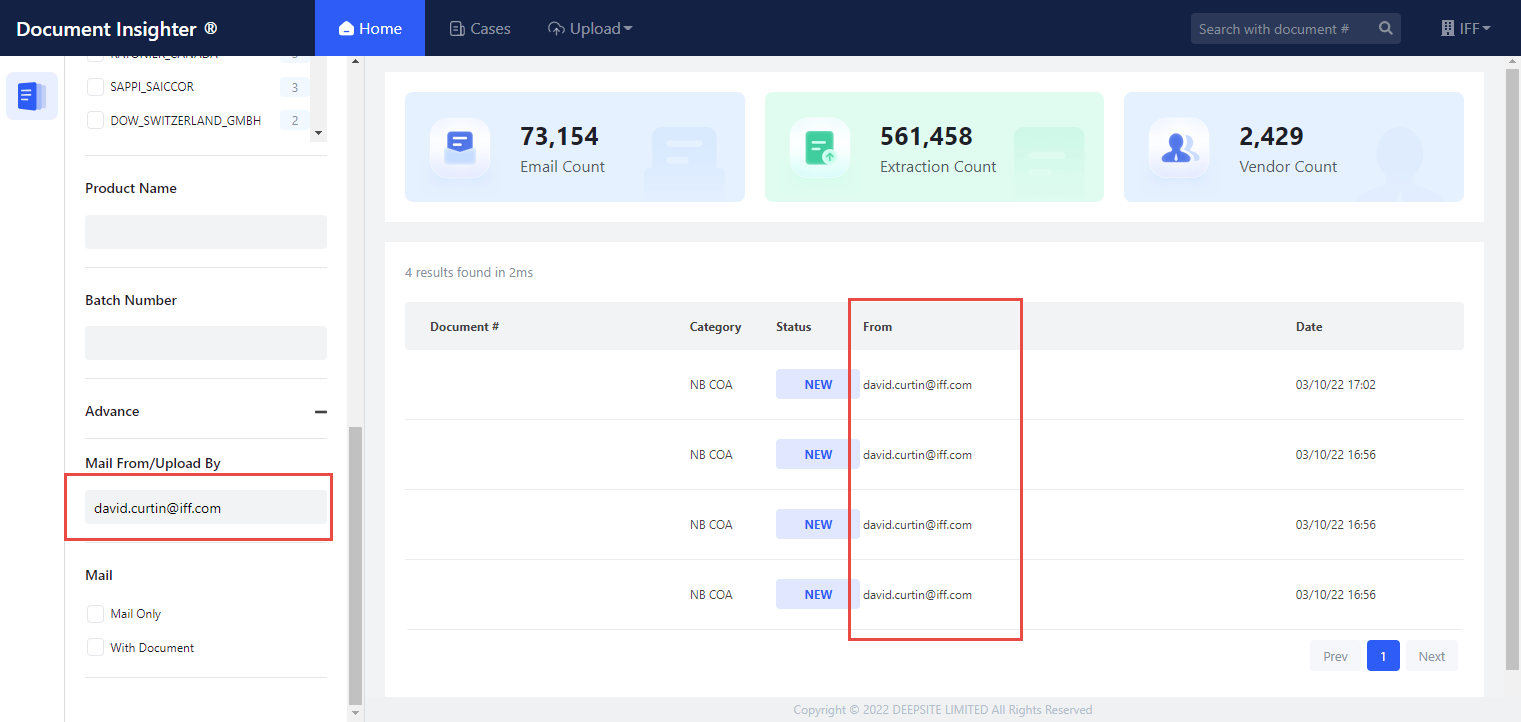
Please note that:
- After uploading the file, if the status is “UPLOADED” means that the system has received the document user uploaded successfully.
- A moment later(around 2 mins), refresh the page, the status will become “COMPLETED”, users can check and view the processed results through the filtering function on the homepage. Input your email address to check all your uploaded file and the corresponding results:
4 Technical Support
Help desk information including responsible technical contact phone numbers for assistance is currently available at the following period.
- Phone Support +852 38931811 (9:30 – 18:00 HKT, Mon to Fri)
- Email Support: customer.service@godeepsite.com (service desk connected)